

SigmundAI tutorial: gaze cuing
- About this tutorial
- What you'll learn
- What you'll need
- Connecting OpenSesame to Sigmund
- The experiment
- Step 1: Create the main sequence
- Step 2: Create the block sequence
- Step 3: Define the trial conditions
- Step 4: Add images and sounds to the file pool
- Step 5: Build the trial sequence
- Step 6: Draw the display items
- Step 7: Configure the keyboard response
- Step 8: Set up the error sound
- Step 9: Create the feedback display
- Step 10: Set block repetitions
- Step 11: Write the instruction screens
- Step 12: Test and debug!
- Key takeaways
- References
About this tutorial
In this tutorial, you'll build a psychology experiment by working together with SigmundAI, your AI copilot for OpenSesame. You'll learn how to give clear instructions to Sigmund, catch and fix mistakes, and build experiments faster than ever before.
We'll create a classic gaze-cuing experiment. This is a fun and interesting paradigm, where people can't help but follow where a face is looking.
This tutorial builds on the beginner tutorial, using the same experiment but showing you how to create it with AI assistance.
What you'll learn
By the end of this tutorial, you'll know how to:
- 💡 Give Sigmund clear, effective instructions
- 💡 Break complex tasks into simple steps
- 💡 Catch and correct Sigmund's mistakes (yes, AI makes mistakes!)
- 💡 Build experiment structures quickly
- 💡 Work efficiently with an AI copilot
What you'll need
OpenSesame 4.1 or later with all updates installed. If you see a notification about available updates, click "Install updates..." and then "Run update script." Restart OpenSesame after updating. You can also manually update by running the following command in the OpenSesame console.
pip install opensesame-core opensesame-extension-sigmund --upgrade
Basic OpenSesame knowledge. New to OpenSesame? Start with the beginner tutorial first. Understanding the basics will help you collaborate effectively with Sigmund. AI is powerful, but it doesn't replace understanding how things work.
A SigmundAI subscription. You'll need an active subscription at sigmundai.eu.
Connecting OpenSesame to Sigmund
Sigmund is an AI assistant specifically designed for OpenSesame. Unlike general chatbots like ChatGPT, Sigmund:
- Knows OpenSesame inside and out
- Works directly inside the OpenSesame interface
- Can make changes to your experiment automatically
To connect, simply log into sigmundai.eu. The Sigmund panel in OpenSesame will automatically connect:
The experiment
As mentioned, we'll create a gaze-cuing experiment, originally developed by Friesen and Kingstone (1998). Here's how it works:
- A face appears in the center of the screen
- The face looks left or right
- A target letter ('F' or 'H') appears on one side
- A distractor letter ('X') appears on the other side
- Participants identify the target letter as quickly as possible
The interesting finding? People are faster when the face looks toward the target, even though the gaze direction doesn't predict where the target will appear. This shows that humans automatically follow where others are looking.

Figure 1. The gaze-cuing paradigm (Friesen and Kingstone, 1998). This example shows an incongruent trial, because the face looks at the distractor ('X') instead of the target ('F').
Step 1: Create the main sequence
Let's start by building the basic structure. The experiment has two phases: practice and experimental. Each phase needs instructions before and a message after. Starting with a clear structure helps both you and Sigmund stay organized.
When talking to Sigmund, be specific! Tell Sigmund exactly what you want, and also what you don't want yet. This prevents Sigmund from doing too much at once.
💬 Prompt:
Hi Sigmund! I'd like to build a gaze-cuing experiment together. Let's start with the basic structure:

- experiment (sequence)
  - instructions (form_text_display)
  - practice_loop (loop)
    - block_sequence (sequence)
  - end_of_practice (form_text_display)
  - experimental_loop (loop)
    - block_sequence (sequence)
  - end_of_experiment (form_text_display)

Please create this structure but don't add any content to the items yet. We'll do that step by step!
After Sigmund creates this structure, let's clean things up. Ask in a separate prompt to avoid overwhelming Sigmund with too many tasks at once.
💬 Prompt:
Great! Now please remove any items we don't need, and give the experiment a clear title.
Your overview area should look like Figure 2. (Your experiment title might be slightly different. That's fine!)
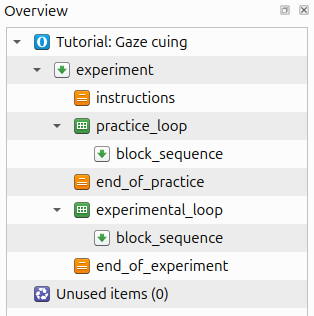
Figure 2. The overview area at the end of Step 1.
💡 Keep Sigmund in check!
At the bottom of the Sigmund panel, you can choose whether to review Sigmund's actions before they happen. When enabled, you'll approve each change Sigmund makes.
- For learning: Keep this ON. You'll understand what Sigmund is doing.
- For speed: Turn this OFF once you're comfortable.
Remember that Sigmund makes mistakes! Always double-check the results, especially at first.
Step 2: Create the block sequence
Now let's build what happens in each block of trials. Each block follows this pattern:
- Reset feedback (so performance on previous blocks doesn't affect feedback on the current one)
- Run a loop of trials
- Show performance feedback
The practice and experimental phases use the same block_sequence item. This is called a linked copy. When you change one, the other changes too. Using linked copies is convenient when the same functionality (such as a block of trials) occurs at multiple places in your experiment.
💬 Prompt:
Perfect! Now let's add content to the block_sequence. This should be shared between practice and experimental phases (a linked copy). Structure it like this:

- block_sequence (sequence)
  - reset_feedback (reset_feedback)
  - block_loop (loop)
    - trial_sequence (sequence)
  - feedback (feedback)

Again, just create the structure. We'll add content later. Ready? Let's go!
Your overview should now look like Figure 3.
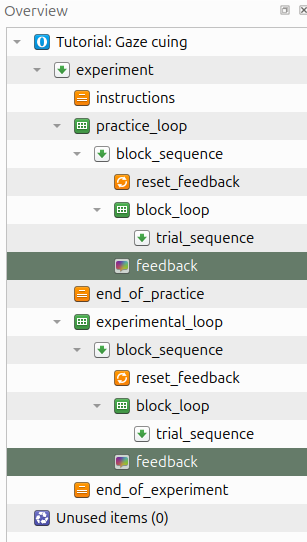
Figure 3. The overview area at the end of Step 2.
Step 3: Define the trial conditions
Every experiment has independent variables. Those are the things you're manipulating. In our experiment, we're varying:
- Which way the face looks (left or right)
- Where the target appears (left at -300, or right at 300)
- Which letter is the target (F or H)
We also need to calculate:
- Where the distractor goes (opposite side from target)
- What the correct response key is (z for F, m for H)
This creates a 2 × 2 × 2 design = 8 different trial types.
By explaining the design to Sigmund, we help Sigmund understand the logic and create all the correct combinations.
💬 Prompt:
Now let's define the variables in the block_loop. This is a 2 × 2 × 2 design (8 rows total):

- gaze_cue: left or right
- target_pos: -300 or 300 (x-coordinate, negative = left, 0 = center)
- target_letter: F or H
- dist_pos: opposite from target_pos
- correct_response: z when target_letter is F, m when target_letter is H

Can you create this? Thanks!
Your block_loop should now look like Figure 4, with 8 rows showing all possible combinations.
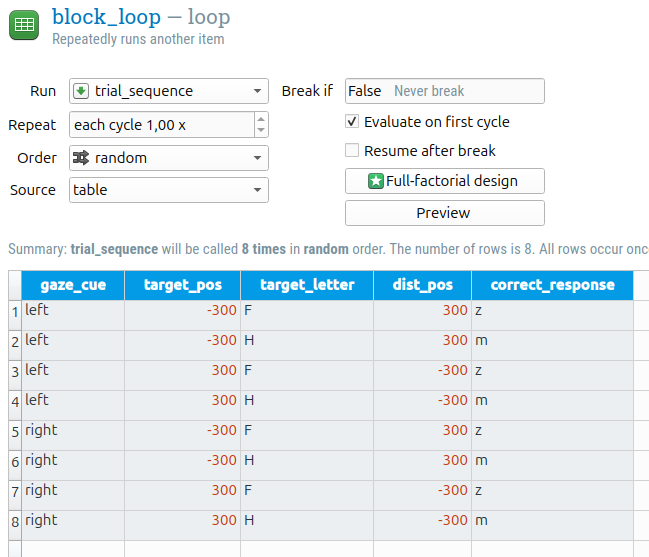
Figure 4. The block_loop at the end of Step 3.
🤖 Choose an AI model that works for you!
Sigmund isn't a single AI. It's a chatbot that can use different AI models. On sigmundai.eu, you can select from various models.
This tutorial was tested with Claude Sonnet 4.5 and GPT-5, both in conversation mode.
Tips:
- Different models have different strengths. Experiment to find your favorite.
- Problem-solving models are slower and not always better for simple tasks.
Step 4: Add images and sounds to the file pool
We need some files for our stimuli:
- Images of a face looking neutral, left, and right
- A sound to play when participants make an error
Sigmund can't download files for you, so you'll have to do this part manually. Download the files below and drag them into your file pool:
file pool should look like Figure 5.
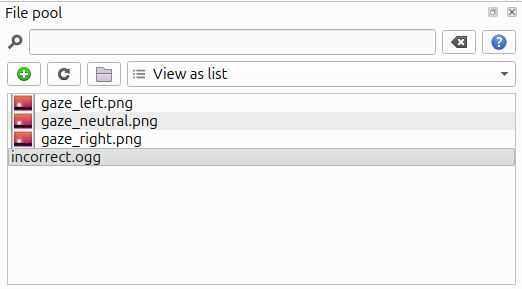
Figure 5. The file pool at the end of Step 4.
Step 5: Build the trial sequence
Time to create the structure of a single trial. Here's what happens on each trial:
- Show a fixation dot (get ready!)
- Show the neutral face (here comes the face)
- Show the gaze cue (face looks left or right)
- Show the target and distractor (time to respond!)
- Collect the keyboard response
- Play error sound (only if the response was wrong)
- Log the data
The error sound should only play on incorrect trials. This uses a run-if expression: a condition that determines when an item runs.
💬 Prompt:
Let's add items to the trial_sequence:

- fixation_dot (sketchpad)
- neutral_gaze (sketchpad)
- gaze_cue (sketchpad)
- target (sketchpad)
- keyboard_response (keyboard_response)
- incorrect_sound (sampler) — only play after an incorrect response
- logger (logger)

Just create the items for now, don't add content yet. Can you do that?
This task requires many actions, and Sigmund sometimes gets confused. Make sure to check his work carefully.
Common mistakes Sigmund makes here:
- Forgetting to create some of the items
- Forgetting to add the run-if expression for incorrect_sound
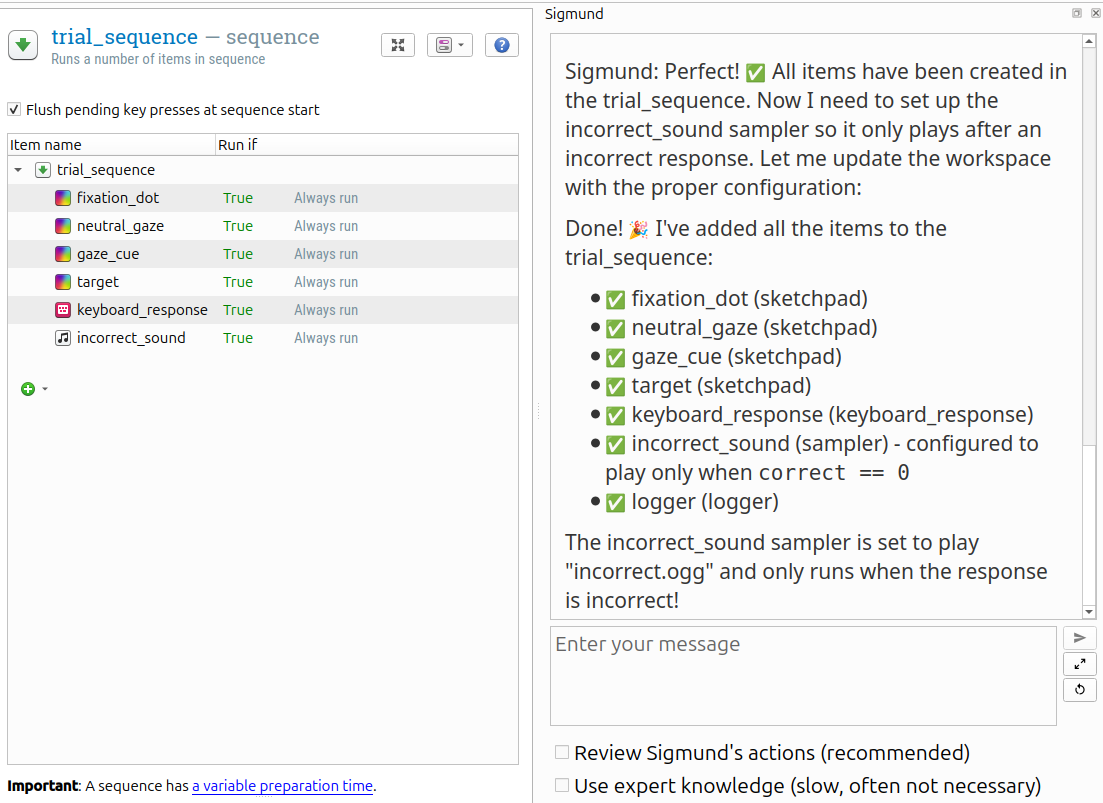
Figure 6. Oops! Sigmund forgot to add a logger and to define a run-if expression for incorrect_sound.
If Sigmund made a mistake (like forgetting the logger or the run-if expression), give it a gentle reminder with specific instructions:
💬 Prompt (adjust based on what's missing):
I notice the logger is missing. Could you add it please?

And then, could you select the trial_sequence and add a run-if expression for the incorrect_sound sampler? Remember, run-if expressions are set in the sequence that contains the item, not in the item itself.
Why does Sigmund make mistakes? AI is unpredictable, which means that mistakes can happen for any task. However, Sigmund struggles especially with multi-step tasks. The task above required 9 separate actions! When asking for complex tasks, always double-check the results.
Your trial_sequence should look like Figure 7.
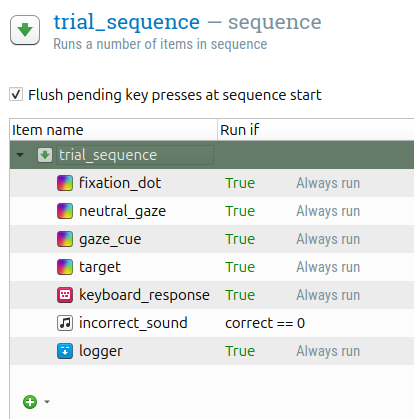
Figure 7. The trial_sequence at the end of Step 5.
Step 6: Draw the display items
Now for the fun part: creating what participants will see! We'll work through each display one by one.
First, let's set up the colors and draw the initial fixation dot. Our gaze stimuli use a white background, so we need a white background with black elements.
💬 Prompt:
Could you change the experiment settings to use black stimuli on a white background? Then add a fixation dot to the fixation_dot item and set its duration to 745 ms.
Next, the neutral face display:
💬 Prompt:
Great! Now add the neutral gaze image. Duration should be 745 ms.
Sigmund should have figured out to use the gaze_neutral.png file from the file pool. Look at the sketchpad to verify!
Now the gaze cue (where the face looks):
💬 Prompt:
Perfect! Now add the gaze cue display. It should show for 495 ms.
Sigmund should use the gaze_cue variable to show either gaze_left.png or gaze_right.png.
Finally, the target display (the most complex one):
💬 Prompt:
Excellent! Now create the target display. It should show:

- The gaze cue (face still looking)
- The target letter on the left or right (based on target_pos)
- An 'X' on the opposite side
The duration should be 0 because the keyboard_response item comes next and will wait for input. Verify that Sigmund did this correctly!
Step 7: Configure the keyboard response
Now we need to collect participants' responses.
💬 Prompt:
Please configure the keyboard response with a 2000 ms timeout. Only accept the correct response keys (z and m).
Step 8: Set up the error sound
When participants make mistakes, they should hear feedback.
💬 Prompt:
Now configure the incorrect_sound sampler to play the error sound file.
Step 9: Create the feedback display
After each block, participants should see how they're doing.
💬 Prompt:
Add feedback to the feedback item showing the average accuracy and response time for the block.
Step 10: Set block repetitions
Now we need to specify how many times to repeat each block.
💬 Prompt:
Set the practice phase to 2 blocks and the experimental phase to 8 blocks. Also create a 'practice' variable (yes or no) so we can distinguish practice from experimental trials in our data.
Step 11: Write the instruction screens
Participants need to know what to do! Let's have Sigmund write clear instructions.
💬 Prompt:
Please write clear, concise instructions for the experiment, plus helpful messages at the end of practice and at the end of the experiment. Use your judgment for the content!
Read through the instructions. Do they make sense? Are they clear? Feel free to ask Sigmund to revise them if needed!
Step 12: Test and debug!
Time for the moment of truth. Let's run the experiment! Press the blue quick-run button and see what happens. You might get an error! This is completely normal. Here's a possible error:
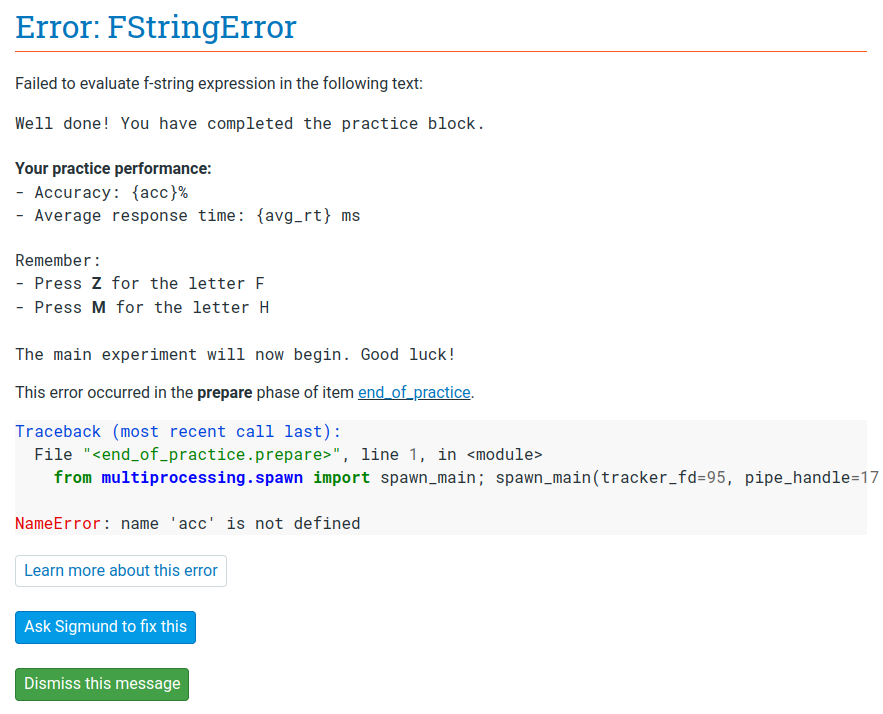
Figure 8. An error appears. Don't panic!
What's going wrong? The end-of-practice item tries to show the acc variable before it exists. This happens because of OpenSesame's prepare-run phases: items are prepared in advance, and sometimes variables haven't been defined yet at this point.
Sigmund can usually fix such issues. Simply click "Ask Sigmund to fix this" when the error appears. Once the error is fixed, try run the experiment again. Rinse and repeat if necessary.
Done! Congratulations. You've built a complete experiment with Sigmund!
💬 Final prompt:
Thank you Sigmund! Great work!
Key takeaways
You've learned how to work effectively with an AI copilot! Here are the main lessons:
- ✅ Be specific and clear in your prompts.
- ✅ Break complex tasks into simple steps. Don't ask too much at once.
- ✅ Always check Sigmund's work. AI makes mistakes!
- ✅ Ask follow-up questions when something's not right.
- ✅ Be patient. Debugging is part of the process.
With practice, you and Sigmund will become a great team! 🤝
References
Friesen, C. K., & Kingstone, A. (1998). The eyes have it! Reflexive orienting is triggered by nonpredictive gaze. Psychonomic Bulletin & Review, 5, 490–495. doi:10.3758/BF03208827
Mathôt, S., Schreij, D., & Theeuwes, J. (2012). OpenSesame: An open-source, graphical experiment builder for the social sciences. Behavior Research Methods, 44(2), 314-324. doi:10.3758/s13428-011-0168-7
Mathôt, S., & March, J. (2022). Conducting linguistic experiments online with OpenSesame and OSWeb. Language Learning. doi:10.1111/lang.12509