

Beginner tutorial: gaze cuing
- About OpenSesame
- About this tutorial
- What you'll learn
- What you'll need
- The experiment
- Step 1: Create the main sequence
- Step 2: Create the block sequence
- Step 3: Fill the block loop with independent variables
- Step 4: Add images and sound files to the file pool
- Step 5: Fill the trial sequence with items
- Step 6: Draw the sketchpad items
- Step 7: Configure the keyboard_response item
- Step 8: Configure the sampler
- Step 9: Configure the logger
- Step 10: Draw the feedback item
- Step 11: Set the number of blocks for the practice and experimental phase
- Step 12: Write the instruction, end_of_practice, and end_of_experiment forms
- Step 13: Run the experiment!
- Effective debugging and understanding errors
- Timing and backend selection
- Key takeaways
- Next steps
- References
About OpenSesame
OpenSesame is a free program for rapid development of behavioral experiments for psychology, cognitive neuroscience, and experimental economics. For beginners, OpenSesame has a comprehensive graphical, point-and-click interface. For advanced users, OpenSesame supports Python and JavaScript scripting (not covered in this tutorial).
About this tutorial
We'll create a classic gaze-cuing experiment. This is a fun and interesting paradigm, where people can't help but follow where a face is looking.
We’ll only use the graphical interface. We will not use Python or JavaScript coding. (This is covered in the intermediate tutorials.) This tutorial takes about one hour.
What you'll learn
By the end of this tutorial, you'll know how to:
- 💡 Build an experiment structure with sequence and loop items
- 💡 Define a full-factorial design with independent variables in a loop table
- 💡 Create visual stimuli with sketchpad items
- 💡 Collect responses with keyboard_response items
- 💡 Provide feedback to participants with feedback items
- 💡 Show text using form_text_display items
- 💡 Use variables to define your stimuli
- 💡 Use conditional (run-if) expressions to control the flow of your experiment
- 💡 Organize stimulus files in the file pool
- 💡 Log data
What you'll need
OpenSesame 4.1 or later with all updates installed. If you see a notification about available updates, click "Install updates..." and then "Run update script." Restart OpenSesame after updating. You can also manually update by running the following command in the OpenSesame console.
pip install opensesame-core opensesame-extension-sigmund --upgrade
The experiment
As mentioned, we'll create a gaze-cuing experiment, originally developed by Friesen and Kingstone (1998). Here's how it works:
- A face appears in the center of the screen
- The face looks left or right
- A target letter ('F' or 'H') appears on one side
- A distractor letter ('X') appears on the other side
- Participants identify the target letter as quickly as possible
The experiment has a practice phase and an experimental phase. You’ll show feedback after each block. A sound plays after incorrect responses.
The interesting finding? People are faster when the face looks toward the target, even though the gaze direction doesn't predict where the target will appear. This shows that humans automatically follow where others are looking.
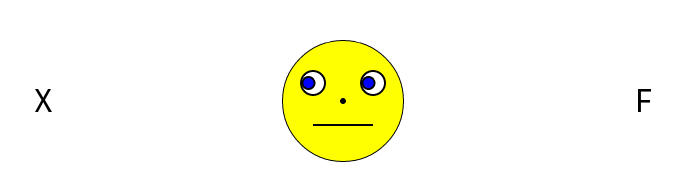
Figure 1. The gaze-cuing paradigm (Friesen and Kingstone, 1998). This example shows an incongruent trial, because the face looks at the distractor ('X') instead of the target ('F').
Step 1: Create the main sequence
🎯 Aim: In this step, we'll create the basic structure of our experiment: a practice phase, during which participants get to practice the task; an experimental phase, during which we'll collect data for analysis; and informative screens before and after these phases. We'll only set up the structure. Details will be implemented later.
When you start OpenSesame, the ‘Get started!’ tab appears (Figure 2). Choose “Default template”.
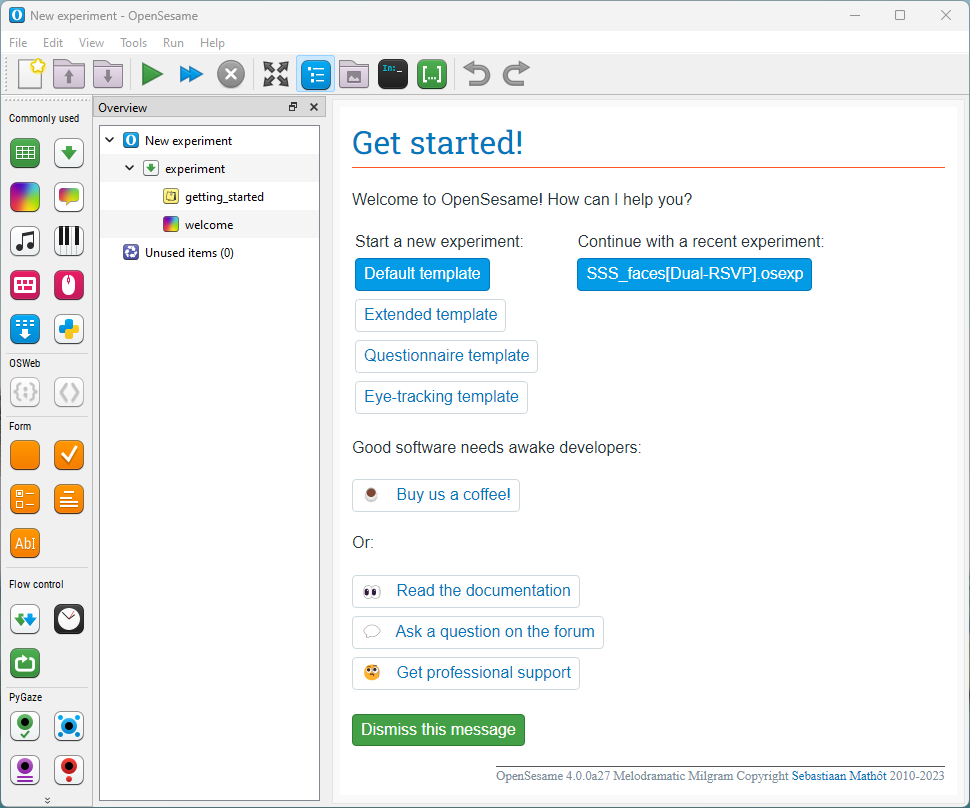
Figure 2. The ‘Get started’ panel on OpenSesame start-up.
Open the main sequence named experiment. It contains two items by default: a notepad (getting_started) and a sketchpad (welcome).
Useful tips for this tutorial
- Click the Help icon in any item’s tab for context help.
- Save often (Ctrl+S). Backups are created automatically (Tools → Open backup folder).
- Deleted items can be recovered from “Unused items” unless permanently deleted (Shift+Del).
- See the figure below for the structure we’ll build.
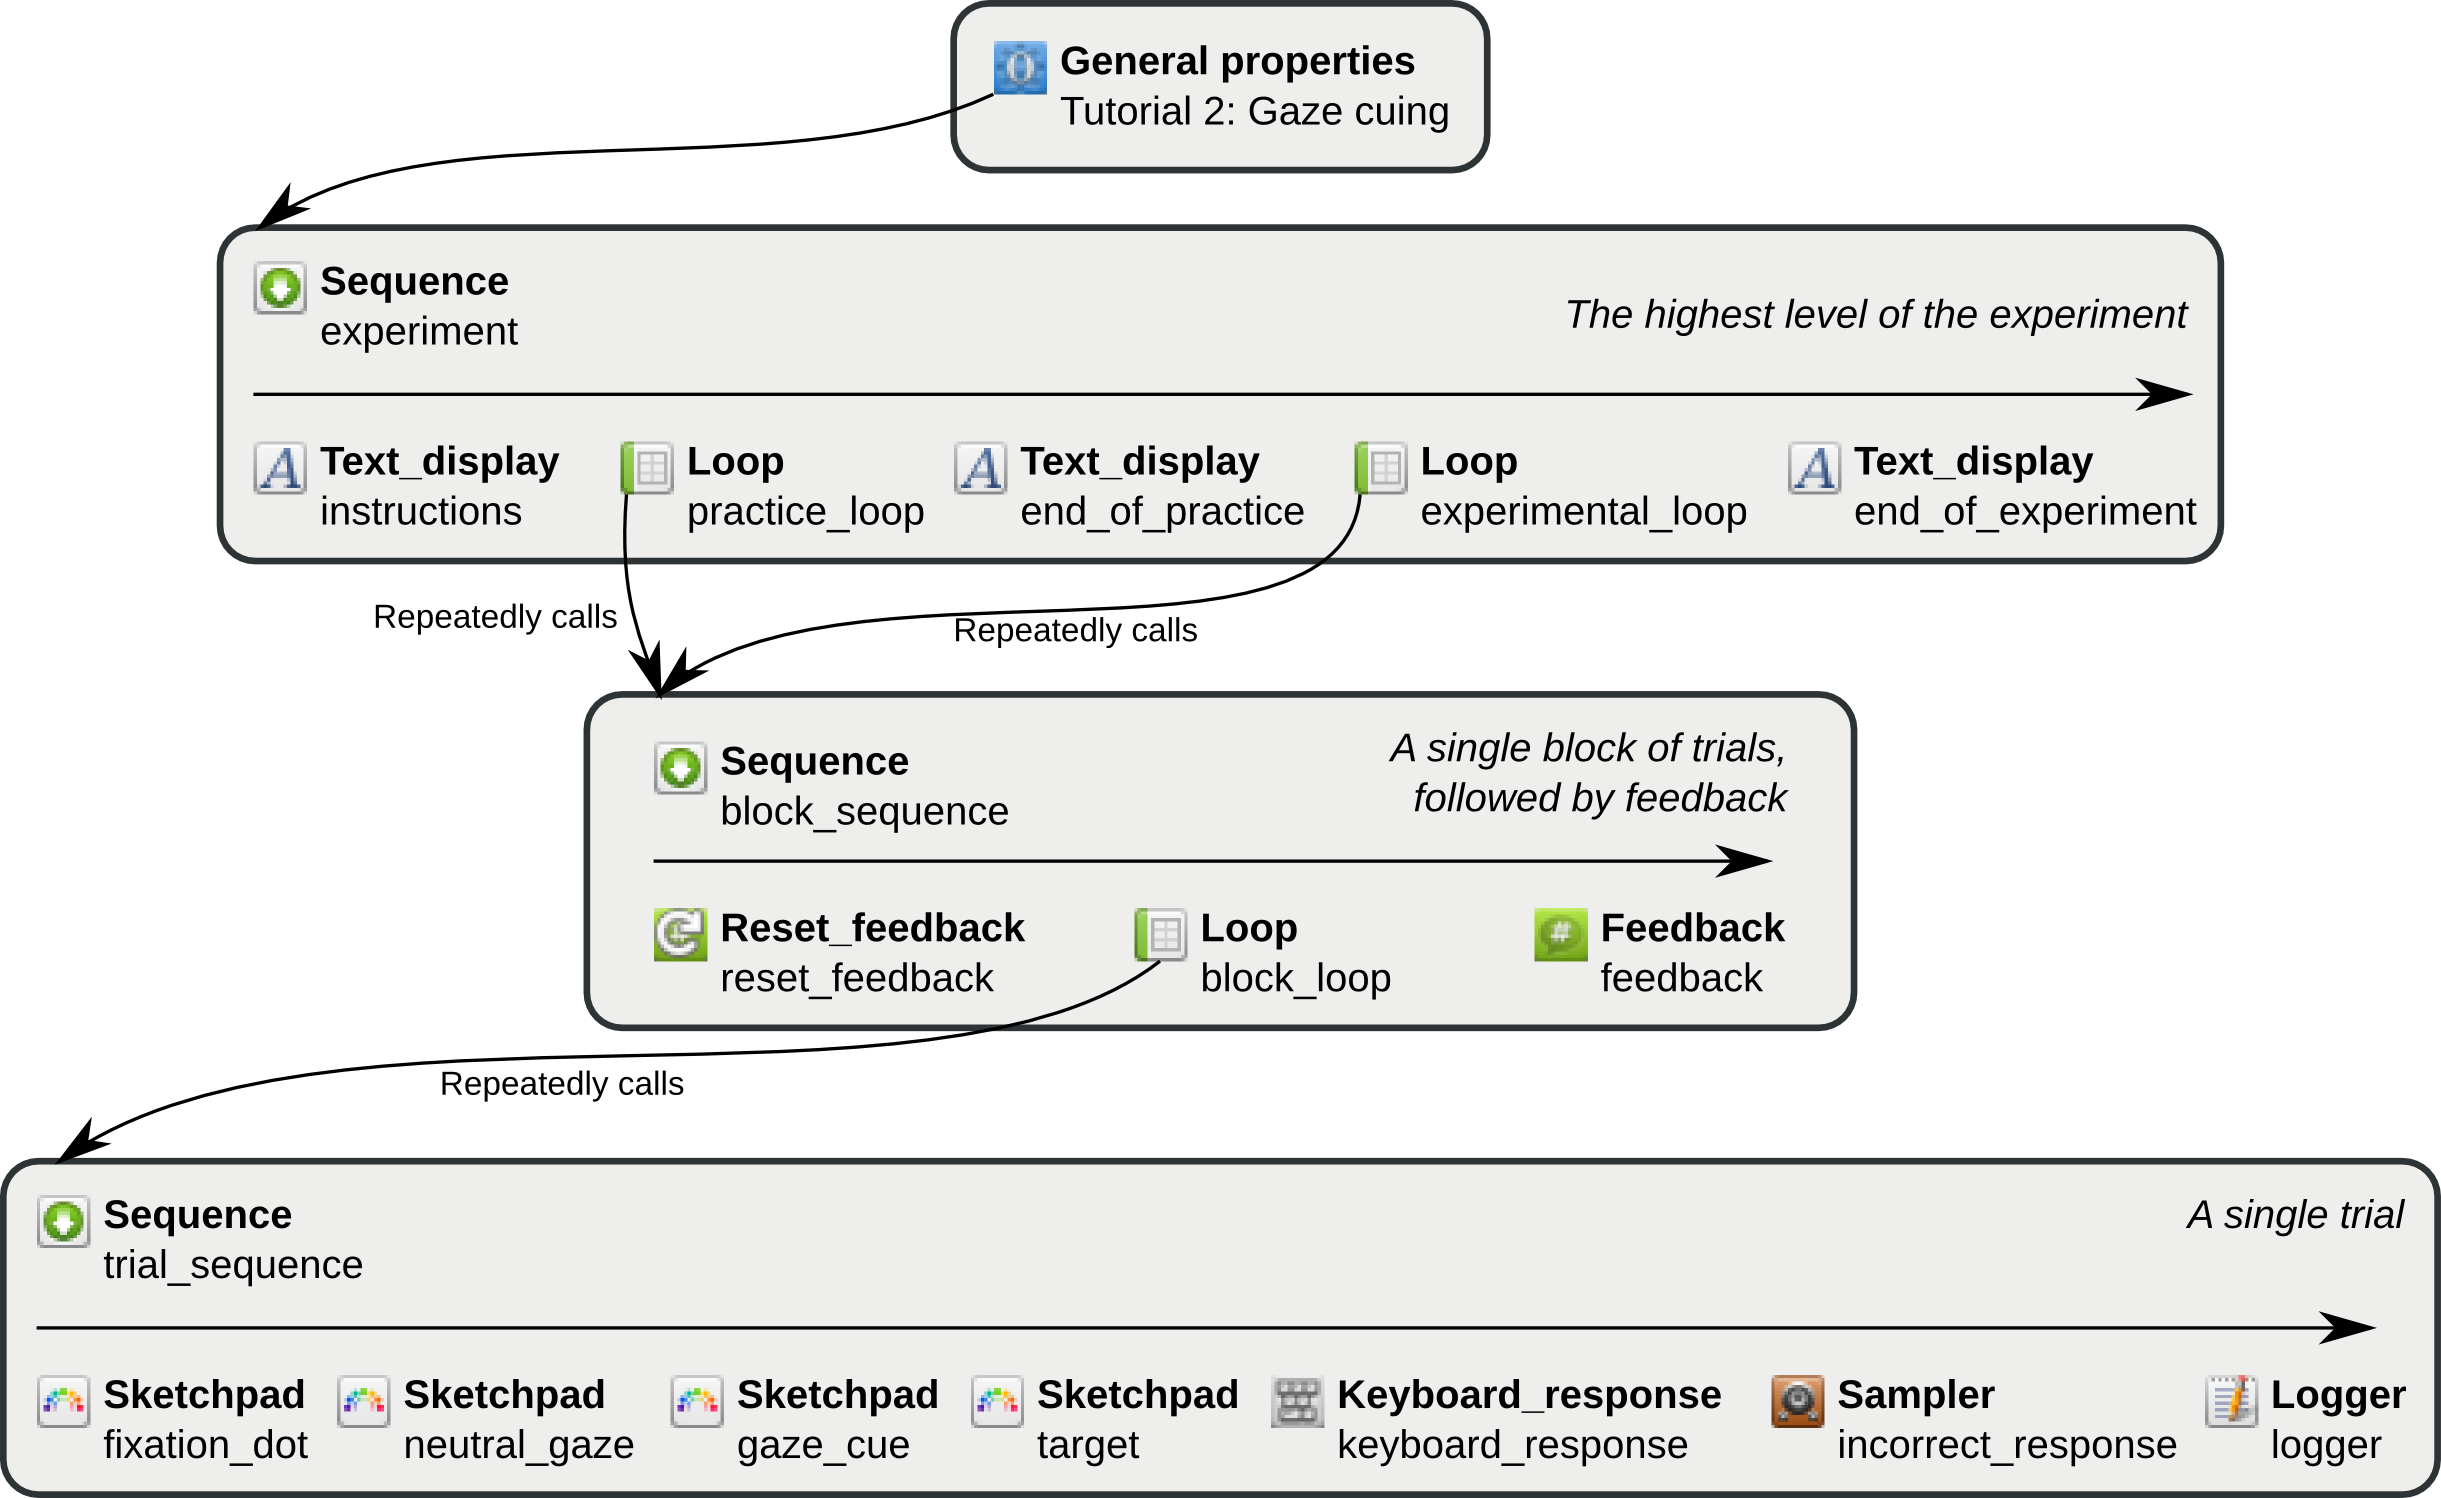
Figure 3. Structure of the gaze-cuing experiment. Item types in bold, item names regular.
Remove the default items:
- Right-click getting_started → Delete
- Right-click welcome → Delete
The experiment sequence is now empty. Add a form for instructions:
- Drag a form_text_display from the toolbar (Form) into experiment. This will show the instructions at the start (we’ll define the actual instructions in Step 12).
Add a loop with a sequence for the practice phase:
- Drag a loop into experiment (place it after the instructions form).
- Drag a sequence into the loop and choose “Insert into [name of the loop item]”.
Learn more about the loop/ sequence structure
You often repeat a sequence of events, such as a trial. This is typically implemented by combining a loop, which repeats a single item, and a sequence, which runs multiple items in order.
Example: A block_loop contains a trial_sequence, which in turns contains multiple items corresponding to a trial. Together, this loop/ sequence structure corresponds to a single block of multiple trials.
Add a form at the end of practice
- In experiment, drag another form_text_display and choose “Insert after [name of the practice loop item]”. This will show an “end of practice” message (Step 12).
Add a loop for the experimental phase, reusing a linked copy of the same sequence as used for the practice loop:
- Drag a loop and insert it after the end-of-practice form.
- Reuse the sequence you created for the practice loop:
- Right-click the existing sequence > Copy (linked).
- Right-click the new experimental loop > Paste > “Insert into [experimental loop]”.
Learn more about linked vs. unlinked copies
When the exact same item occurs in multiple places, they are called linked copies. Linked copies are convenient, because it means that if you want to change the item, you need to do this only once.
Unlinked copies are independent from each other, so that you can change one without affecting the other.
It is good practice to use linked copies whenever possible!
Add a goodbye form:
- Drag a form_text_display and insert it after the experimental loop.
Rename items for clarity:
- new_form_text_display → instructions
- new_loop → practice_loop
- new_sequence → block_sequence (linked copies update automatically)
- new_form_text_display_1 → end_of_practice
- new_loop_1 → experimental_loop
- new_form_text_display_2 → end_of_experiment
Rename the experiment:
- Click New experiment in the overview. Rename to “Tutorial: Gaze cuing”. Then save (Ctrl+S).
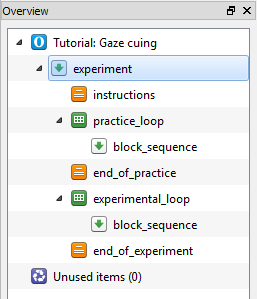
Figure 4. Overview at the end of Step 1.
Learn more about different item types
- sequence: Runs items in order.
- loop: Repeats another item, often a sequence, and defines independent variables.
- sketchpad: Presents visual stimuli. Is prepared in advance, and is therefore suitable for stimuli that require precise timing.
- feedback: Presents visual stimuli. Is not prepared in advance, and is therefore suitable for presenting up-to-date content, such as feedback about a participant's responses.
- keyboard_response: Collects a single keypress response.
- sampler: Plays a sound from file.
- logger: Writes data to file.
- RESET_feedback: Resets feedback variables at the start of a block.
- form_text_display: Shows text using a form layout.
Step 2: Create the block sequence
🎯 Aim: In this step, we'll again add structure to our experiment. This time will implement the structure for a single block of trials, which corresponds to the block_sequence. We'll only set up the structure. Details will be implemented later.
Open block_sequence, and add the following items in order:
- RESET_feedback (to reset feedback variables at the start of the block)
- loop with a new sequence inserted into it (to handle the actual loop and trial logic)
- feedback (to provide participant feedback at the end of the block)
Rename
- new_reset_feedback → reset_feedback
- new_loop → block_loop
- new_sequence → trial_sequence
- new_feedback → feedback
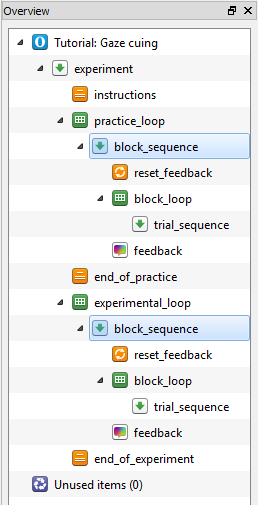
Figure 5. Overview at the end of Step 2.
Step 3: Fill the block loop with independent variables
🎯 Aim: In this step, we'll define the independent variables (conditions) of our experiment. Our experiment is an example of a fully randomized design, which means that independent variables are varied from trial to trial.
Open block_loop. Click Full-factorial design. Define:
gaze_cue: left, righttarget_pos: -300, 300 (x-coordinate in pixels; 0 = center; negative = left)target_letter: F, H
This creates 2×2×2 = 8 combinations. We also need to define a number variables that are derived from the variables above. For this, you need manually add a column for each variable and enter the correct values in each cell.
dist_pos: For each row, set to 300 iftarget_posis -300, and -300 iftarget_posis 300correct_response: z for F, m for Hcongruency: congruent the gaze cue looks in the direction of the target, and incongruent otherwise
Ensure that the loop table consists of 8 rows. Then set Repeat to 3 so that we end up with 3 × 8 = 24 trials per block.

Figure 6. The block_loop at the end of Step 3.
Learn more about the loop table
- You can copy-paste a table from a spreadsheet, or load a .csv/ .xlsx file by setting Source to file.
- Repeat can be fractional. For example, by setting repeat to 0.5, only half the rows are executed, randomly sampled.
Step 4: Add images and sound files to the file pool
🎯 Aim: In this step, we'll use the file pool to bundle stimulus files (images and a sound) with the experiment.
Download the files below:
Open the file pool (Ctrl+P) and drag the files into it. Or use the + button to add them. The file pool is automatically bundled with your experiment.
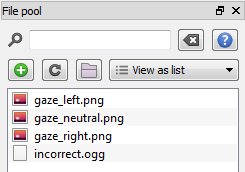
Figure 7. File pool at the end of Step 4.
Step 5: Fill the trial sequence with items
🎯 Aim: In this step, we'll define the trial sequence. For now, we'll only add the necessary items without defining them. We'll do that later.
A trial consists of:
- Fixation dot — 750 ms — sketchpad
- Neutral gaze — 750 ms — sketchpad
- Gaze cue — 500 ms — sketchpad
- Target — 0 ms — sketchpad (the 0 ms duration allows the experiment to advance immediately to response collection)
- Response collection — keyboard_response
- Incorrect sound — sampler (run only if incorrect)
- Log — logger
Open trial_sequence, and the items in the order indicated above. When done, rename them:
- new_sketchpad → fixation_dot
- new_sketchpad_1 → neutral_gaze
- new_sketchpad_2 → gaze_cue
- new_sketchpad_3 → target
- new_keyboard_response → keyboard_response
- new_sampler → incorrect_sound
- new_logger → logger
In trial_sequence, set run-if for incorrect_sound to: correct == 0. It is important to use a double equals sign (==), which checks whether two values are identical, in this case whether the correct is equal to 0. (If you accidentally use a single equals sign, correct = 1, you will get a SyntaxError when running the experiment.)
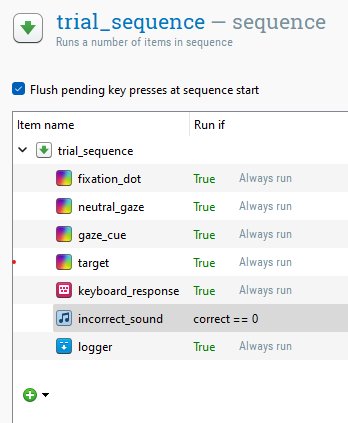
Figure 8. trial_sequence at the end of Step 5.
Learn more about variables and run-if expressions
Variables and conditional (run-if) expressions are powerful! See https://osdoc.cogsci.nl/4.1/manual/variables
Step 6: Draw the sketchpad items
🎯 Aim: In this step, we'll define the four sketchpad items of the trial sequence: fixation dot, neutral gaze (looks straight ahead), gaze cue (looks left or right), and target display (two letters on either side of the gaze cue, which is still looking left or right).
Set the experiment background color to white, and foreground color to black:
- Click the experiment title to open the General properties
- Change Background to 'white' and Foreground to 'black'
Define the fixation dot:
- Open fixation_dot
- Select the fixdot element. This is the fixation-dot icon in the vertical toolbar to the left of the canvas.
- Draw a fixation dot at the display center (0, 0)
- Set the duration to 745 ms. This will be rounded up to the desired duration of 750 ms.
Why specify a duration of 745 ms when you want to show a display for 750 ms?
Displays refresh periodically. On a 60 Hz monitor, one refresh cycle takes 1000 / 60 = 16.67 ms. This means that, on a 60 Hz monitor, the duration of a display is necessarily a multiple of 16.67.
745 is not a multiple of 16.67. Therefore, the duration will be rounded up to the nearest multiple of 16.67, which is 750.
For more information, see:
Define the neutral-gaze display:
- Open neutral_gaze
- Select the image element
- Draw an image at the display center, and choose
gaze_neutral.pngin the file-pool dialog that appears. - Set the duration to 745 ms
Define the gaze-cue display:
- Open gaze_cue
- Draw
gaze_left.pngat the display center
Of course, we do not always want to show gaze_left.png. Rather, we want to show gaze_left.png when the variable gaze_cue is "left", and gaze_right.png when the variable gaze_cue is "right". In other words, we want to show gaze_{gaze_cue}.png, where the curly brackets indicate that a variable should be inserted.
We can specify this in the item script. Click Select view (the middle of the three icons at the top-right) → View script. This shows the so-called OpenSesame script that defines the item. (This is not Python or JavaScript!). Change the draw image command as indicated below. While you're at it, you can also specify the duration (remember that 495 ms will be rounded up to 500 ms, as explained above).
set duration 495
set description "Displays stimuli"
draw image center=1 file="gaze_{gaze_cue}.png" scale=1 show_if=True x=0 y=0 z_index=0
Click Apply. The view now switches back to graphical controls view. The image now appears as a question mark. Don't worry! The correct image will be shown during the experiment.
Learn more about the variables that exist in your experiment
Open the variable inspector (Ctrl+I) to see which variables exist in your experiment. When the experiment is running, you will even see their values change in real time!
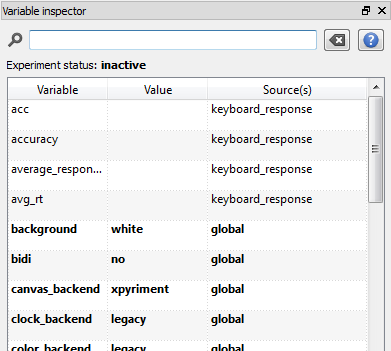
Figure 9. The Variable inspector.
Define the target display:
- Open target
- Draw
gaze_left.pngat the display center. - Select the textline element
- Draw "{target_letter}" somewhere on the left side of the display. The exact coordinates don't matter, because we'll use a variable for it later on. As before, the curly brackets indicate that the
target_lettervariable should be inserted. - Draw "X" somewhere on the right side of the display
Edit the item script (Select view → View script). As before, the gaze cue should depend on the gaze_cue variable. In addition, the X-coordinate of the target letter should depend on the target_pos variable, and the X-coordinate of the "X" should depend on the dist_pos variable.
Importantly, we set Duration to 0. This doesn't mean that the target is shown for 0 ms. Rather, this means that the experiment advances immediately to the next item, which is a keyboard_response. In other words, response collection starts as soon as the target is shown!
set duration keypress
set description "Displays stimuli"
draw image center=1 file="gaze_{gaze_cue}.png" scale=1 show_if=True x=0 y=0 z_index=0
draw textline center=1 color=black font_bold=no font_family=mono font_italic=no font_size=32 html=yes show_if=True text="{target_letter}" x="{target_pos}" y=0 z_index=0
draw textline center=1 color=black font_bold=no font_family=mono font_italic=no font_size=32 html=yes show_if=True text="X" x="{dist_pos}" y=0 z_index=0
Learn more about using complex variable expressions in OpenSesame script
In OpenSesame script, you inlude complex expressions using curly brackets. For example, instead of specifying x="{dist_pos}" for the "X", we could have specified x="{-1 * target_pos}". This relies on Python's formatted string literals.
Step 7: Configure the keyboard_response item
🎯 Aim: In this step, we'll configure the keys that participants can use to respond, and how long participants have to respond.
Open keyboard_response:
- Leave Correct response blank. The
correct_responsevariable (from Step 3) will be used by default. - Set Allowed responses to
z;m - Set Timeout to
2000ms - Leave Event type set to keypress
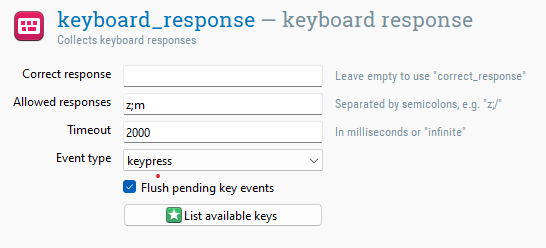
Figure 10. keyboard_response at the end of Step 7.
Step 8: Configure the sampler
🎯 Aim: In this step, we'll specify which should be played after an incorrect response.
Open incorrect_sound. Click Browse and incorrect.ogg from the file pool.
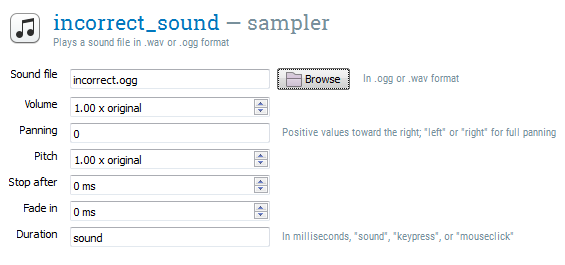
Figure 11. incorrect_sound at the end of Step 8.
Step 9: Configure the logger
🎯 Aim: In this step, we'll review how data is logged.
Open logger. By default, “Automatically log all variables” is enabled. This is good practice, so we don't need to change anything here!
Learn more about custom logging
You can also exclude specific variables that you don’t want to be logged. You can also disable automatic logging altogether, and manually select specific variables that you want to be logged. Doing so may help to keep logfiles clean. However, always carefully check that all required variables are logged!
Step 10: Draw the feedback item
🎯 Aim: In this step, we'll define the feedback that participants receive on their performance at the end of each block.
Open feedback. Leave the duration at 'keypress'. Add some feedback text:
End of block

Your average response time was {avg_rt} ms
Your accuracy was {acc} %

Press any key to continue
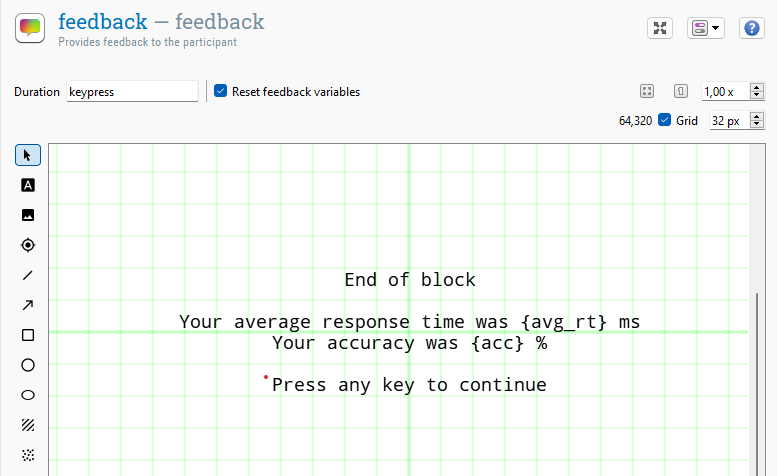
Figure 12. feedback at the end of Step 10.
Learn more about feedback variables
OpenSesame automatically keeps track of feedback variables:
responseis the value of the last response. Examples: "z", "left", etc.correctis 1 after a correct response, and 0 after an incorrect responseresponse_timeis the response time (in milliseconds) of the last responseaccis the percentage of correct responses since feedback variables were reset, in this case by the RESET_feedback item at the start of the blockavg_rtis the average response time since feedback variables were reset
See also:
Step 11: Set the number of blocks for the practice and experimental phase
🎯 Aim: In this step, we'll specify the number of blocks of trials in both the practice and experimental phase.
Open practice_loop and set Repeat to 2, so that we have two practice blocks. Also add a practice variable to the loop table, and set it to 'yes'. This is convenient, because during data analysis it will allow us to easily tell which trials were part of the practice phase.
Open experimental_loop and set Repeat to 8. Again, add a practice variable but this time set it to 'no'.
Step 12: Write the instruction, end_of_practice, and end_of_experiment forms
🎯 Aim: In this step, we'll add informative instruction messages throughout the experiment.
Open the three form_text_display items and enter brief, clear instructions. Good instructions are simple, complete, and specific!
Step 13: Run the experiment!
🎯 Aim: In this step, we'll give the experiment a first test run!
The double blue arrow in the toolbar is the Quick run (Ctrl+Shift+W) button. This launches the experiment in a window using a dummy subject number and logfile location. This is mainly useful during development.
The single green arrow is the Run fullscreen (Ctrl+R) butto. This first asks for a subject number and logfile, and whether you want to run the experiment fullscreen or in a window. This is mainly useful during data collection.
Press one of the two buttons to give your experiment a test run!
🏁 If the experiment runs, you are now done! But before you leave, let's review two more final important points, related to debugging and backend selection:
Effective debugging and understanding errors
Errors are normal when building experiments. Read errors carefully, and try to understand what they mean. This is the One True Path towards effective debugging!
Figure 13 shows an example error message:
- The error type is
FStringError - The description indicates: “Failed to evaluate f-string expression in the following text:
gaze_{gaze_ceu}.png” - The error occured in the prepare phase of the gaze_cue items
- The traceback is a Python error message. It is a more technical version of the description above.
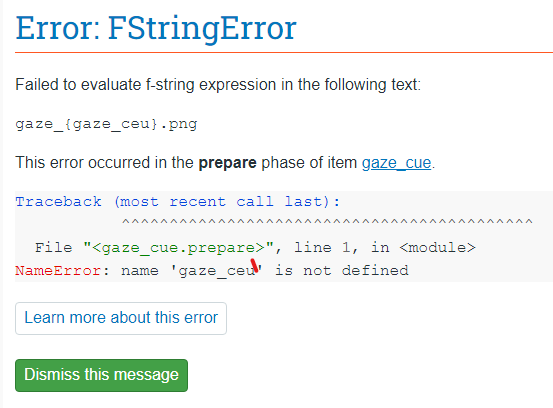
Figure 13. An error message in OpenSesame.
Once you understand where the error comes from, you can try to fix it. In this example, the error results from a typo when defining the gaze_cue item in Step 6. gaze_{gaze_ceu}.png should be gaze_{gaze_cue}.png. Easily fixed!
Learn more about effective debugging
Effective debugging is an important skill. Learning it will save you much time and frustration! See the link below for tips:
Timing and backend selection
In the 'General properties' tab of the experiment (the tab that you open by clicking on the experiment name), you can select a backend. The backend is the layer of software that controls the display, input devices, sound, etc. Most experiments work with all backends, but there are reasons to prefer one backend over the other, mostly related to timing. Currently there are four backends:
- psycho is the default. It is based on PsychoPy and provides excellent timing (Peirce, 2007).
- xpyriment — is based on Expyriment and also provides excellent timing(Krause & Lindemann, 2013)
- legacy — is a fallback option that works on more systems but offers less precise timing
- osweb — runs experiments in a browser (Mathôt & March, 2022)
See also:
Key takeaways
You’ve learned how to build a simple but complete experiment!
- ✅ The structure of an experiment is usually built by combining sequence and loop items
- ✅ Variables are usually defined in the loop table
- ✅ Time-sensitive visual stimuli are usually presented with a sketchpad
- ✅ Participant feedback is usually presented with a feedback items
- ✅ The form_text_display is convenient for presenting text
- ✅ Variables and expressions can be inserted using curly brackets. Example:
{gaze_cue} - ✅ Run-if expressions are defined in a sequence and determine which items are actually run: Example:
correct == 0 - ✅ Always verify timing and logfiles with a comprehensive test run before collecting data
Next steps
You now have a basic understanding of OpenSesame. This is enough to build many simple experiments. However, you may need or want to learn even more! Here are sensible next steps:
- Learn how to build experiments together with SigmundAI
- Learn how to use Python code in your experiments
- Learn how to use JavaScript code in your online experiments
References
Brand, A., & Bradley, M. T. (2011). Assessing the effects of technical variance on the statistical outcomes of web experiments measuring response times. Social Science Computer Review. doi:10.1177/0894439311415604
Damian, M. F. (2010). Does variability in human performance outweigh imprecision in response devices such as computer keyboards? Behavior Research Methods, 42, 205-211. doi:10.3758/BRM.42.1.205
Friesen, C. K., & Kingstone, A. (1998). The eyes have it! Reflexive orienting is triggered by nonpredictive gaze. Psychonomic Bulletin & Review, 5, 490–495. doi:10.3758/BF03208827
Krause, F., & Lindemann, O. (2013). Expyriment: A Python library for cognitive and neuroscientific experiments. Behavior Research Methods. doi:10.3758/s13428-013-0390-6
Mathôt, S., Schreij, D., & Theeuwes, J. (2012). OpenSesame: An open-source, graphical experiment builder for the social sciences. Behavior Research Methods, 44(2), 314-324. doi:10.3758/s13428-011-0168-7
Mathôt, S., & March, J. (2022). Conducting linguistic experiments online with OpenSesame and OSWeb. Language Learning. doi:10.1111/lang.12509
Peirce, J. W. (2007). PsychoPy: Psychophysics software in Python. Journal of Neuroscience Methods, 162(1-2), 8-13. doi:10.1016/j.jneumeth.2006.11.017
Ulrich, R., & Giray, M. (1989). Time resolution of clocks: Effects on reaction time measurement—Good news for bad clocks. British Journal of Mathematical and Statistical Psychology, 42(1), 1-12. doi:10.1111/j.2044-8317.1989.tb01111.x