

SigmundAI tutorial: Visual Search Task
- About this tutorial
- What you’ll learn
- Connecting OpenSesame to Sigmund
- The experiment
- Step 1: Build the main structure
- Step 2: Build block sequence
- Step 3: Define between-blocks variables
- Step 4: Define trial conditions
- Step 5: Build trial sequence
- Step 6: Fixation display
- Step 7: Generate the visual search display
- Step 8: Define the correct response
- Step 9: Configure the keyboard response
- Step 10: Create the feedback displays
- Step 11: Block instructions
- Step 12: Block feedback
- Step 13: Closing message
- Finished
- References
About this tutorial
This tutorial shows how to create a classic visual-search experiment in OpenSesame using SigmundAI, the AI copilot, integrated directly into the OpenSesame interface. Rather than building the experiment entirely by hand, you will learn how to collaborate with Sigmund to construct the full experimental structure, define factorial designs, and implement dynamic stimulus generation through scripted logic.
What you’ll learn
By the end of this tutorial, you'll know how to:
- 💡 Give Sigmund clear, effective instructions
- 💡 Break complex tasks into simple steps
- 💡 Catch and correct Sigmund's mistakes (yes, AI makes mistakes!)
- 💡 Build experiment structures quickly
- 💡 Write scripts with Sigmund
- 💡 Work efficiently with an AI copilot
Connecting OpenSesame to Sigmund
Sigmund is an AI assistant specifically designed for OpenSesame. Unlike general chatbots like ChatGPT, Sigmund:
- Knows OpenSesame inside and out
- Works directly inside the OpenSesame interface
- Can make changes to your experiment automatically
To connect, simply log into sigmundai.eu. The Sigmund panel in OpenSesame will automatically connect:
Video 1. Connecting OpenSesame to Sigmund.
The experiment
In this tutorial, you will create a basic visual-search experiment. The experiment resembles the classic visual-search studies of Treisman and Gelade (1980), but it is not identical.
In this experiment, participants search for a target object, which can be a yellow square, a yellow circle, a blue square, or a blue circle; the identity of the target is varied between blocks of trials. Participants indicate whether the target is present or not by pressing the right (present) or left (absent) arrow key.
In addition to the target, zero or more distractor objects are shown. There are three conditions, and the condition determines what kind of distractors there are:
-
In the Conjunction condition, distractors can have any shape and color, with the only restriction that distractors cannot be identical to the target. So, for example, if the target is a yellow square, then distractors are yellow circles, blue circles, and blue squares.
-
In the Shape Feature condition, distractors have a different shape from the target, but can have any color. So, for example, if the target is a yellow square, then distractors are yellow circles and blue circles.
-
In the Color Feature condition, distractors can have any shape, but have a different color from the target. So, for example, if the target is a yellow square, then distractors are blue squares and blue circles.
Immediate feedback is shown after each trial: a green dot after a correct response, and a red dot after an incorrect response. Detailed feedback on average response times and accuracy is shown after each block of trials.
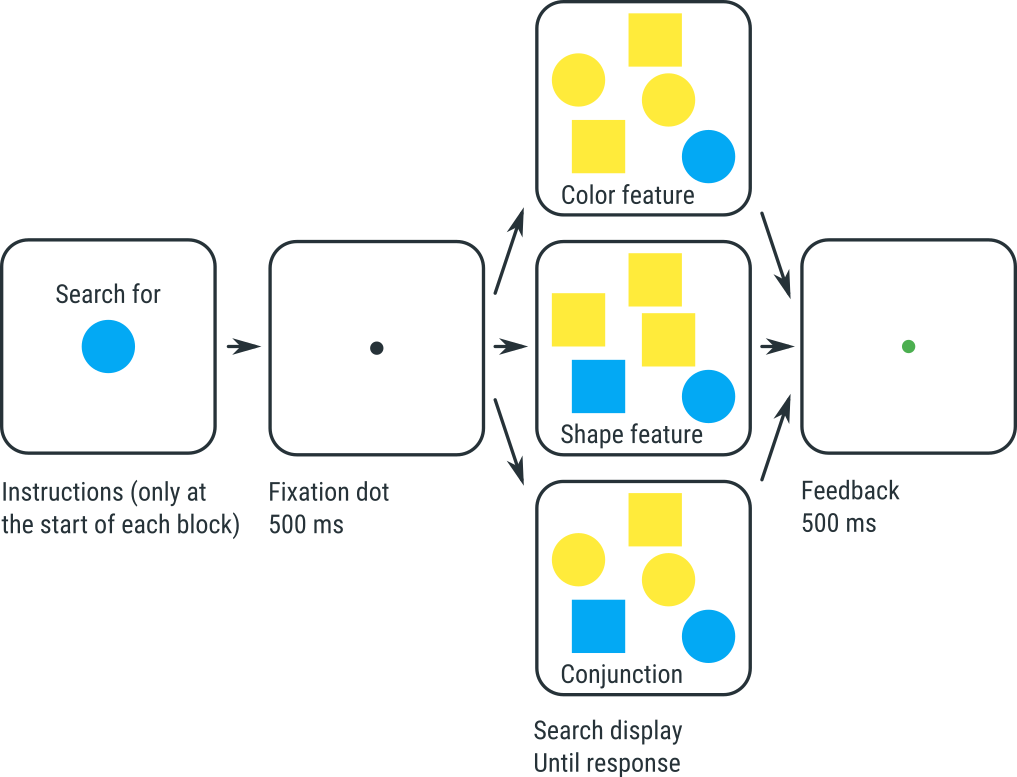
Figure 1. The visual-search experiment that you will implement in this tutorial.
Experiments like this show two typical findings:
- It takes more time to find the target in the Conjunction condition than in the two Feature conditions.
- In the Conjunction condition, response times increase as the number of distractors increases. This suggests that people search for the target one item at a time; this is called serial search.
- In the Feature conditions (both shape and color), response times do not, or hardly, increase as the number of distractors increases. This suggests that people process the entire display at once; this is called parallel search.
According to Treisman and Gelade's feature-integration theory, these results reflect that the Conjunction condition requires that you combine, or bind, the color and shape of each object. This binding requires attention, and you therefore need to shift your attention from one object to the next; this is slow, and explains why response times depend on how many objects there are. In contrast, in the Feature conditions, color and shape do not need to be bound, and therefore the whole display can be processed in a single sweep without attention being directed at each and every object.
Step 1: Build the main structure
Before we start building an experiment, it helps to understand how experiments are organized in OpenSesame. In OpenSesame an experiment is made up of items that control what happens in what order. We first want to define this structure so that Sigmund can build upon it.
The basic framework for our experiment includes:
- The main experimental sequence – This contains the whole experiment
- A place for general instructions – Participants will need instructions before the experiment begins.
- A loop that defines the different experimental blocks – A loop repeats part of the experiment multiple times. In our case, each repetition will correspond to one experimental block.
- A sequence that defines what happens inside each block – This sequence will later contain the trials and block-specific logic.
- And a final end screen – So participants know when the experiment is finished.
Using a clear structure like this keeps both us and Sigmund organized. If we try to make Sigmund build everything at once, Sigmund will be more likely to make errors and it will be harder for us to spot mistakes and fix them.
So let’s make the framework first, and fill in the details later!
💬 Prompt:
Hi Sigmund! I’d like to build a visual search experiment. Please create this structure without adding content yet:

- experiment (sequence)
  - instructions (sketchpad)
  - experimental_loop (loop)
    - block_sequence (sequence)
  - end_message (sketchpad)
When Sigmund is done, the overview should look like Figure 2:
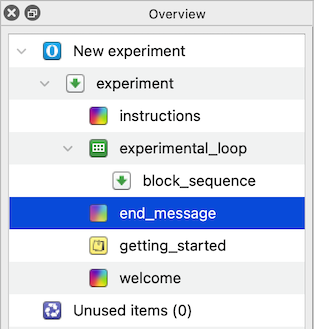
Figure 2. The overview area after creating the main structure.
Before continuing we should ask Sigmund to give our experiment a fitting name and remove any unnecessary items:
💬 Prompt:
Please remove unnecessary default items and give the experiment a clear title.
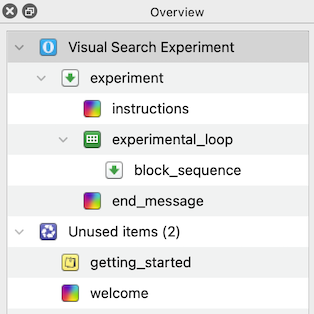
Figure 3. The overview area at the end of Step 1.
Step 2: Build block sequence
The visual search experiment is hierarchical. That means that the experiment contains blocks and the blocks themselves contain trials. In every block the participants will complete multiple trials looking for the same target. It is important that we do not mix up these levels, otherwise the targets might vary between trials!
The next step is to build the structure for a single block. Each block should have:
- Instructions that tell the participant what the target is
- A loop that runs all trials for that block
- A block feedback screen
💬 Prompt:
Now create the block_sequence contents. It should look like this:

- block_sequence (sequence)
  - block_instructions (sketchpad)
  - block_loop (loop)
    - trial_sequence (sequence)
  - feedback (feedback)

Just build the structure for now.
Your overview should now look like Figure 4.
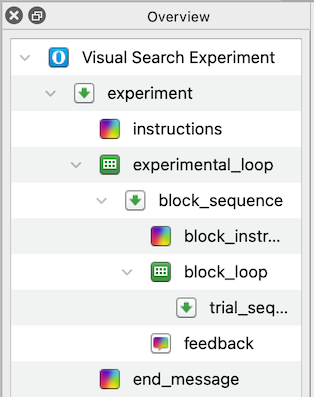
Figure 4. The overview area at the end of Step 2.
Step 3: Define between-blocks variables
The targets have two features, shape and color, that change between blocks. Therefore, Sigmund needs to define these in the outer loop (experimental_loop).
If we define these variables inside the trial loop instead, the target changes every trial instead of every block.
We now tell Sigmund to define variables in experimental_loop to create all combinations of circle/square and blue/yellow.
💬 Prompt:
Please define the variables in experimental_loop so that all combinations of:

  1. target_shape (circle/square)
  2. target_color (blue/yellow)

occur equally often across blocks.
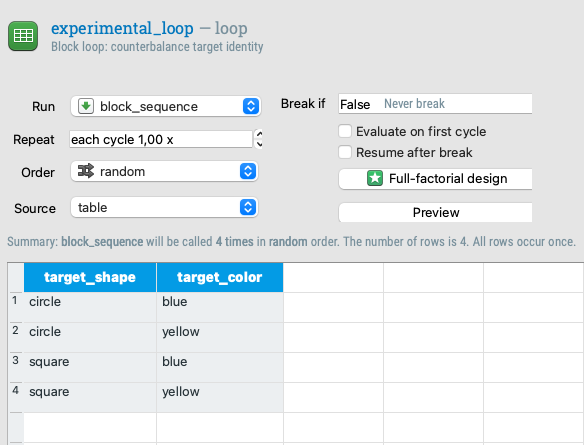
Figure 5. The table of experimental_loop at the end of step 3.
Step 4: Define trial conditions
Within each block, three factors vary from trial to trial:
- The condition (conjunction / shape / color)
- The number of stimuli (1 / 5 / 15)
- Whether the target is present or not.
We want Sigmund to make trial conditions for all combinations, a full factorial design. 3 conditions x 3 set sizes x 2 presence levels = 18 trial types
💬 Prompt:
Now define the block_loop variables. This should be a full factorial design with:

- condition: conjunction, feature_shape, feature_color
- set_size: 1, 5, 15
- target_present: present, absent

Please create all combinations.
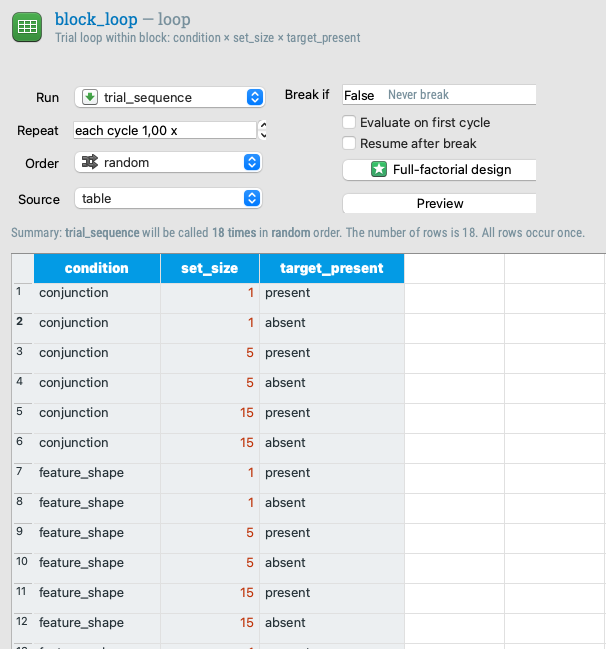
Figure 6. The table of block_loop at the end of step 4.
Step 5: Build trial sequence
Now we need to define what happens in a single trial. Let’s first create the items, we’ll add content in the next steps. During a single trial we:
- Show a fixation dot
- Show the main search display (this requires a Python inline script)
- Get the response from the participant
- Log the data we need
- Give feedback to the participant
💬 Prompt:
Please add items to trial_sequence in this order:

- fixation (sketchpad)
- search_display_script (inline_script)
- keyboard_response (keyboard_response)
- logger (logger)
- green_feedback (sketchpad)
- red_feedback (sketchpad)

Only create the items for now, don’t add content yet.
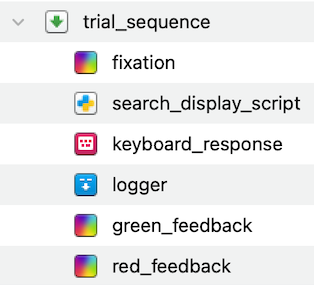
Figure 7. The trial_sequence at the end of Step 5.
Step 6: Fixation display
Let’s start adding content! Get Sigmund to draw a fixation dot on the sketchpad:
💬 Prompt:
Please draw a central fixation dot in the fixation item and set its duration to 500 ms.

Figure 8. The fixation display
Step 7: Generate the visual search display
Generating the visual search display goes beyond what the OpenSesame graphical interface can do. We need dynamic generation of stimuli, random placement, and conditional logic. OpenSesame has the option to do this using Python (inline_script) or JavaScript (inline_javscript). In our case, we will use Python. We already added an (empty) inline script to the trial sequence in Step 5.
But what if we can’t or don’t want to write a script ourselves? Sigmund can do it for us! Tell Sigmund to write us the script we need:
💬 Prompt:
Now implement the search display using the inline script. It should:

- create a canvas
- generate random non-overlapping positions
- draw the target if present
- draw distractors based on the condition:
  - conjunction: any shape/color except target combination
  - feature_shape: shape must differ from target
  - feature_color: color must differ from target
- use the set_size variable for the number of items
- raise an error if invalid values occur

The script should show the canvas.
Because this task is a bit more complex, Sigmund sometimes makes errors. However, Sigmund may be able to fix them himself! Try to run the experiment and if it returns an error, ask Sigmund to fix it.
An example of a common mistake is that Sigmund sometimes forgets to import a Python library, such as random. If you notice this, you can point this out and ask Sigmund to fix it!
💬 Prompt:
It looks like you forgot to import random. Please fix it!
If everything went well, you can now run the experiment (even though it is still incomplete) and it will show a display like this:
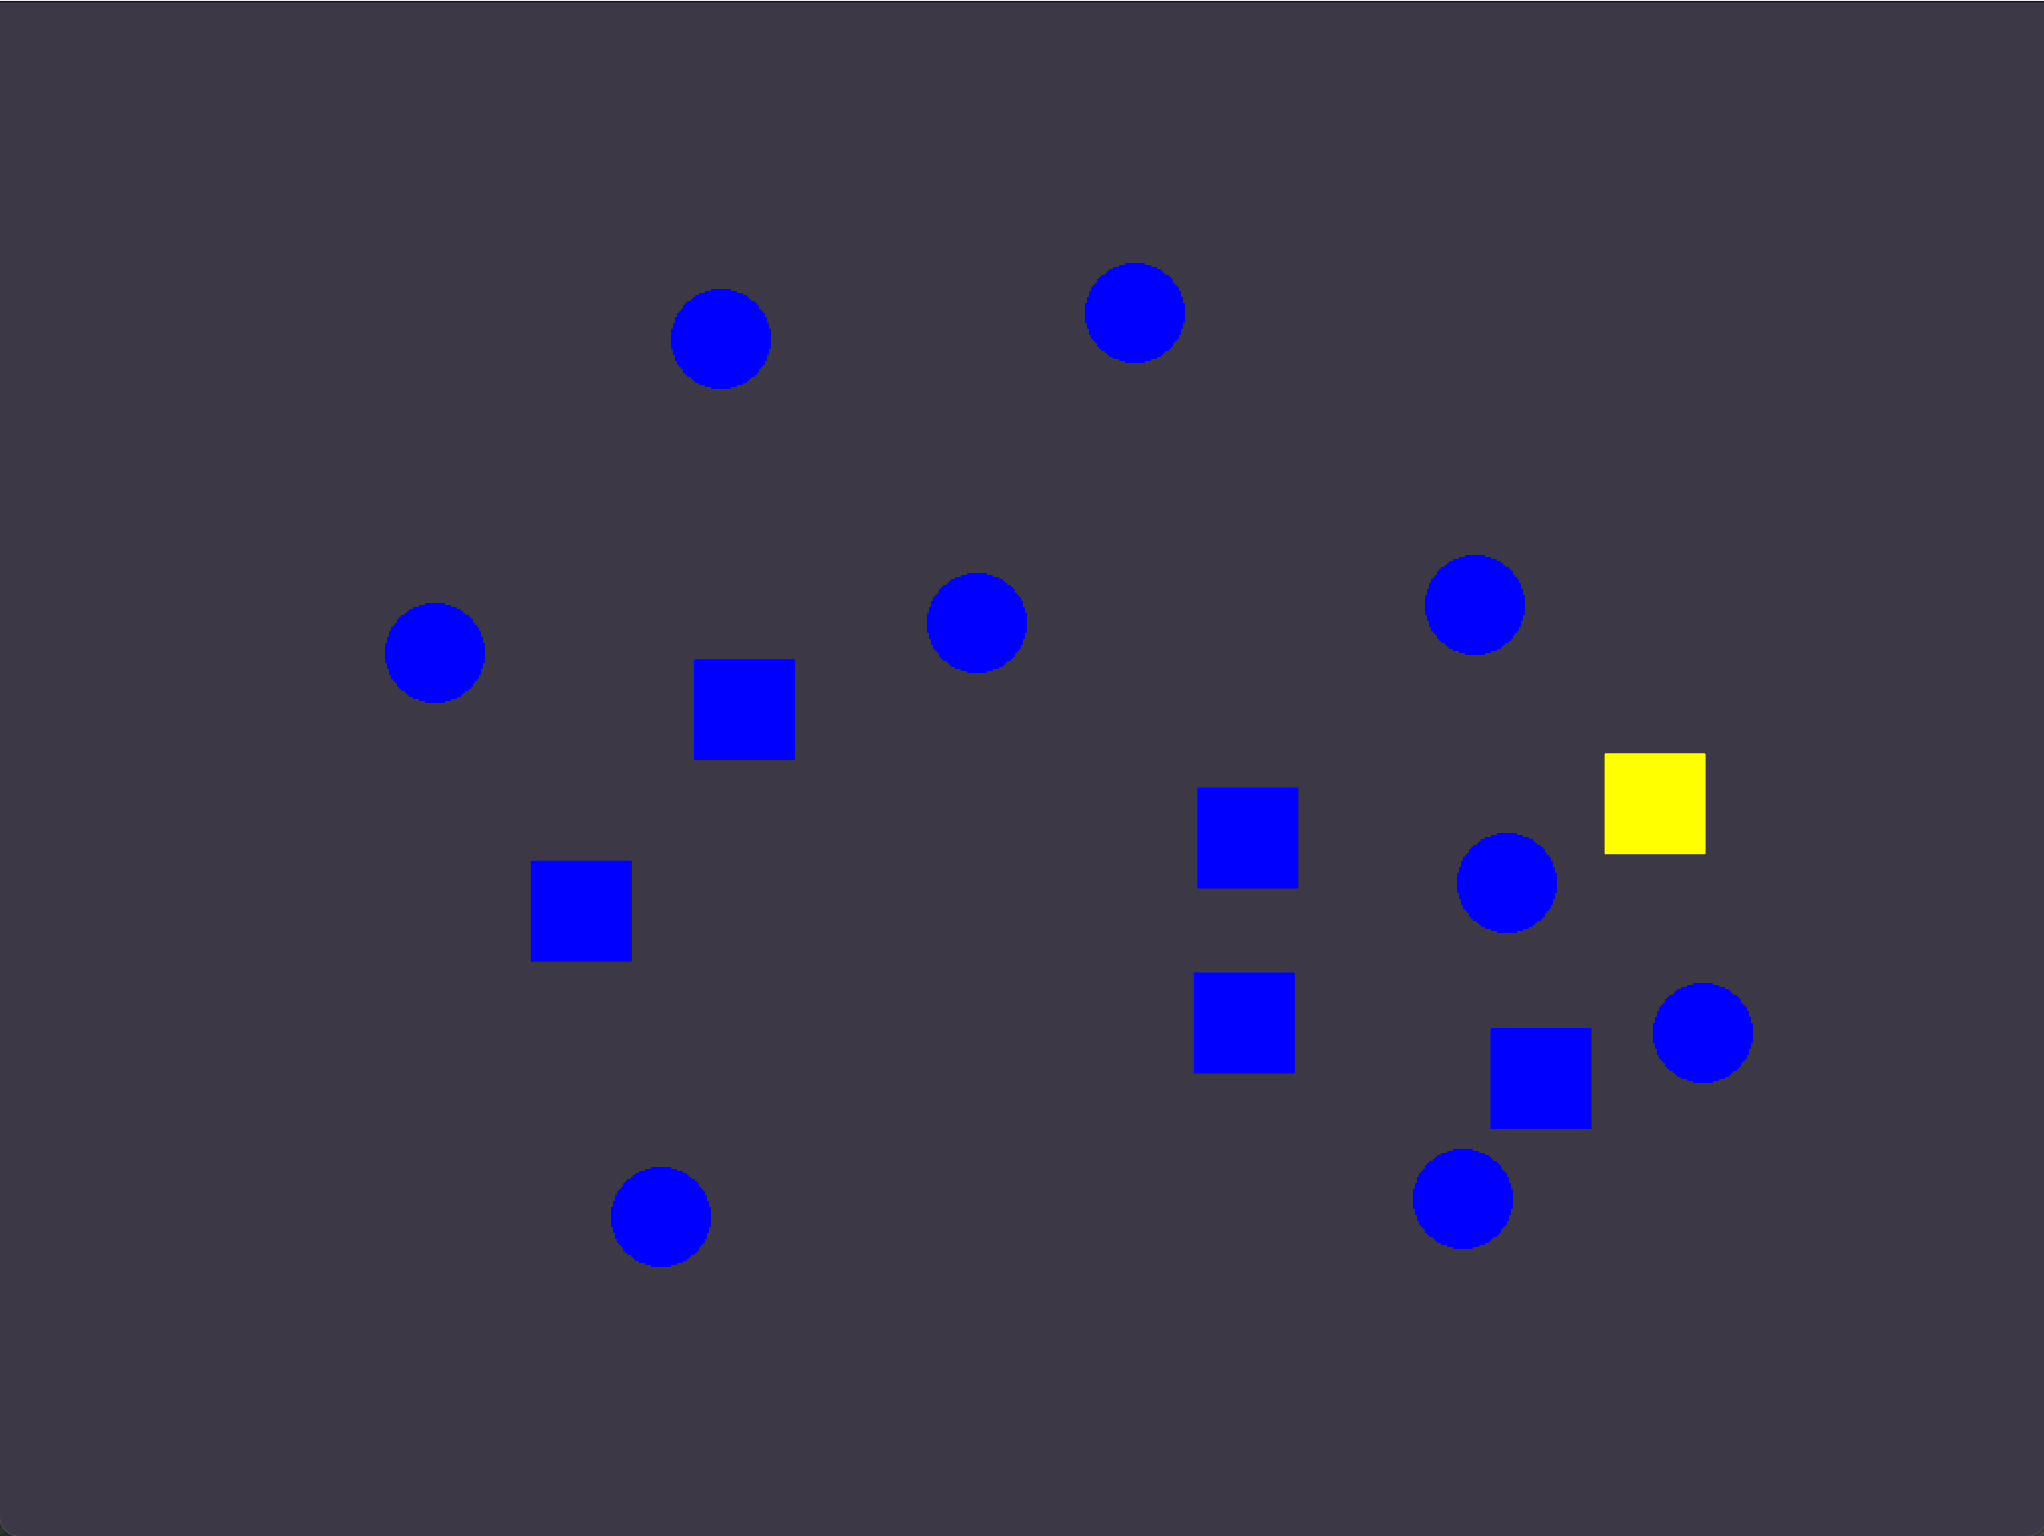
Figure 9. A visual search display.
Step 8: Define the correct response
The keyboard_response item Sigmund put in earlier checks answers against a variable called correct_response. So we must define what the correct answer is before the response is collected. We can ask Sigmund to do so with an inline script:
💬 Prompt:
Add logic so the experiment knows the correct response.

- If target_present is present → correct_response is right arrow key.
- If target_present is absent → correct_response is left arrow key.

Please implement this using a new inline script placed before the keyboard response item.
Step 9: Configure the keyboard response
Only the left and right arrow keys are valid responses, so we restrict the participants to using those. We can also ask Sigmund to automatically advance to the next trial after a fixed amount of time if the participant does not respond within a reasonable time (i.e. a timeout).
💬 Prompt:
Please configure the keyboard response so that:

- timeout is 3000 ms
- only left and right arrow keys are allowed
Step 10: Create the feedback displays
Next we want to give the participants feedback on whether they correctly identified the presence of the target in a trial. Tell Sigmund to dynamically set the feedback display:
💬 Prompt:
Now configure the feedback sketchpads:

- green_feedback should show a green fixation dot for 500 ms
- red_feedback should show a red fixation dot for 500 ms

Show green only after correct responses and red only after incorrect responses.
Step 11: Block instructions
The participants need to know what they are looking for! Ask Sigmund to make the instructions screen and show a representation of the current target:
💬 Prompt:
Please add instructions to block_instructions that tell participants which target to search for, based on the current block’s target shape and color. Visually show what the target looks like.
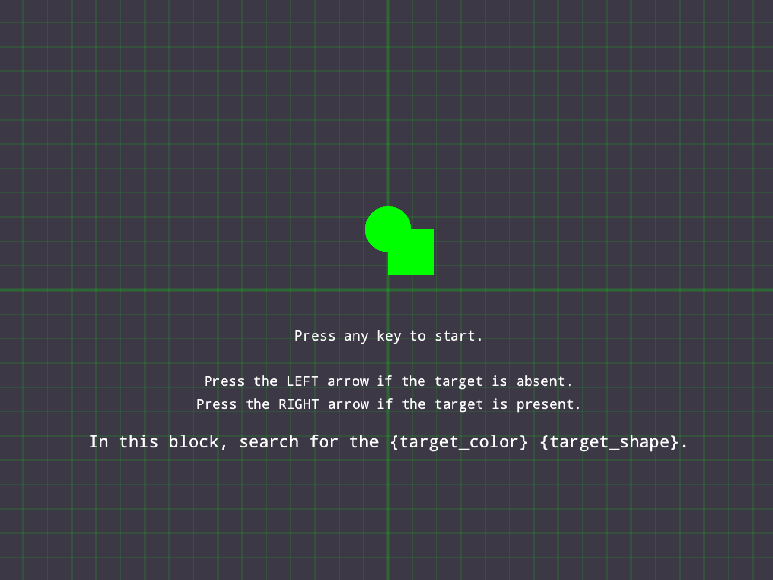
Figure 10. The instruction display.
Step 12: Block feedback
After each block we give the participants feedback on how well they performed based on accuracy and response time. Let Sigmund make the screen for us:
💬 Prompt:
Configure the feedback item so it shows average accuracy and response time for the block.
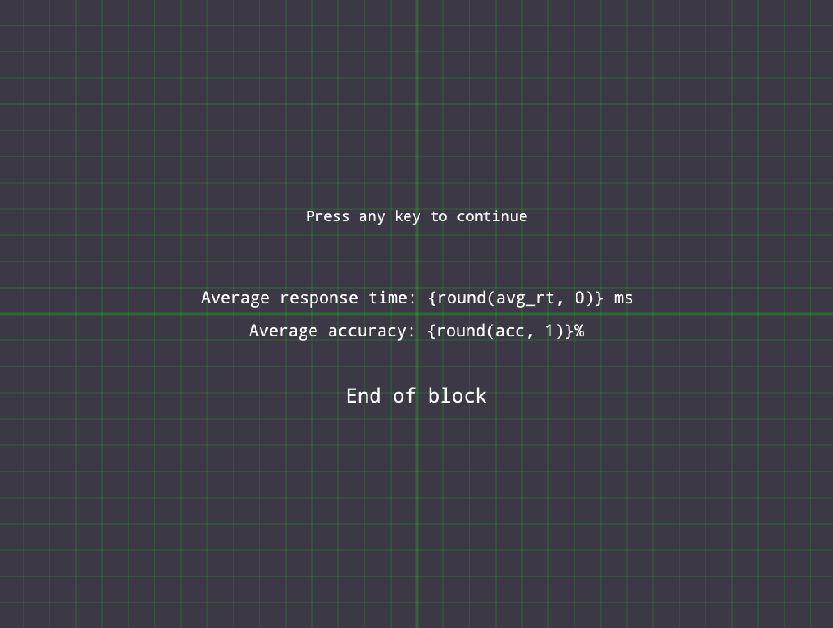
Figure 11. The block feedback display.
Step 13: Closing message
Finally, we add a closing message.
💬 Prompt:
Set an end of experiment message in end_message.
Finished
Congratulations, the experiment is complete! You can give it a test run by clicking the blue double-arrow button (shortcut: Ctrl+W).
Here is what a completed visual-search block looks like:
Video 2. Demonstration of a completed visual-search block.
To make sure the experiment works well, check if you recognize the following elements:
- Each block begins with instructions showing the current target shape and color
- Each trial has a fixation dot and the correct feedback is shown immediately after each trial
- Across trials set sizes and target presence varies
- After each block there is a performance summary
If you notice small bugs or mistakes—don’t worry. Sigmund can often fix these on his own. Try running the experiment and, if an error appears, simply describe the problem to Sigmund and ask him to fix it. For example, Sigmund can usually fix missing imports, incorrect variable names, or small logic errors when you point them out. Learning to test your experiment and iteratively ask Sigmund for targeted fixes is an important part of working efficiently with an AI copilot.
References
Treisman, A. M., & Gelade, G. (1980). A feature-integration theory of attention. Cognitive Psychology, 12(1), 97–136. doi:10.1016/0010-0285(80)90005-5