


About Python
In OpenSesame you can create complex experiments using only the graphical user interface (GUI). But you will sometimes encounter situations in which the functionality provided by the GUI is insufficient. In these cases you can add Python code to your experiment.
- Learning Python
- Python in the OpenSesame GUI
- Things to know
- Common functions
- The var object: Access to experimental variables
- The clock object: Time functions
- The log object: Data logging
- The pool object: Access to the file pool
- The responses object: Access to participant responses
- The Canvas class: Presenting visual stimuli
- The Keyboard class: Collecting key presses
- The Mouse class: Collecting mouse clicks and screen touches
- The Sampler class: Sound playback
- Alternative modules for display presentation, response collection, etc.
Learning Python
- Learn Python -- A set of basic tutorials and exercises to get you started:
- Code Academy -- The Python track at Code Academy is an excellent way to get started with Python:
- A Byte of Python -- A good free E-book to learn Python for non-programmers is "A Byte of Python", by Swaroop. Make sure to get the version for Python 2, which is what OpenSesame uses.
- "A Byte of Python" by Swaroop [Download PDF for Python 2.X]
- Think Python -- Another good free E-Book is "Think Python", by Allen B. Downey. This book should work for Python 2 as well as Python 3.
- "Think Python" by Allen B. Downey [Download PDF]
Python in the OpenSesame GUI
Screencast
A single Python workspace
All Python code is executed in a single Python workspace. This means that variables that have been defined in one inline_script are accessible in all other inline_scripts, as well as in Python statements that are embedded in run-if statements and text strings. The same principle applies to modules: once imported, they are available everywhere.
For example, you can simply construct the Canvas in one inline_script ...
my_canvas = Canvas()
my_canvas.fixdot()
... and show it in another inline_script ...
my_canvas.show()
Inline_script items
In order to use Python code you need to add an inline_script item to your experiment. You can do this by dragging the Python icon (the blue/yellow icon) from the item toolbar into the experiment sequence. After you have done this you will see something like Figure 1.
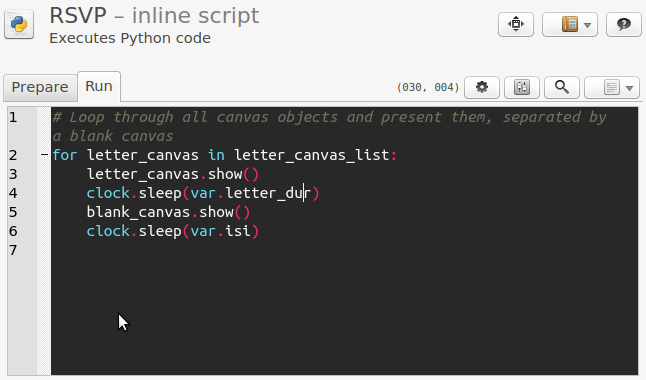
Figure 1. The inline_script item.
As you can see, the inline_script item consists of two tabs: one for the Prepare phase and one for the Run phase. The Prepare phase is executed first, to allow items to prepare for the time-critical run phase. It is good practice to construct Canvas objects, Sampler objects, etc. during the Prepare phase, so that they can be presented without delay during the Run phase. But this is only convention; you can execute arbitrary Python code during both phases.
For more information about the prepare-run strategy, see:
Loop tables and conditional ("if") statements
You can use single-line Python statements also where you would normally type static values, or would use the OpenSesame square-brackets notation to indicate values (i.e. [my_var]). To do so, you need to prefix an =. For example, you can use the following Python script as a run-if statement (see also Figure 2):
=var.correct == 1 and var.response_time < 1000
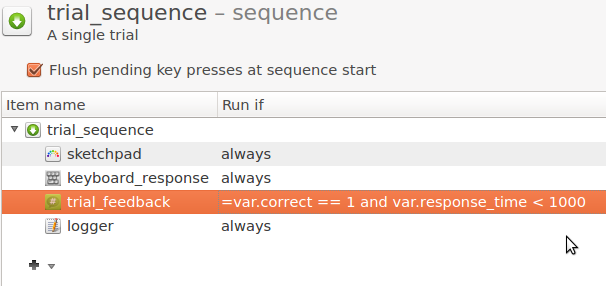
Figure 2. Using Python script in the run-if statement of a sequence item.
For more information about conditional ("if") statements, see:
Similarly, you can use single-line Python statements to define variables in loop tables. Let's say that you want to assign a random value between 0 and 1000 to a variable. You could this by first importing the random in an inline_script. Once the random module is available, you could use random.randint() to obtain a random variable in a loop item:
=random.randint(0, 1000)
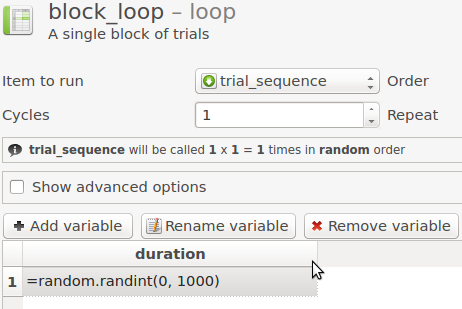
Figure 3. Using Python script to define variables in a loop table.
Python in text strings
You can embed Python statements in text strings using the [=...] syntax. For example, you could the following text to a sketchpad:
The resolution is [=var.width] x [=var.height] px
Depending on your experiment's resolution, this might evaluate to:
The resolution is 1024 x 768 px
The IPython debug window
OpenSesame reroutes the standard output to the debug window, which you can activate using Control + D or through the menu (Menu -> View -> Show debug window; see Figure 4). You can print to the debug window using print():
print('This will appear in the debug window!')
If available, the debug window is an IPython terminal. IPython is a powerful interactive Python terminal. If IPython is not available, a simple fallback terminal will be used.
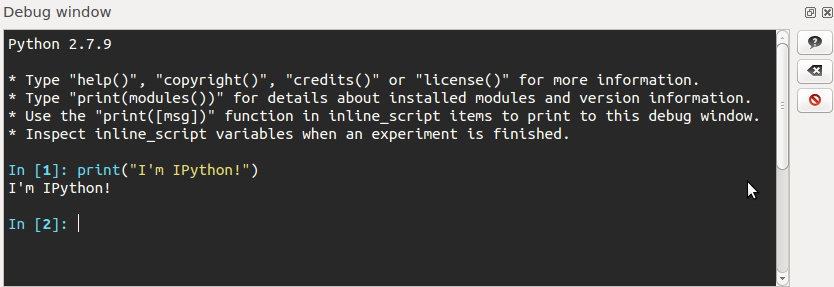
Figure 4. The debug window.
Things to know
Common functions
Many common functions are directly available in an inline_script item, without the need to import anything. For example:
# `Canvas()` is a factory function that returns a `Canvas` object
fixdot_canvas = Canvas()
if sometimes(): # Sometimes the fixdot is green
    fixdot_canvas.fixdot(color='green')
else: # Sometimes it is red
    fixdot_canvas.fixdot(color='red')
fixdot_canvas.show()
For a list of common functions, see:
The var object: Access to experimental variables
You can access experimental variables through the var object:
# Get an experimental variable
print(u'my_variable is: %s' % var.my_variable)
# Set an experimental variable
var.my_variable = u'my_value'
A full overview of the var object can be found here:
The clock object: Time functions
Basic time functions are available through the clock object:
# Get the current timestamp
t = clock.time()
# Wait for 1 s
clock.sleep(1000)
A full overview of the clock object can be found here:
The log object: Data logging
Data logging is available through the log object:
# Write one line of text
log.write(u'My custom log message')
# Write all variables
log.write_vars()
A full overview of the log object can be found here:
The pool object: Access to the file pool
You get the full path to a file in the file pool through the pool object:
# Show an image from the file pool
path = pool['img.png']
my_canvas = Canvas()
my_canvas.image(path)
my_canvas.show()
A full overview of the pool object can be found here:
The responses object: Access to participant responses
The responses object keeps track of all participant responses that have been collected during the experiment. For example, to list the correctness of all responses so far:
for response in responses:
    print(response.correct)
A full overview of the responses object can be found here:
The Canvas class: Presenting visual stimuli
The Canvas class is used to present visual stimuli. For example, you can show a fixation dot as follows:
my_canvas = Canvas()
my_canvas.fixdot()
my_canvas.show()
A full overview of the Canvas class can be found here:
The Keyboard class: Collecting key presses
The Keyboard class is used to collect key presses. For example, to collect a key press with a timeout of 1000 ms:
my_keyboard = Keyboard(timeout=1000)
key, time = my_keyboard.get_key()
A full overview of the Keyboard class can be found here:
The Mouse class: Collecting mouse clicks and screen touches
The Mouse class is used to collect mouse clicks and screen touches. (OpenSesame makes no distinction between the two.) For example, to collect a mouse click with a timeout of 1000 ms:
my_mouse = Mouse(timeout=1000)
button, position, time = my_mouse.get_click()
A full overview of the Mouse class can be found here:
The Sampler class: Sound playback
The Sampler class is used to play back sound samples. For example, to play back a simple beep:
my_sampler = Sampler()
my_sampler.play()
A full overview of the Sampler class can be found here:
Alternative modules for display presentation, response collection, etc.
psychopy
If you are using the psycho backend, you can directly use the various PsychoPy modules. For more information, see:
expyriment
If you are using the xpyriment backend, you can directly use the various Expyriment modules. For more information, see:
pygame
If you are using the legacy, droid, or xpyriment (only with "Use OpenGL" set to "no") backend, you can directly use the various PyGame modules. For more information, see: