Variables
What is an experimental variable in OpenSesame?
Experimental variables in OpenSesame are those variables that:
- You can refer to in the user interface with the '[variable_name]' syntax.
- You can refer to in a Python inline_script with the
var.variable_namesyntax. - Contain things like:
- The variables that you have defined in a loop item.
- The responses that you have collected.
- Various properties of the experiment.
- Etc.
The variable inspector
The variable inspector (Ctrl+I) provides an overview of available variables (Figure 1). When the experiment is not running, this overview is based on a best guess of which variables will become available during the experiment. However, when the experiment is running, the variable inspector shows a live overview of variables and their values. This is useful for debugging your experiment.
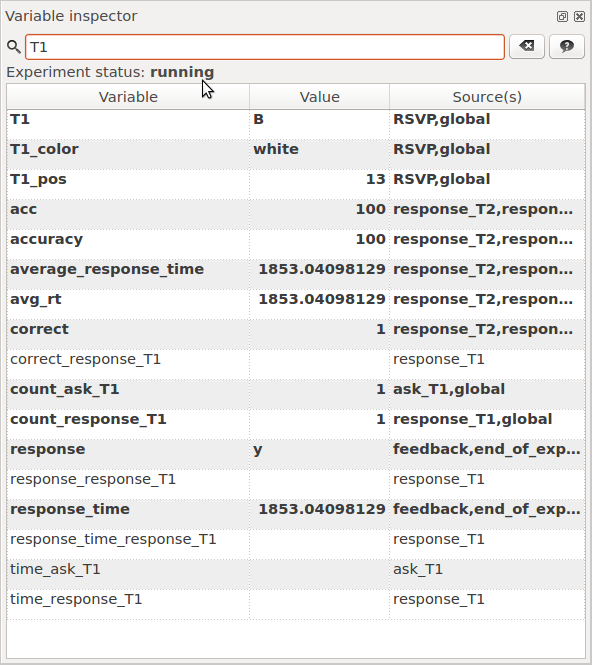
Figure 1. The variable inspector provides an overview of all variables that OpenSesame knows about.
Defining variables
The simplest way to define a variable is through the loop item. For example, Figure 2 shows how to define a variable named target. In this example, trial_sequence item is called once while target is 'left' and once while 'target' is 'right'.
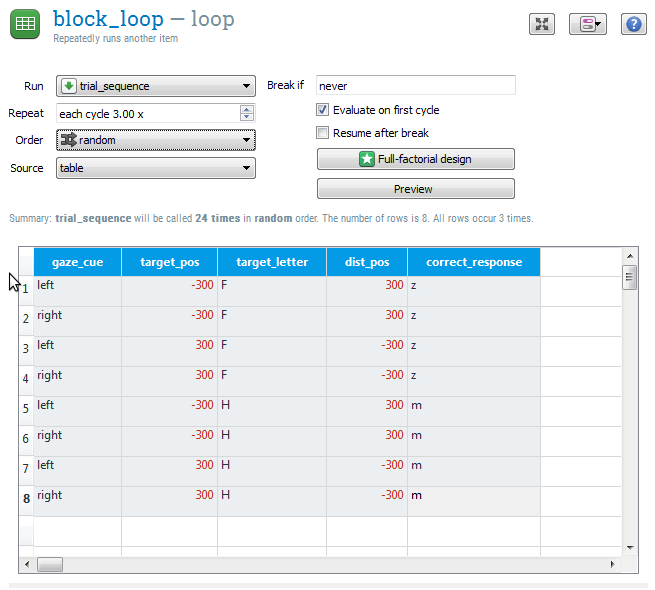
Figure 2. The most common way to define independent variables is using the loop table.
Built-in variables
The following variables are always available:
Experiment variables
| Variable name | Description |
|---|---|
title |
The title of the experiment |
description |
The description of the experiment |
foreground |
The default foreground color. E.g., 'white' or '#FFFFFF'. |
background |
The default background color. E.g., 'black' or '#000000'. |
height |
The height-part of the display resolution. E.g., '768' |
width |
The width-part of the display resolution. E.g., '1024' |
subject_nr |
The subject number, which is asked when the experiment is started. |
subject_parity |
Is 'odd' if subject_nr is odd and 'even' if subject_nr is even. Useful for counterbalancing. |
experiment_path |
The folder of the current experiment, without the experiment filename itself. If the experiment is unsaved, it has the value None. |
pool_folder |
The folder where the contents of the file pool have been extracted to. This is generally a temporary folder. |
logfile |
The path to the logfile. |
Item variables
There are also variables that keep track of all the items in the experiment.
| Variable name | Description |
|---|---|
time_[item_name] |
Contains a timestamp of when the item was last executed. For sketchpad items, this can be used to verify the timing of display presentation. |
count_[item_name] |
Is equal the number of times minus one (starting at 0, in other words) that an item has been called. This can, for example, be used as a trial or block counter. |
Response variables
When you use the standard response items, such as the keyboard_response and mouse_response, a number of variables are set based on the participant's response.
| Variable name | Description |
|---|---|
response |
Contains the last response that has been given. |
response_[item_name] |
Contains the last response for a specific response item. This is useful in case there are multiple response items. |
response_time |
Contains the interval in milliseconds between the start of the response interval and the last response. |
response_time_[item_name] |
Contains the response time for a specific response item. |
correct |
Is set to '1' if the last response matches the variable correct_response, '0' if not, and 'undefined' if the variable correct_response has not been set. |
correct_[item_name] |
As correct but for a specifc response item. |
Feedback variables
Feedback variables maintain a running average of accuracy and response times.
| Variable name | Description |
|---|---|
average_response_time |
The average response time. This is variable is useful for presenting feedback to the participant. |
avg_rt |
Synonym for average_response_time |
accuracy |
The average percentage of correct responses. This is variable is useful for presenting feedback to the participant. |
acc |
Synonym for accuracy |
Using variables in the user interface
Wherever you see a value in the user interface, you can replace that value by a variable using the '[variable name]' notation. For example, if you have defined a variable soa in a loop item, you can use this variable for the duration of a sketchpad as shown in Figure 3.
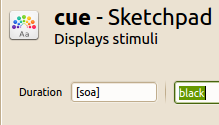
Figure 3. The duration '[soa]' indicates that the duration of the sketchpad depends on the variable soa.
This works throughout the user interface. For example, if you have the defined a variable my_freq, you can use this variable as the frequency in a synth item, as shown in Figure 4.
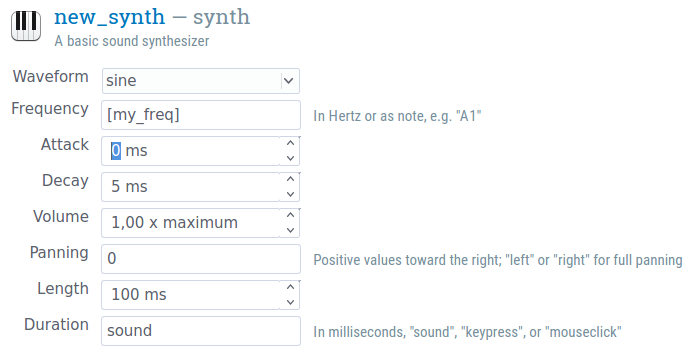
Figure 4. The frequency '[my_freq]' indicates that the frequency of the synth depends on the variable my_freq.
Sometimes, the user interface doesn't let you type in arbitrary text. For example, the elements of a sketchpad are shown visually, and you cannot directly change an X coordinate to a variable. However, you can click on the Select view → View script button on the top right, and edit the script directly.
For example, you can change the position of a fixation dot from the center:
draw fixdot x=0 y=0
… to a position defined by the variables xpos and ypos:
draw fixdot x=[xpos] y=[ypos]
Using variables in Python
In an inline_script, you can access experimental variables through the var object. For example, if you have defined example_variable in a loop, then the following will print the value example_variable to the debug window:
print(var.example_variable)
You can set the experimental variable example_variable to the value 'some value' as follows:
var.example_variable = 'some value'
For more information, see:
Using conditional ("if") statements
Conditional statements, or 'if statements', provide a way to indicate that something should happen only under specific circumstances, such when some variable has a specific value.
The most commonly used if-statement in OpenSesame is the run-if statement of the sequence, which allows you to specify the conditions under which a particular element is executed. If you open a sequence item, you see that every item from the sequence has a 'Run if …'' option. The default value is 'always', which means that the item is always run; but you can also enter a condition here. For example, if you want to show a green fixation dot after a correct response, and a red fixation dot after an incorrect response, you can create a sequence like the following (this makes use of the fact that a keyboard_response item automatically sets the correct variable, as discussed above) as shown in Figure 5.
Important: Run-if statements only apply to the Run phase of items. The Prepare phase is always executed. See also this page.
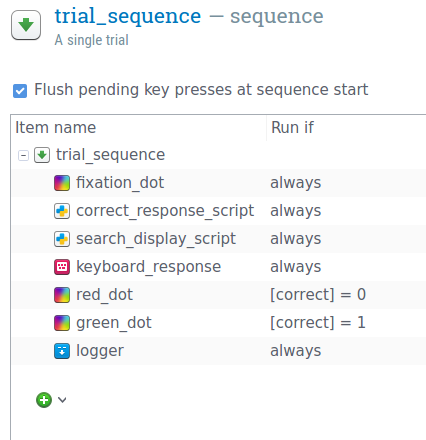
Figure 5. 'Run if' statements can be used to indicate that certain items from a sequence should only be executed under specific circumstances.
You can use more complex conditions as well. Let's take a look at a few examples:
[correct] = 1 and [response_time] > 2000
[correct] != 1 or [response_time] > [max_response_time] or [response_time] < [min_response_time]
Variables are not typed and putting quotes around a value is only necessary if a value contains spaces (but always permitted).
Alternatively, you can use Python code in your conditional statements. To indicate that you are using Python code instead of the OpenSesame syntax (as above), prepend an = character to your conditional statement, like so:
=var.correct == 0
You cannot use the square-bracket syntax when using Python code. Instead, you use the var object to retrieve a variable, like you would in an ordinary inline_script.
The same principle applies to 'Show if' fields in sketchpad items. For example, if you want to draw a leftwards arrow only if the variable cue has been set to 'right', simply type the proper condition in the 'Show if ...' field and draw the arrow, as in Figure 6. Make sure that you draw the arrow after you have set the condition.
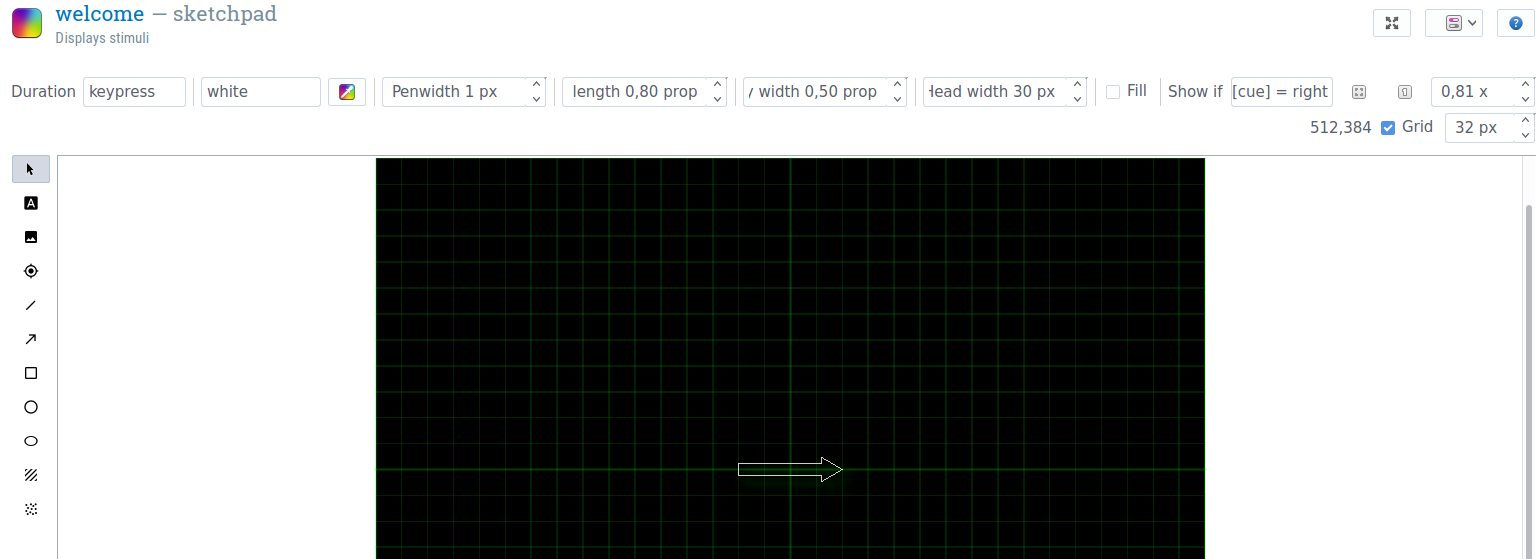
Figure 6. 'Show if' statements can be used to indicate that certain elements from a sketchpad or feedback item should only be shown under specific circumstances.
Important: The moment at which a conditional statement is evaluated may affect how your experiment works. This is related to the prepare-run strategy employed by OpenSesame, which is explained here:
Smart variable typing (and some pitfalls)
You don't need to indicate whether the type of your variable is a string, integer (a whole number, such as 1), or floating point (a decimal number, such as 1.1). Instead, OpenSesame selects a variable type automatically, according to the following logic:
- If a value is numeric and integer, it is treated as an integer. An example is the value 10.
- If a value is numeric, but not integer, it is treated as a float. An example is the value 0.1.
- All other values are left as is.
The reason for this smart typing is convenience: You can compare one value that looks like a number to another value that looks like a number, without needing to explicitly indicate that the variables are numbers, and not strings. However, in some cases, smart typing can lead to unpredictable behavior.
The most important pitfall is that text may unintentionally become numeric. For example, if a variable is set to a str that can be converted to an integer, it will automatically become an int, and no longer be equal to the str that it was set to:
var.l = '0'
print(var.l == '0') # will print False
print(var.l == 0) # will print True


