


Visual world
- About this tutorial
- About the experiment
- The tutorial
- Step 1: Download and start OpenSesame
- Step 2: Build the main structure of the experiment
- Step 3: Import files into the file pool
- Step 4: Define experimental variables in the block_loop
- Step 5: Apply advanced loop operations
- Step 6: Create the trial sequence
- Step 7: Define the visual stimuli
- Step 8: Define the sound
- Step 9: Add basic eye tracking
- Step 10: Define instructions and goodbye screen
- Step 11: Run the experiment!
- Extra assignments
- Download the experiment
- References
About this tutorial
This tutorial assumes a basic knowledge of OpenSesame and, for some parts, Python. Therefore, if you're not familiar with OpenSesame or Python, I recommend that you walk through the beginner and intermediate tutorials before continuing with this tutorial:
In this tutorial, you will learn the following:
- Eye tracking with PyGaze
- Doing things in parallel with
coroutines - Using advanced
loopoperations
About the experiment
In this tutorial, we will implement a visual-world paradigm, which was introduced by Cooper (1974; for a review see also Huettig, Rommers, and Meyer, 2011). In this paradigm, participants hear a spoken sentence, while they are looking at a display with several objects. We will use four separate objects presented in the four quadrants of the display (Figure 1).
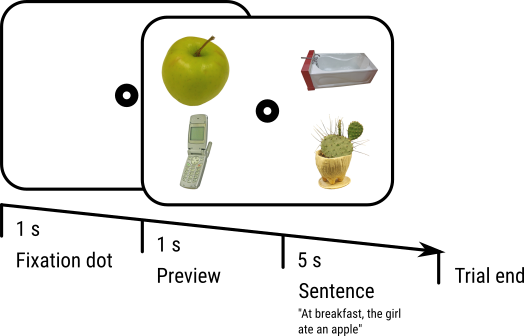
Figure 1. A schematic of our trial sequence. This is an example of a Full Match trial, because the target object (the apple) is directly mentioned in the spoken sentence. Stimuli taken from the BOSS stimuli (Brodier et al., 2010).
The spoken sentence refers to one or more of the objects. For example, an apple (the target object) may be shown while the spoken sentence "at breakfast, the girl ate an apple" is played back. In this case, the target matches the sentence fully. The sentence may also refer indirectly to a shown object. For example, an apple (again the target object) may be shown while the spoken sentence "at breakfast, the girl ate a banana" is played back. In this case, the target matches the sentence semantically, because a banana and an apple are both fruits that a girl may eat at breakfast.
During the experiment, eye position is recorded, and the proportion of fixations on target and non-target objects is measured over time. The typical finding is then that the eyes are drawn toward target objects; that is, participants look mostly at objects that are directly or indirectly referred to by the spoken sentence. And the more direct the reference, the stronger this effect.
Now let's make this more formal. Our experiment will have the following design:
- One factor (Target Match) with two levels (Full or Semantic), varied within subjects. In the Full Match condition, the target object is directly mentioned in the sentence. In the Semantic Match condition, the target object is semantically related to an object that is mentioned in the sentence.
- We have 16 spoken sentences and sixteen target objects. Every sentence and every target object is shown twice: once in the Full Match condition, and once in the Semantic Match condition.
- We have 16 × 3 = 48 distractor objects, each of which (like the targets) is shown twice.
- Each trial starts with a fixation dot for 1 s, followed by the presentation of the stimuli, followed 1 s later by the onset of the spoken sentence. The trial ends 5 s later.
The tutorial
Step 1: Download and start OpenSesame
OpenSesame is available for Windows, Linux, Mac OS (experimental), and Android (runtime only). This tutorial is written for OpenSesame 3.2.X Kafkaesque Koffka. To be able to use PyGaze, you should download the Python 2.7 version (which is the default). You can download OpenSesame from here:
(If you start OpenSesame for the first time, you will see a Welcome tab. Dismiss this tab.) When you start OpenSesame, you will be given a choice of template experiments, and (if any) a list of recently opened experiments (see Figure 2). Click on 'Default Template' to start with an almost empty experiment.
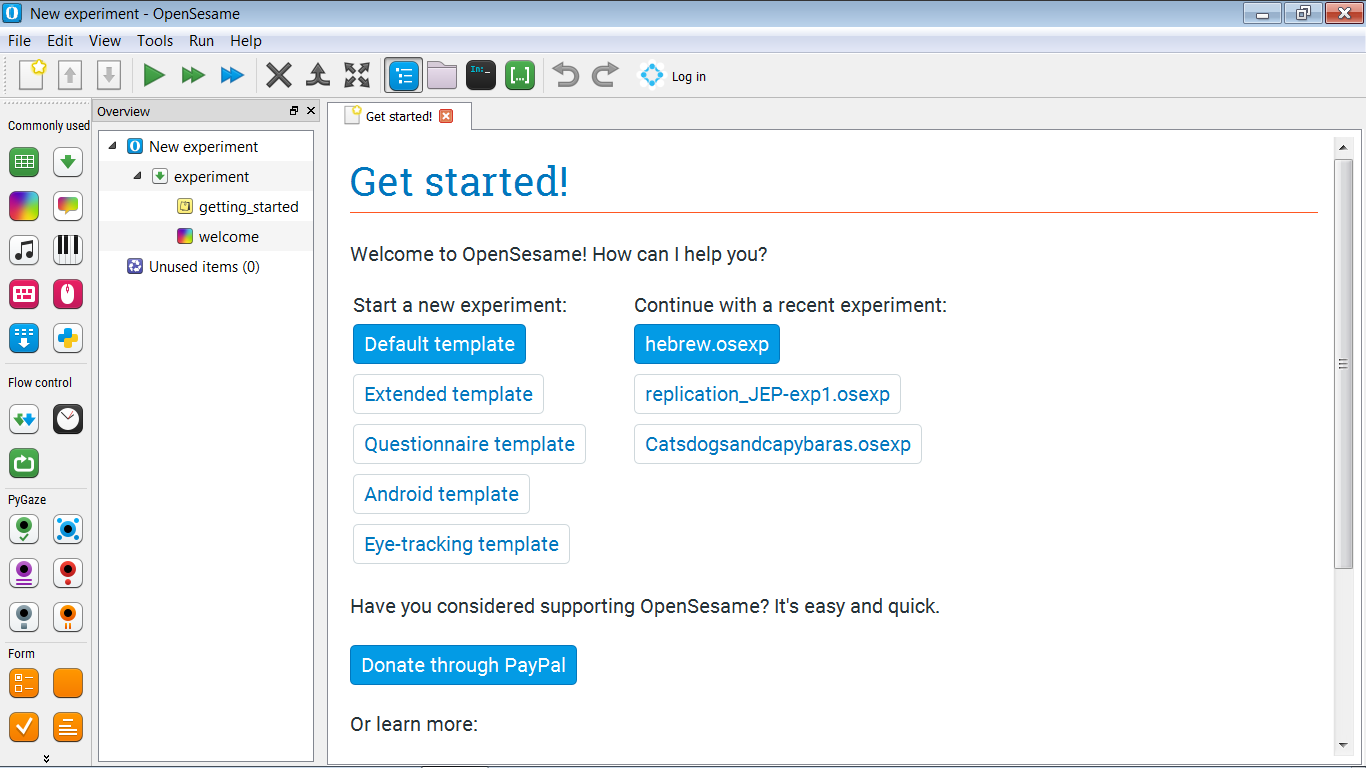
Figure 2. The OpenSesame window on start-up.
Step 2: Build the main structure of the experiment
For now, build the following main structure for your experiment (see also Figure 3):
- We start with an instructions screen. This will be a
sketchpad. - Next, we run one block of trials. This will be a single
sequence, corresponding to a single trial, inside a singleloop, corresponding to a block of trials. You can leave the trial sequence empty for now! - Finally, we end with a goodbye screen.
We also need to change the foreground color of the experiment to black, and the background color to white. This is because we will use images that have a white background, and we don't want these images to stand out!
And don't forget to give your experiment a sensible name, and to save it!
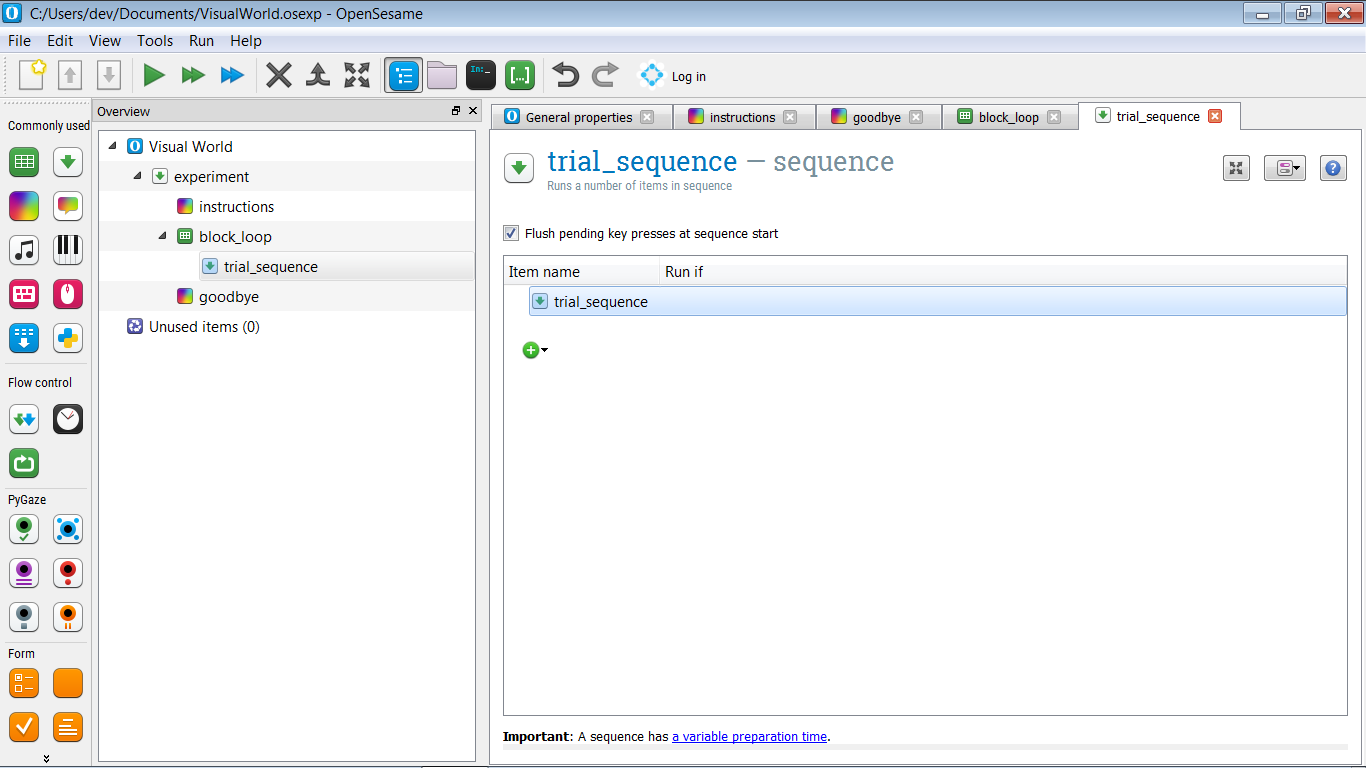
Figure 3. The main structure of the experiment.
Step 3: Import files into the file pool
For this experiment we need stimuli: sound files for the spoken sentences, and image files for the objects. Download these from the link below, extract the zip file, and place the stimuli in the file pool of your experiment (see also Figure 4).
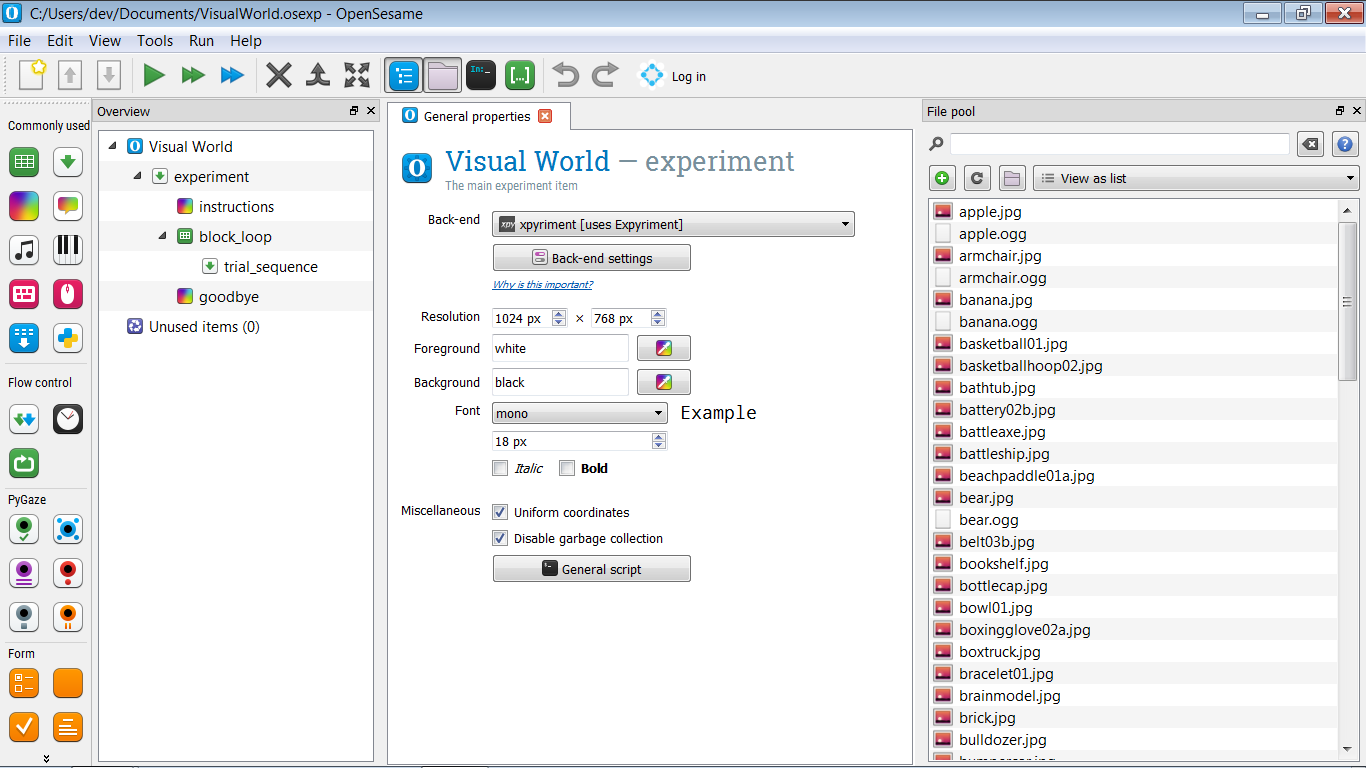
Figure 4. The file pool of your experiment after all stimuli have been added.
Step 4: Define experimental variables in the block_loop
The block_loop is where we define the experimental variables, by entering them into a table, where each row corresponds to a trial, and each column corresponds to an experimental variable.
For now, we define only the Full Match condition, in which the target object is directly mentioned in the spoken sentence. (We will add the Semantic Match condition as part of the Extra Assignments.)
We need the following variables. First, simply add columns to the loop table, without giving the rows any content.
pic1— the name of the first picture (e.g. 'apple.jpg')pic2— the name of the second picturepic3— the name of the third picturepic4— the name of the fourth picturepos1— the position of the first picture (e.g. 'topleft')pos2— the position of the first picturepos3— the position of the first picturepos4— the position of the first picturesound— the name of a sound file that contains a spoken sentence (e.g. 'apple.ogg').
The target object will always correspond to pic1. We have the following target objects; that is, for the following objects, we have sound files that refer to them. Simply copy-paste the following list into the pic1 column of the table:
apple.jpg
armchair.jpg
banana.jpg
bear.jpg
card.jpg
cello.jpg
chicken.jpg
cookie.jpg
croissant.jpg
dice.jpg
egg.jpg
guitar.jpg
keyboard.jpg
mouse.jpg
sofa.jpg
wolf.jpg
And do the same for the sound files:
apple.ogg
armchair.ogg
banana.ogg
bear.ogg
card.ogg
cello.ogg
chicken.ogg
cookie.ogg
croissant.ogg
dice.ogg
egg.ogg
guitar.ogg
keyboard.ogg
mouse.ogg
sofa.ogg
wolf.ogg
The rest of the pictures are distractors. Copy-paste the following list into the pic2, pic3, and pic4 columns, in such a way that each column has exactly 16 rows. (If you accidentally make the table longer than 16 rows, simply select the extraneous rows, right-click and delete them.)
basketball01.jpg
basketballhoop02.jpg
bathtub.jpg
battery02b.jpg
battleaxe.jpg
battleship.jpg
beachpaddle01a.jpg
belt03b.jpg
bookshelf.jpg
bottlecap.jpg
bowl01.jpg
boxingglove02a.jpg
boxtruck.jpg
bracelet01.jpg
brainmodel.jpg
brick.jpg
bulldozer.jpg
bumpercar.jpg
bust.jpg
button01.jpg
cactus.jpg
calculator01.jpg
calendar.jpg
camera01b.jpg
cd.jpg
ceilingfan02.jpg
cellphone.jpg
mitten04.jpg
monument.jpg
moon.jpg
motorboat02.jpg
motoroilbottle03b.jpg
mrpotatohead.jpg
nailclipper03b.jpg
needlenosepliers03a.jpg
nightstand.jpg
nintendods.jpg
noparkingsign.jpg
oven.jpg
pacifier02a.jpg
paintcan01.jpg
pants.jpg
paperairplane.jpg
paperclip02.jpg
parkfountain.jpg
patioumbrella.jpg
pencilsharpener03b.jpg
peppermill01a.jpg
Now we need to specify the positions. Simply set:
pos1to 'topleft'pos2to 'topright'pos3to 'bottomleft'pos4to 'bottomright'
Your loop table should now look like Figure 5.
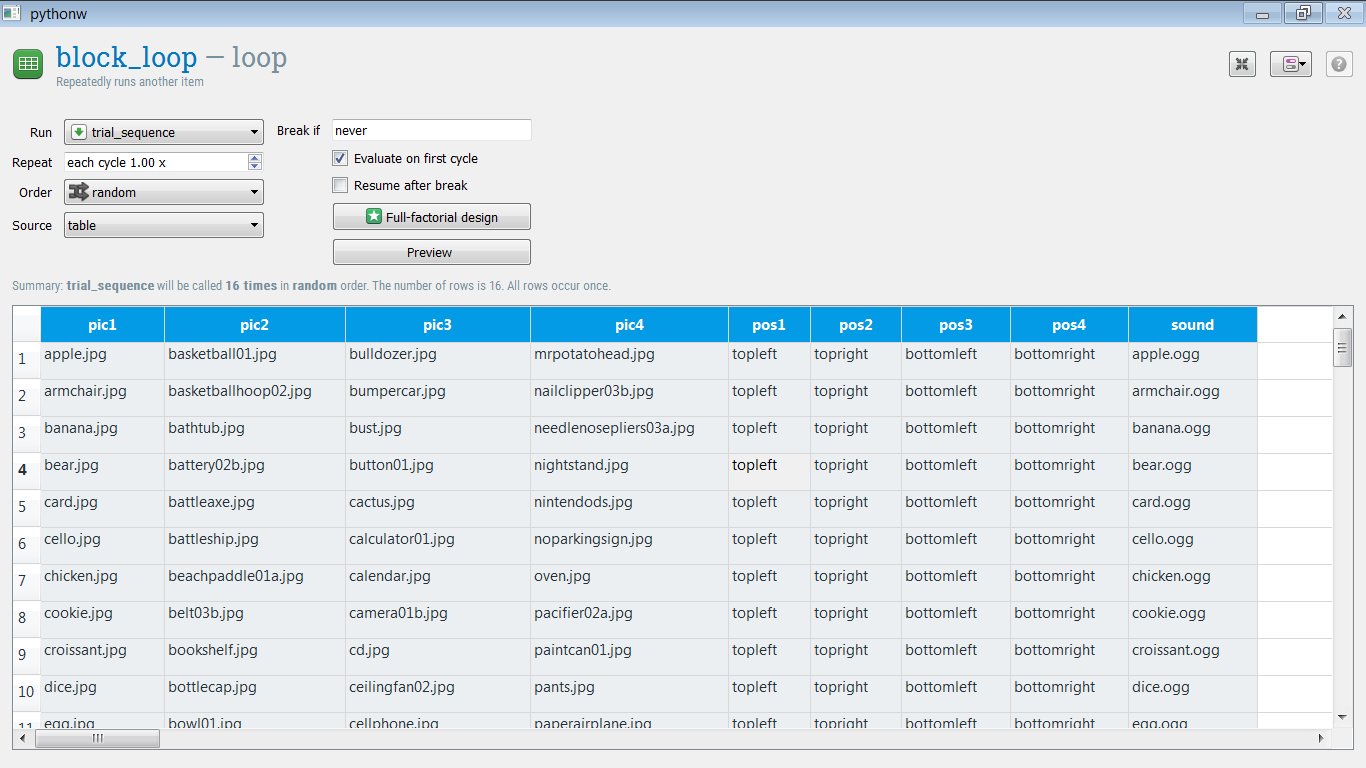
Figure 5. The loop table after all experimental variables have been defined.
Step 5: Apply advanced loop operations
Although you have now defined all experimental variables, the loop table is not finished yet! Let's see what's wrong:
Positions
pos1 is always the top left, meaning that pic1 (the target object) is always presented at the top left of the display! (Assuming that we will implement our trial sequence such that these positions are used in that way.) And the same is true for pos2, pos3, and pos4.
We can fix this by horizontal shuffling of the pos[x] columns. That is, for each row, we randomly swap the values of these rows, such that this:
pos1        pos2         pos3        pos4
topleft     topright     bottomleft  bottomright
topleft     topright     bottomleft  bottomright
…
Becomes (say) this:
pos1        pos2         pos3        pos4
bottomleft  topleft      topright    bottomright
topright    bottomright  topright    bottomleft
…
To do this, view the script of block_loop, and add the following line of code to the very end of the script:
shuffle_horiz pos1 pos2 pos3 pos4
And click 'Apply and close'. If you now click on 'Preview', you will get a preview of what your loop table might look like if the experiment were actually run. And you will see that the pos[x] columns are horizontally shuffled, meaning that the pictures will be shown at random positions!
Distractors
The distactor pictures are always linked to the same target object. For example, 'basketball01.jpg' always occurs together with the target 'apple.jpg'. But this is not what we want! Rather, we want the pairing between distactors and targets to be random, and different for all participants. (Except if by chance an identical pairing occurs for two participants.)
We can fix this by vertical shuffling of the pic2, pic3, and pic4 columns. That is, the order of each of these columns should be shuffled independently. To do this, view the script again, and add the following lines to the very end of the script:
shuffle pic2
shuffle pic3
shuffle pic4
And click 'Apply and close'. If you now click on 'Preview', you will see that the loop table is properly randomized!
For more information about advanced loop operations, see:
Question
At this point, you may wonder why we do not also need to horizontally shuffle the pic2, pic3, and pic4 columns. But we don't! Do you know why not?
Step 6: Create the trial sequence
As shown in Figure 1, our trial sequence is simple, and consists of:
- central fixation dot (a
sketchpad) - After 1000 ms: stimulus display (another
sketchpad) - After 1000 ms: start sound playback (a
sampler) while stimulus displays remains on screen - After 5000 ms: trial end
For now, the trial sequence is therefore purely sequential, and we could implement it using only a sequence, as we've done in other tutorials. However, as one of the Extra Assignments, we want to analyze eye position during the trial sequence; in other words, later we'll want to do two things in parallel, and therefore we need a coroutines item. (Even if for now we won't do anything that requires this.)
So we want to have the following structure:
- trial_sequence should contain a
coroutinesitem (let's call it trial_coroutines) followed by aloggeritem. - trial_coroutines should have a duration of 7000 ms, and contain three items:
- A
sketchpadfor the fixation dot (let's call it fixation_dot) that is shown after 0 ms- A
sketchpadfor the stimulus display (let's call it objects) that is shown after 1000 ms - A
samplerfor the sound (let's call it spoken_sentence) that is shown after 2000 ms
- A
The structure of your experiment should now look as in Figure 6.
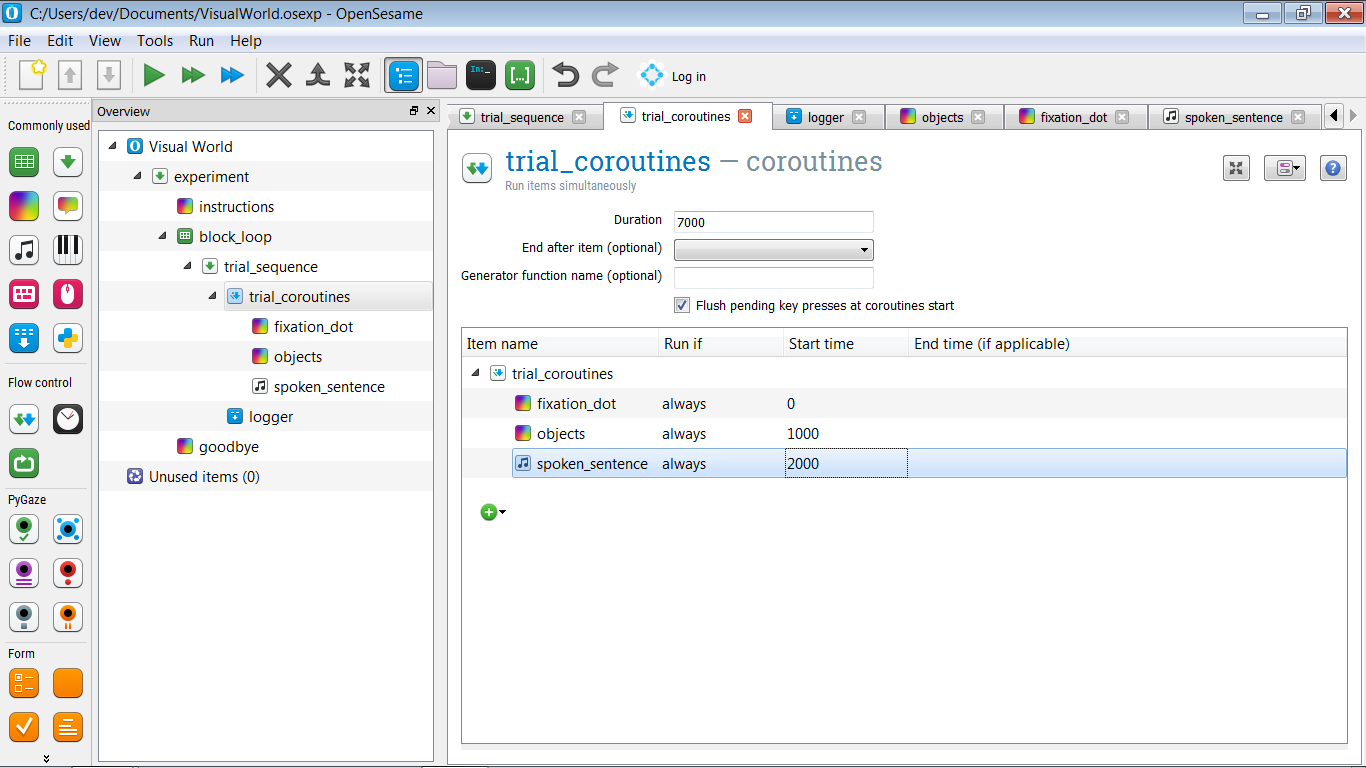
Figure 6. The experiment structure after defining the trial sequence.
Step 7: Define the visual stimuli
fixation_dot
The fixation_dot is easily defined: simply draw a central fixation dot on it.
Note that you don't need to specify the duration of the sketchpad, as you would normally need to do; this is because the item is part of trial_coroutines, and the timing is specified by the start and end time indicated there.
objects
To define the objects, first create a prototype display, an example of what a display might look like on a particular trial. More specifically, draw a central fixation dot, and draw an arbitrary images in each of the four quadrants, as shown in Figure 7.
Also give each of the four objects a name: pic1, pic2, pic3, and pic4. We will use these names in the Extra Assignments to perform a regions-of-interest (ROI) analysis.
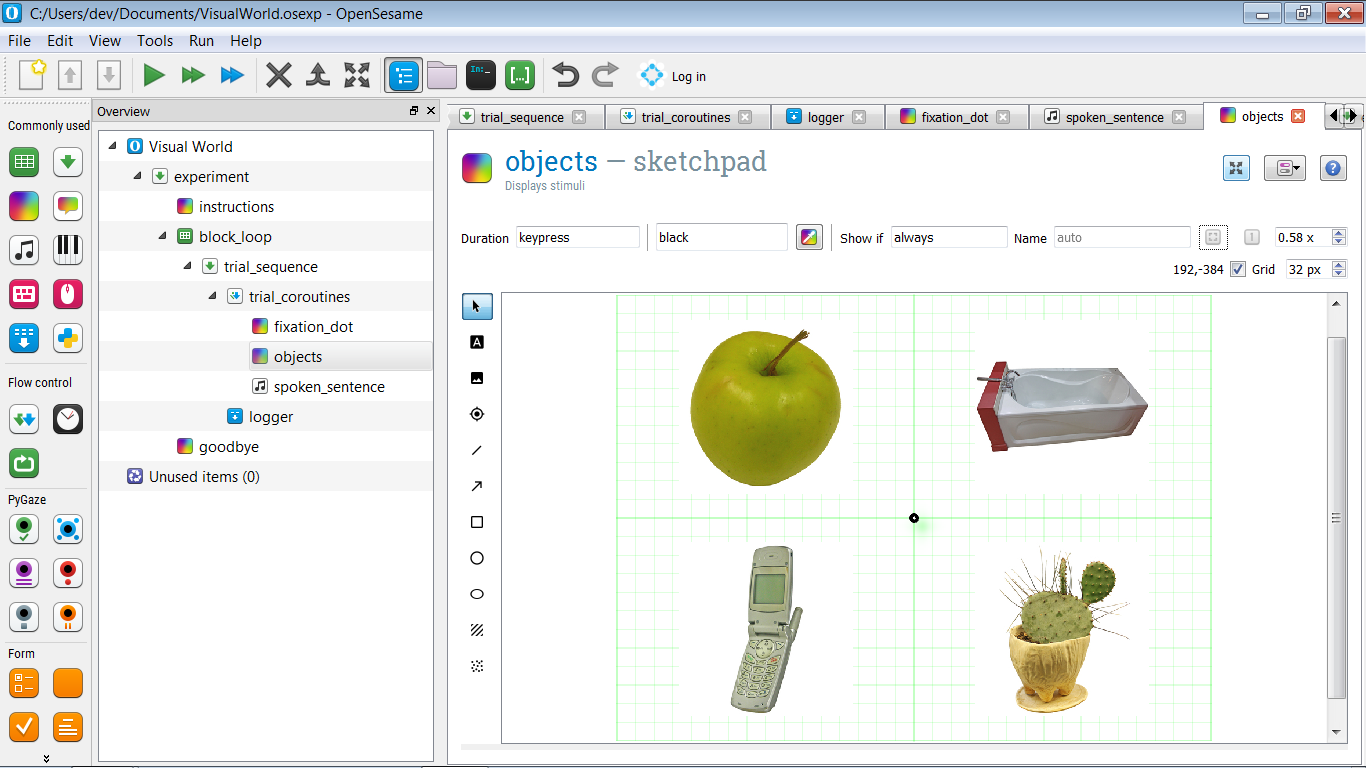
Figure 7. A prototype display with an arbitrary object in each of the four quadrants.
Of course, we don't want to show the same objects over and over again. Rather, we want the pic[x] variables to specify which objects are shown, and the pos[x] variables to specify where these objects are shown. Let's start with the first object: the object in top-left, which in my example is an apple.
View the script and find the line that corresponds to the first object. In my example, this is the following line: name=pic1
draw image center=1 file="apple.jpg" scale=1 show_if=always x=-256 y=-192 z_index=0
Now change file="apple.jpg" to file=[pic1]. This will make sure that the target picture as specified in the pic1 variable is shown, rather than always the same apple.
So how can we use pos1, which has values like 'topleft', 'bottomright', etc., to specify the X and Y coordinates of the image? To do so, we make use of the fact that we can embed Python expressions in OpenSesame script, by using the [=python_expression] notation:
- Change
x=-256tox="[=-256 if 'left' in var.pos1 else 256]" - Change
y=-192toy="[=-192 if 'top' in var.pos1 else 192]"
And do the same for the other images, until the script looks this:
draw fixdot color=black show_if=always style=default x=0 y=0 z_index=0
draw image center=1 file="[pic1]" scale=1 show_if=always x="[=-256 if 'left' in var.pos1 else 256]" y="[=-192 if 'top' in var.pos1 else 192]" z_index=0
draw image center=1 file="[pic2]" scale=1 show_if=always x="[=-256 if 'left' in var.pos2 else 256]" y="[=-192 if 'top' in var.pos2 else 192]" z_index=0
draw image center=1 file="[pic3]" scale=1 show_if=always x="[=-256 if 'left' in var.pos3 else 256]" y="[=-192 if 'top' in var.pos3 else 192]" z_index=0
draw image center=1 file="[pic4]" scale=1 show_if=always x="[=-256 if 'left' in var.pos4 else 256]" y="[=-192 if 'top' in var.pos4 else 192]" z_index=0
Try it yourself: the if expression
If you're not familiar with the Python if expression, which is slightly different from the traditional if statement, open the debug window, and enter the following line:
print('This is shown if True' if True else 'This is shown if False')
What do you see? Now change if True else into if False else and run the line again. What do you see now? Do you get the logic?
Step 8: Define the sound
Defining the sound is easy: simply open the spoken_sentence item, and enter '[sound]' in the 'Sound file' box, indicating that the variable sound specifies the sound file.
Step 9: Add basic eye tracking
Eye tracking is done with the PyGaze plug-ins, which are installed by default in OpenSesame. The general procedure is as follows:
- At the start of the experiment, the eye tracker is initialized and calibrated with the
pygaze_inititem. This is also where you indicate what eye tracker you wan to use. During, it's convenient to select the Advanced Dummy eye tracker, which allows you to simulate eye movements with the mouse. - Before each trial, a drift-correction procedure is performed with the
pygaze_drift_correctitem. During drift correction, a single point is shown on the screen and the participant looks at it. This allows the eye tracker to see how much drift error there is in the eye-position measurement. How this error is treated depends on your eye tracker and settings: - The drift error is either used for a single-point recalibration
- Or a simple check is performed to see if the drift error does not exceed a certain maximum error, giving the possibility to recalibrate if the maximum error is exceeded.
- Next, still before each trial, the eye-tracker is told to start collecting data with the
pygaze_start_recordingitem. You can specify a status message to indicate the start of each trial. It's convenient to include a trial number in this status message (e.g. 'start_trial [count_trial_sequence]'). - At the end of each trial, data is sent to the eye-tracker log file with the
pygaze_logitem. It's convenient to enable the 'Automatically detect and log all variables' option. - Finally, at the very end of each trial, the eye tracker is told to stop recording with the
pygaze_stop_recordingitem.
The structure of your experiment should now look as in Figure 8.
![]()
Figure 8. The structure of the experiment after adding PyGaze items for eye tracking.
Step 10: Define instructions and goodbye screen
We now have a working experiment! But we haven't added any content to the instructions and goodbye items yet. So before you run the experiment, open these items and add some text.
Step 11: Run the experiment!
Congratulations—you have implemented a visual-world paradigm! It's now time to give your experiment a quick test run by clicking on the orange play button (shortcut: Ctrl+Shift+W).
Extra assignments
Extra 1: Define the Semantic Match condition
So far, we have only implemented the Full Match condition, in which the target object (e.g. 'apple') is explicitly mentioned in the spoken sentence (e.g. 'at breakfast, the girl ate an apple').
Now, also implement the Semantic Match condition, in which each target (e.g. 'apple') is paired with a semantically related spoken sentence (e.g. 'at breakfast, the girl at a banana'). The stimuli have been created such that there is one semantically related spoken sentence for each target object.
In every other way, the Semantic Match condition should be identical to the Full Match condition.
And don't forget to create a variable that indicates the condition!
Extra 2: Use Python constants to define coordinates
Right now, the coordinates of the objects have been hard-coded in the objects script, in the sense that the coordinates have been typed directly into the script:
x="[=-256 if 'left' in var.pos1 else 256]"
It's more elegant to define the coordinates (XLEFT, XRIGHT, YTOP, and YBOTTOM) as constants in an inline_script at the start of the experiment, and then refer to these constants in the objects script.
Constants in Python
In computer science, a constant is a variable with a value that you cannot change. In Python, you can always change variables, so constants don't strictly speaking exist in the language. However, if you have a variable that you treat as though it were a constant (i.e. you define it once and never change its value), you typically indicate this by writing the variable name in ALL_CAPS.
Such naming conventions are described in Python's PEP-8 style guidelines:
Extra 3: Analyze eye position online (challenging!)
In trial_coroutines, you can indicate the name of a generator function (see below for an explanation of generators). Let's enter the name roi_analysis here, and also create an inline_script at the start of the experiment in which we define this function.
Here's a partly implemented roi_analysis() function. Can you finish the TODO list?
def roi_analysis():

    # sample_nr will be used to create a different variable name for each
    # 500 ms sample
    sample_nr = 0
    # This first yield indicates that the generator has finished preparing
    yield
    # Retrieve the canvas of the objects sketchpad. We need to do this after
    # the yield statement that signals the end of preparation, because that we
    # are sure that the canvas object has been constructed (which also happens)
    # during preparation.
    canvas = items['objects'].canvas
    while True:
        # We only want to analyze a gaze sample once very 500 ms. This is so
        # that we don't end up with too many columns in the log file. If it's
        # not time to analyze a gaze sample, simply yield and continue.
        if not clock.once_in_a_while(ms=500):
            yield # so that other items in the coroutines can run
            continue
        #
        # TODO:
        #
        # - Get an eye-position coordinate from the eye tracker
        #   (Hint: Use eyetracker.sample())
        # - Check which sketchpad elements are at this coordinate (if any)
        #   (Hint: use canvas.elements_at())
        # - If pic1 (the target object) is among these elements set
        #   var.on_target_[sample_nr] to 1, else to 0
        #   (Hint: use var.set())
See also:
Generator functions in Python
In Python, a generator function is a function with a yield statement. A yield statement is similar to a return statement, in that it stops a function. However, whereas return stops a function permanently, yield merely suspends a function—and the function can later resume from the yield point onward.
Download the experiment
You can download the full experiment from here:
References
Brodeur, M. B., Dionne-Dostie, E., Montreuil, T., Lepage, M., & Op de Beeck, H. P. (2010). The Bank of Standardized Stimuli (BOSS), a new set of 480 normative photos of objects to be used as visual stimuli in cognitive research. PloS ONE, 5(5), e10773. doi:10.1371/journal.pone.0010773
Cooper, R. M. (1974). The control of eye fixation by the meaning of spoken language: A new methodology for the real-time investigation of speech perception, memory, and language processing. Cognitive Psychology, 6(1), 84–107. doi:10.1016/0010-0285(74)90005-X
Dalmaijer, E., Mathôt, S., & Van der Stigchel, S. (2014). PyGaze: An open-source, cross-platform toolbox for minimal-effort programming of eyetracking experiments. Behavior Research Methods, 46(4), 913–921. doi:10.3758/s13428-013-0422-2
Huettig, F., Rommers, J., & Meyer, A. S. (2011). Using the visual world paradigm to study language processing: A review and critical evaluation. Acta Psychologica, 137(2), 151–171. doi:10.1016/j.actpsy.2010.11.003
Mathôt, S., Schreij, D., & Theeuwes, J. (2012). OpenSesame: An open-source, graphical experiment builder for the social sciences. Behavior Research Methods, 44(2), 314–324. doi:10.3758/s13428-011-0168-7