


ESCoP 2017 workshop
- About the workshop
- Screencast
- The tutorial
- Step 1: Download and start OpenSesame
- Step 2: Add a block_loop and trial_sequence
- Step 3: Import images and sound files
- Step 4: Define the experimental variables in the block_loop
- Step 5: Add items to the trial sequence
- Step 6: Define the central fixation dot
- Step 7: Define the animal sound
- Step 8: Define the animal picture
- Step 9: Define the response
- Step 10: Define the correct response
- Step 11: Define the logger
- Step 12: Add per-trial feedback
- Step 13: Add instructions and goodbye screens
- Step 15: Finished!
- Extra assignments
- References
About the workshop
This OpenSesame workshop took place as a pre-conference event before ESCoP 2017.
The workshop consisted of two main parts. In the first part, corresponding to the Tutorial below, we created a complete experiment together. In the second part, corresponding to the Extra assignments below, the workshop participants improved this experiment by themselves, based on a few suggestions.
You can download the full experiment, including the solutions of the extra assignments here:
When?
- September 3rd, 2017
- JASP: 09:00 - 12:00
- OpenSesame: 13:00 - 16:00
Where?
- University Potsdam
- Campus III - Griebnitzsee
- Building 6 (Lecture hall building)
- August-Bebel-Straße 89
- 14482 Potsdam
- Germany
More info
- Conference site: http://www.escop2017.org/program
- JASP site: https://jasp-stats.org/
Screencast
The tutorial
Figure 1. Don't be fooled by meowing capybaras! (Source)
_2560x1600.jpg)
- About the workshop
- Screencast
- The tutorial
- Step 1: Download and start OpenSesame
- Step 2: Add a block_loop and trial_sequence
- Step 3: Import images and sound files
- Step 4: Define the experimental variables in the block_loop
- Step 5: Add items to the trial sequence
- Step 6: Define the central fixation dot
- Step 7: Define the animal sound
- Step 8: Define the animal picture
- Step 9: Define the response
- Step 10: Define the correct response
- Step 11: Define the logger
- Step 12: Add per-trial feedback
- Step 13: Add instructions and goodbye screens
- Step 15: Finished!
- Extra assignments
- References
We will create a simple animal-filled multisensory integration task, in which participants see a picture of a dog, cat, or capybara. A meow or a bark is played while the picture is shown. The participant reports whether a dog or a cat is shown, by pressing the right or the left key. No response should be given when a capybara is shown: those are catch trials.
To make things more fun, we will design the experiment so that you can run it on OSWeb, an online runtime for OpenSesame experiments (which is still a work in progress, but it works for basic experiments).
We make two simple predictions:
- Participants should be faster to identify dogs when a barking sound is played, and faster to identify cats when a meowing sound is played. In other words, we expect a multisensory congruency effect.
- When participants see a capybara, they are more likely to report seeing a dog when they hear a bark, and more likely to report seeing a cat when they hear a meow. In other words, false alarms are biased by the sound.
Step 1: Download and start OpenSesame
OpenSesame is available for Windows, Linux, Mac OS, and Android (runtime only). This tutorial is written for OpenSesame 3.1.X, and you can use either the version based on Python 2.7 (default) or Python 3.5. You can download OpenSesame from here:
When you start OpenSesame, you will be given a choice of template experiments, and (if any) a list of recently opened experiments (see Figure 2).
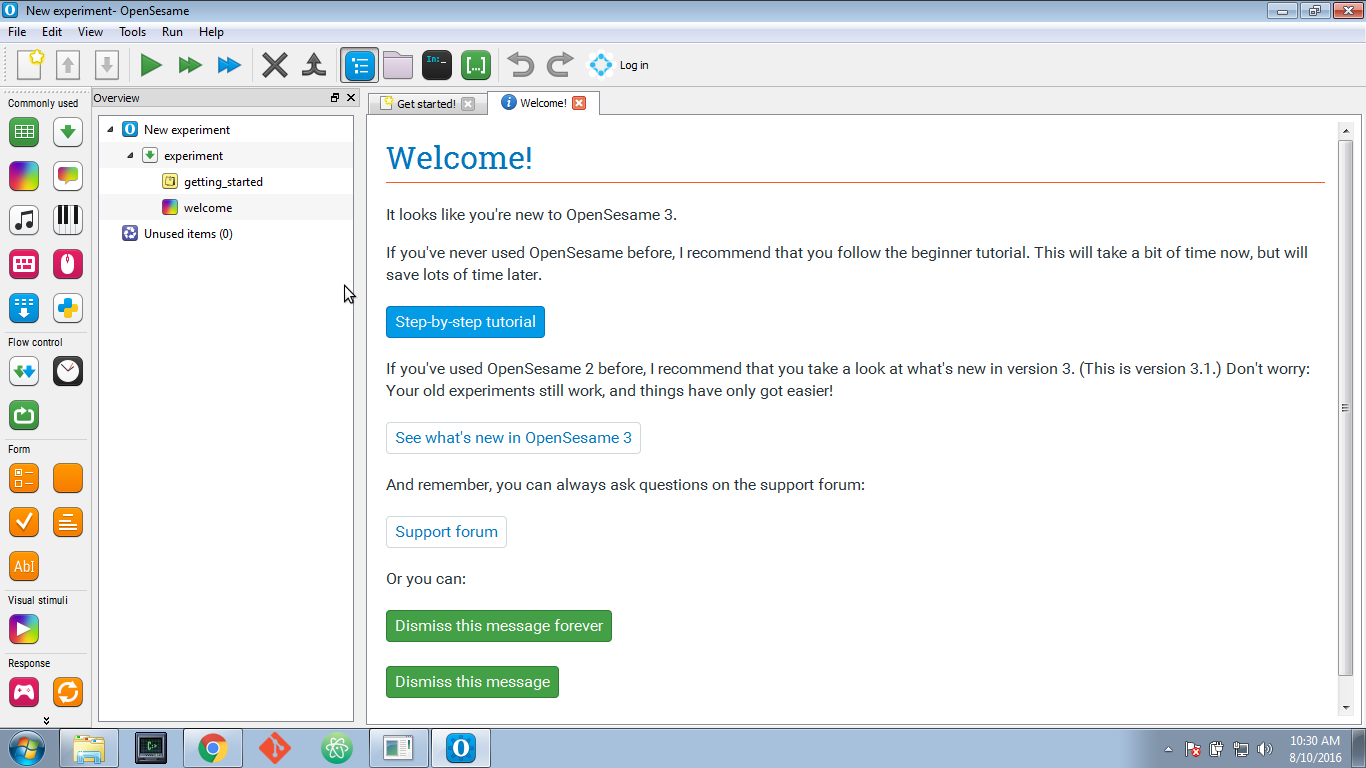
Figure 2. The OpenSesame window on start-up.
The Extended template provides a good starting point for creating Android-based experiments. However, in this tutorial we will create the entire experiment from scratch. Therefore, we will continue with the 'default template', which is already loaded when OpenSesame is launched (Figure 3). Therefore, simply close the 'Get started!' and (if shown) 'Welcome!' tabs.
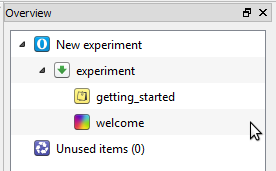
Figure 3. The structure of the 'Default template' as seen in the overview area.
Background box 1: Basics
OpenSesame experiments are collections of items. An item is a small chunk of functionality that, for example, can be used to present visual stimuli (the sketchpad item) or to record key presses (the keyboard_response item). Items have a type and a name. For example, you might have two items of the type keyboard_response with the names t1_response and t2_response. To make the distinction between item types and item names clear, we will use this_style for types, and this style for names.
To give structure to your experiment, two types of items are especially important: the loop and the sequence. Understanding how you can combine loops and sequences to build experiments is perhaps the trickiest part of working with OpenSesame, so let's get that out of the way first.
A loop is where, in most cases, you define your independent variables. In a loop you can create a table in which each column corresponds to a variable, and each row corresponds to a single run of the 'item to run'. To make this more concrete, let's consider the following block_loop (unrelated to this tutorial):

Figure 4. An example of variables defined in a loop table. (This example is not related to the experiment created in this tutorial.)
This block_loop will execute trial_sequence four times. Once while soa is 100 and target is 'F', once while soa is 100 and target is 'H', etc. The order in which the rows are walked through is random by default, but can also be set to sequential in the top-right of the tab.
A sequence consists of a series of items that are executed one after another. A prototypical sequence is the trial_sequence, which corresponds to a single trial. For example, a basic trial_sequence might consist of a sketchpad, to present a stimulus, a keyboard_response, to collect a response, and a logger, to write the trial information to the log file.
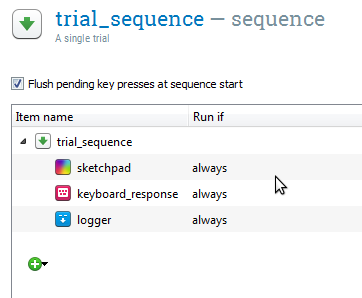
Figure 5. An example of a sequence item used as a trial sequence. (This example is not related to the experiment created in this tutorial.)
You can combine loops and sequences in a hierarchical way, to create trial blocks, and practice and experimental phases. For example, the trial_sequence is called by the block_loop. Together, these correspond to a single block of trials. One level up, the block_sequence is called by the practice_loop. Together, these correspond to the practice phase of the experiment.
Step 2: Add a block_loop and trial_sequence
The default template starts with three items: A notepad called getting_started, a sketchpad called welcome, and a sequence called experiment. We don't need getting_started and welcome, so let's remove these right away. To do so, right-click on these items and select 'Delete'. Don't remove experiment, because it is the entry for the experiment (i.e. the first item that is called when the experiment is started).
Our experiment will have a very simple structure. At the top of the hierarchy is a loop, which we will call block_loop. The block_loop is the place where we will define our independent variables (see also Background box 1). To add a loop to your experiment, drag the loop icon from the item toolbar onto the experiment item in the overview area.
A loop item needs another item to run; usually, and in this case as well, this is a sequence. Drag the sequence item from the item toolbar onto the new_loop item in the overview area. OpenSesame will ask whether you want to insert the sequence into or after the loop. Select 'Insert into new_loop'.
By default, items have names such as new_sequence, new_loop, new_sequence_2, etc. These names are not very informative, and it is good practice to rename them. Item names must consist of alphanumeric characters and/ or underscores. To rename an item, double-click on the item in the overview area. Rename new_sequence to trial_sequence to indicate that it will correspond to a single trial. Rename new_loop to block_loop to indicate that will correspond to a block of trials.
The overview area of our experiment now looks as in Figure 6.
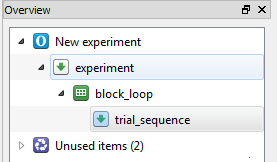
Figure 6. The overview area at the end of Step 2.
Background box 3: Unused items
Tip — Deleted items are still available in the Unused Items bin, until you select 'Permanently delete unused items' in the Unused Items tab. You can re-add deleted items to your experiment by dragging them out of the Unused Items bin into a sequence or loop.
Step 3: Import images and sound files
For this experiment, we will use images of cats, dogs, and capybaras. We will also use sound samples of meows and barks. You can download all the required files from here:
Download stimuli.zip and extract it somewhere (to your desktop, for example). Next, in OpenSesame, click on the 'Show file pool' button in the main toolbar (or: Menu →View → Show file pool). This will show the file pool, by default on the right side of the window. The easiest way to add the stimuli to the file pool is by dragging them from the desktop (or wherever you have extracted the files to) into the file pool. Alternatively, you can click on the '+' button in the file pool and add files using the file-selection dialog that appears. The file pool will automatically be saved with your experiment.
After you have added all stimuli, your file pool looks as in Figure 7.
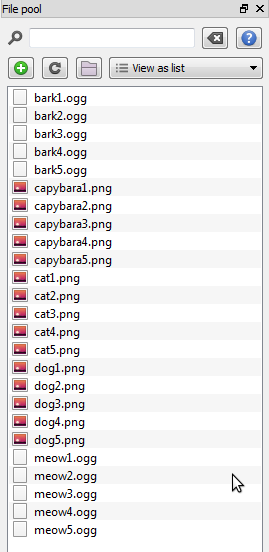
Figure 7. The file pool at the end of Step 3.
Step 4: Define the experimental variables in the block_loop
Conceptually, our experiment has a fully crossed 3×2 design: We have three types of visual stimuli (cats, dogs, and capybaras) which occur in combination with two types of auditory stimuli (meows and barks). However, we have five exemplars for each stimulus type: five meow sounds, five capybara pictures, etc. From a technical point of view, it therefore makes sense to treat our experiment as a 5×5×3×2 design, in which picture number and sound number are factors with five levels.
OpenSesame is very good at generating full-factorial designs. First, open block_loop by clicking on it in the overview area. Next, click on the Full-Factorial Design button. This will open a wizard for generating full-factorial designs, which works in a straightforward way: Every column corresponds to an experimental variable (i.e. a factor). The first row is the name of the variable, the rows below contain all possible values (i.e. levels). In our case, we can specify our 5×5×3×2 design as shown in Figure 8.
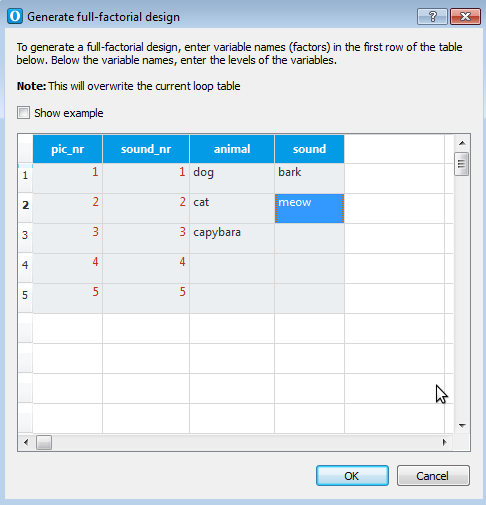
Figure 8. The loop wizard generates full-factorial designs.
After clicking 'Ok', you will see that there is now a loop table with four rows, one for each experimental variable. There are 150 cycles (=5×5×3×2), which means that we have 150 unique trials. Your loop table now looks as in Figure 9.

Figure 9. The loop table at the end of Step 4.
Step 5: Add items to the trial sequence
Open trial_sequence, which is still empty. It's time to add some items! Our basic trial_sequence is:
- A sketchpad to display a central fixation dot for 500 ms
- A sampler to play an animal sound
- A sketchpad to display an animal picture
- A keyboard_response to collect a response
- A logger to write the data to file
To add these items, simply drag them one by one from the item toolbar into the trial_sequence. If you accidentally drop items in the wrong place, you can simply re-order them by dragging and dropping. Once all items are in the correct order, give each of them a sensible name. The overview area now looks as in Figure 10.

Figure 10. The overview area at the end of Step 5.
Step 6: Define the central fixation dot
Click on fixation_dot in the overview area. This opens a basic drawing board that you can use to design your visual stimuli. To draw a central fixation dot, first click on the crosshair icon, and then click on the center of the display, i.e. at position (0, 0).
We also need to specify for how long the fixation dot is visible. To do so, change the duration from 'keypress' to 495 ms, in order to specify a 500 ms duration. (See Background box 4 for an explanation.)
The fixation_dot item now looks as in Figure 11.
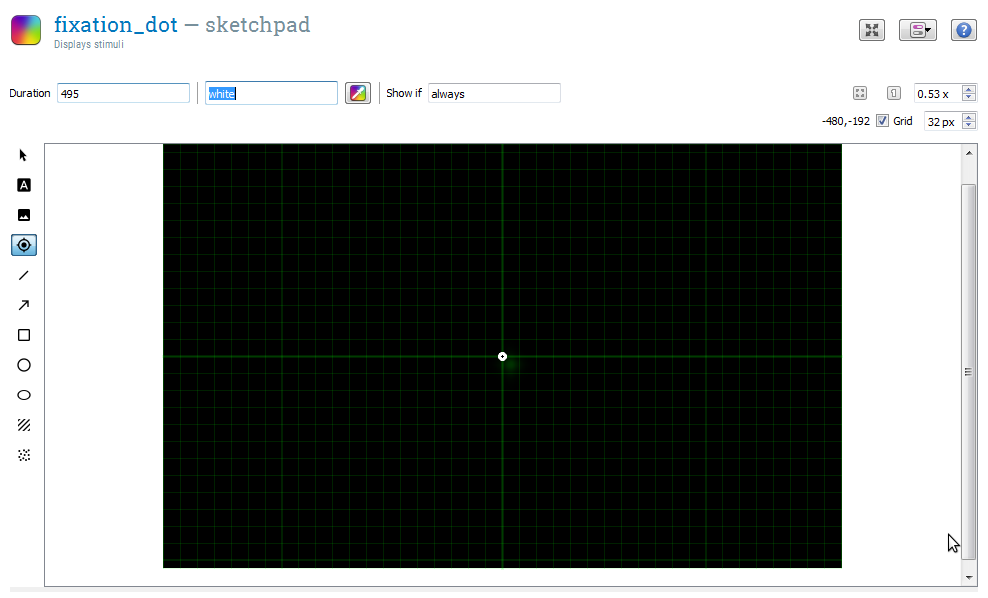
Figure 11. The fixation_dot item at the end of Step 6.
Background box 4: Selecting the correct duration
Why specify a duration of 495 if we want a duration of 500 ms? The reason for this is that the actual display-presentation duration is always rounded up to a value that is compatible with your monitor's refresh rate. This may sound complicated, but for most purposes the following rules of thumb are sufficient:
- Choose a duration that is possible given your monitor's refresh rate. For example, if your monitor's refresh rate is 60 Hz, this means that every frame lasts 16.7 ms (=1000 ms/60 Hz). Therefore, on a 60 Hz monitor, you should always select a duration that is a multiple of 16.7 ms, such as 16.7, 33.3, 50, 100, etc.
- In the duration field of the sketchpad specify a duration that is a few milliseconds shorter than what you're aiming for. So if you want to present a sketchpad for 50 ms, choose a duration of 45. If you want to present a sketchpad for 1000 ms, choose a duration of 995. Etcetera.
For a detailed discussion of experimental timing, see:
Step 7: Define the animal sound
Open animal_sound. The sampler item provides a number of options, the most important being the sound file that should be played. Click on the browse button to open the file-pool selection dialog, and select one of the sound files, such as bark1.ogg.
Of course, we don't want to play the same sound over-and-over again! Instead, we want to select a sound based on the variables sound and sound_nr that we have defined in the block_loop (Step 5). To do this, simply replace the part of the string that you want to have depend on a variable by the name of that variable between square brackets. More specifically, 'bark1.ogg' becomes '[sound][sound_nr].ogg', because we want to replace 'bark' by the value of the variable sound and '1' by the value of sound_nr.
We also need to change the duration of the sampler. By default, the duration is 'sound', which means that the experiment will pause while the sound is playing. Change the duration to 0. This does not mean that the sound will be played for only 0 ms, but that the experiment will advance right away to the next item, while the sound continues to play in the background. The item animal_sound now looks as shown in Figure 12.
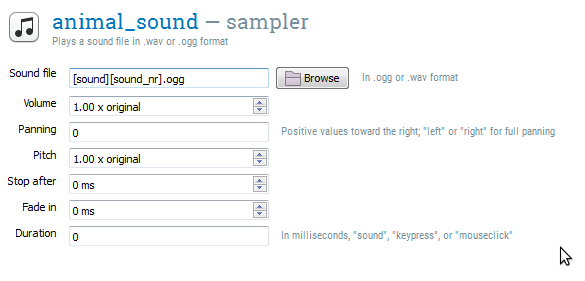
Figure 12. The item animal_sound at the end of Step 7.
Background box 5: Variables
For more information about using variables, see:
Step 8: Define the animal picture
Open animal_picture. Select the image tool by clicking on the button with the landscape-like icon. Click on the center (0, 0) of the display. In the File Pool dialog that appears, select capybara1.png. The capybara's sideways glance will now lazily stare at you from the center of the display. But of course, we don't always want to show the same capybara. Instead, we want to have the image depend on the variables animal and pic_nr that we have defined in the block_loop (Step 5).
We can use essentially the same trick as we did for animal_sound, although things work slightly differently for images. First, right-click on the capybara and select 'Edit script'. This allows you to edit the following line of OpenSesame script that corresponds to the capybara picture:
draw image center=1 file="capybara1.png" scale=1 show_if=always x=0 y=0 z_index=0
Now change the name of image file from 'capybara.png' to '[animal][pic_nr].png':
draw image center=1 file="[animal][pic_nr].png" scale=1 show_if=always x=0 y=0 z_index=0
Click on 'Ok' to apply the change. The capybara is now gone, replaced by a placeholder image, and OpenSesame tells you that one object is not shown, because it is defined using variables. Don't worry, it will be shown during the experiment!
To remind the participant of the task, also add two response circles, one marked 'dog' on the left side of the screen, and one marked 'cat' on the right side. I'm sure you will able to figure out how to do this with the sketchpad drawing tools. My rendition is shown in Figure 13. Note that these response circles are purely visual, and we still need to explicitly define the response criteria (see Step 10).
Finally, set 'Duration' field to '0'. This does not mean that the picture is presented for only 0 ms, but that the experiment will advance to the next item (response) right away. Since response waits for a response, but doesn't change what's on the screen, the target will remain visible until a response has been given.
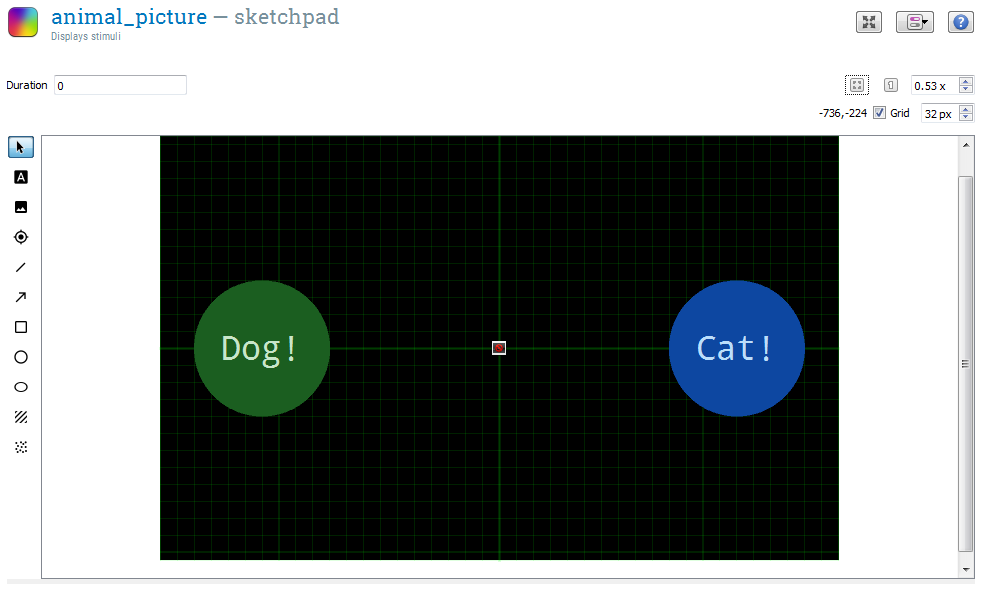
Figure 13. The animal_picture sketchpad at the end of Step 8.
Background box 6: Image formats
Tip -- OpenSesame can handle a wide variety of image formats. However, some (non-standard) .bmp formats are known to cause trouble. If you find that a .bmp image is not shown, you may want to consider using a different format, such as .png. You can convert images easily with free tools such as GIMP.
Step 9: Define the response
Open the response item. This is a keyboard_response item, which collects a single key press. There are a few options:
- Correct response — let's skip this for now; we'll get back to it in Step 10.
- Allowed responses is a semicolon-separated list of keys that are accepted. Let's set this to left;right to indicate that only the left and right arrow keys are accepted. (The escape key pauses the experiment, and is always accepted!)
- Timeout indicates a duration after which the response will be set to 'None', and the experiment will continue. A timeout is important in our experiment, because participants need to have the opportunity to not respond when they see a capybara. So let's set the timeout to 2000.
- Flush pending keypresses indicates that we should only accept new key presses. This is best left enabled (it is by default).
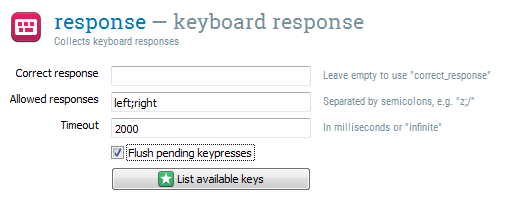
Figure 14. The response keyboard_response at the end of Step 9.
Step 10: Define the correct response
So far, we haven't defined the correct response for each trial. This is done by defining a correct_response variable. You can do this either by creating a correct_response column in a loop table (here the block_loop) and entering the correct responses manually, or by specifying the correct response in a Python inline_script item—which is what we will do here.
First, drag an inline_script item from the item toolbar and insert it at the top of the trial_sequence. (Don't forget to give it a sensible name!) You now see a text editor with two tabs: a Run tab, and a Prepare tab. You can enter Python code in both tabs, but this code is executed during different phases of the experiment. The Prepare phase is executed first whenever a sequence is executed; this gives all items in the sequence a chance to perform time consuming operations that could otherwise slow down the experiment at time-sensitive moments. Next, the Run phase is executed; this is where the action happens, such as showing a display, collecting a response, etc.
For more information, see:
Defining a correct response is a clear example of something that should be done in the Prepare phase. The following script will do the trick:
if var.animal == 'dog':
    var.correct_response = 'left'
elif var.animal == 'cat':
    var.correct_response = 'right'
elif var.animal == 'capybara':
    var.correct_response = None # A timeout is coded as None!
else:
    raise ValueError('Invalid animal: %s' % var.animal)
This code is almost plain English, but a few pointers may be useful:
- In Python script, experimental variables are not referred to using square brackets (
[my_variable]), as they are elsewhere in OpenSesame, but as properties of thevarobject (i.e.var.my_variable). - We also consider the possibility that the animal is neither a dog, a cat, nor a capybara. Of course this should never happen, but by taking this possibility into account, we protect ourselves against typos and other bugs. This is called 'defensive programming'.
Step 11: Define the logger
We don't need to configure the logger, because its default settings are fine; but let's take a look at it anyway. Click on logger in the overview area to open it. You see that the option 'Log all variables (recommended)' is selected. This means that OpenSesame logs everything, which is fine.
Background box 8: Always check your data!
The one tip to rule them all — Always triple-check whether all necessary variables are logged in your experiment! The best way to check this is to run the experiment and investigate the resulting log files.
Step 12: Add per-trial feedback
It is good practice to inform the participant of whether the response was correct or not. To avoid disrupting the flow of the experiment, this type of immediate feedback should be as unobtrusive as possible. Here, we will do this by briefly showing a green fixation dot after a correct response, and a red fixation dot after an incorrect response.
First, add two new sketchpads to the end of the trial_sequence. Rename the first one to feedback_correct and the second one to feedback_incorrect. Of course, we want to run only one of these items on any given trial, depending on whether or not the response was correct. To do this, we can make use of the built-in variable correct, which has the value 0 after an incorrect response, and 1 after a correct response. (Provided that we have defined correct_response, which we did in Step 11.) To tell the trial_sequence that the feedback_correct item should be called only when the response is correct, we use the following run-if statement:
[correct] = 1
The square brackets around correct indicate that this is the name of a variable, and not simply the string 'correct'. Analogously, we use the following run-if statement for the feedback_incorrect item:
[correct] = 0
We still need to give content to the feedback_correct and feedback_incorrect items. To do this, simply open the items and draw a green or red fixation dot in the center. Also, don't forget to change the durations from 'keypress' to some brief interval, such as 195.
The trial_sequence now looks as shown in Figure 15.
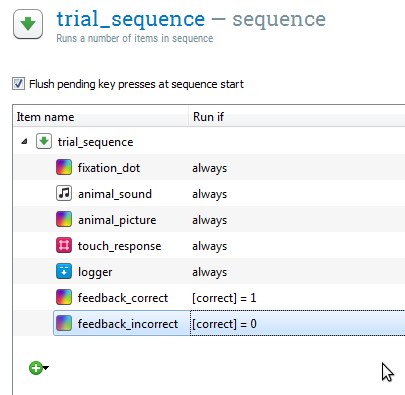
Figure 15. The trial_sequence at the end of Step 12.
Background box 9: Conditional statements
For more information about conditional 'if' statements, see:
Step 13: Add instructions and goodbye screens
A good experiment always start with an instruction screen, and ends by thanking the participant for his or her time. The easiest way to do this in OpenSesame is with form_text_display items.
Drag two form_text_displays into the main experiment sequence. One should be at the very start, and renamed to form_instructions. The other should be at the very end, and renamed to form_finished. Now simply add some appropriate text to these forms, for example as shown in Figure 16.
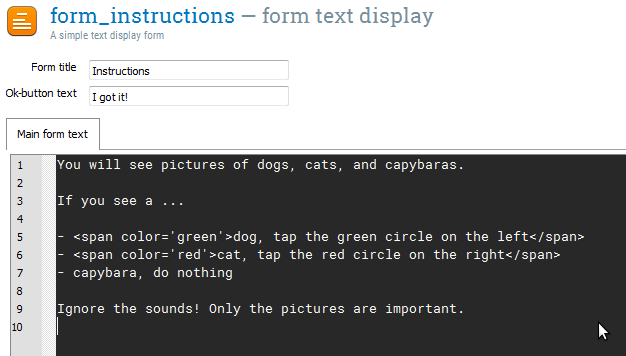
Figure 16. The form_instructions item at the end of Step 13.
Background box 10: Text
Tip -- Forms, and text more generally, support a subset of HTML tags to allow for text formatting (i.e. colors, boldface, etc.). This is described here:
Step 15: Finished!
Your experiment is now finished! Click on the 'Run fullscreen' (Control+R) button in the main toolbar to give it a test run. You can also upload the experiment to OSWeb (http://osweb.cogsci.nl/) and run it online!
Background box 11: Quick run
Tip — A test run is executed even faster by clicking the orange 'Run in window' button, which doesn't ask you how to save the logfile (and should therefore only be used for testing purposes).
Extra assignments
The solutions to these extra assingments can be found in the experiment file.
Extra 1: Add an instruction and goodbye screen
Tips:
- sketchpad and form_text_display can present text
- Good instructions are brief and concrete
Extra 2: Analyze the data
Tips:
- Run the experiment once on yourself
- Open the data file in Excel, LibreOffice, or JASP
Extra 3: Divide the trials into multiple blocks
Tips:
- Use a break-if statement to break the loop after (say) 15 trials:
([count_trial_sequence]+1) % 15 = 0 - Add a new loop-sequence structure above the block_loop to repeat a block of trials multiple times
- Disable the 'Evaluate on first cycle' option in the block_loop so that the break-if statement isn't evaluated when the
count_trial_sequencevariable doesn't yet exist - Enable the 'Resume after break' option in the block_loop to randomly sample without replacement from the loop table
Extra 4: Add accuracy and average response time feedback after every block
First do Extra 3!
Tips:
- Use a feedback item to provide feedback
- The variables
accandavg_rtcontain the running accuracy and average reaction time
Extra 5: Counterbalance the response rule
Tips:
- The variable
subject_parityis 'even' or 'odd' - This requires a simple inline_script
- Make sure that the instructions match the response rule!
References
Mathôt, S., Schreij, D., & Theeuwes, J. (2012). OpenSesame: An open-source, graphical experiment builder for the social sciences. Behavior Research Methods, 44(2), 314–324. doi:10.3758/s13428-011-0168-7