


Kurt Lewin Institute Workshop 2020 Part 2
Part 2 Kurt Lewin Institute Workshop 2020

Figure 1.
Gaze cuing
In this tutorial, you will create a gaze-cuing experiment, as introduced by Friesen and Kingstone (1998). In this experiment, a face is presented in the center of the screen (Figure 2). This face looks either to the right or to the left. A target letter (an 'F' or an 'H') is presented to the left or right of the face. A distractor stimulus (the letter 'X') is presented on the other side of the face. The task is to indicate as quickly as possible whether the target letter is an 'F' or an 'H'. In the congruent condition, the face looks at the target. In the incongruent condition, the face looks at the distractor.
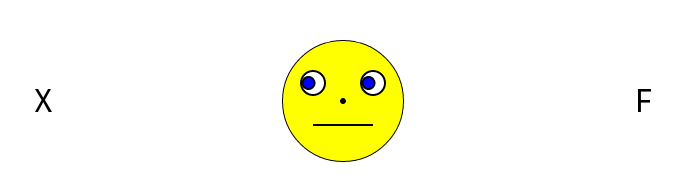
Figure 2. The gaze-cuing paradigm (Friesen and Kingstone, 1998) that you will implement in this tutorial. This example depicts a trial in the incongruent condition, because the smiley looks at the distractor ('X') and not at the target ('F').
Prediction
As you may have guessed, the typical finding is that participants respond faster in the congruent condition, compared to to the incongruent condition, even though the direction of gaze is not predictive of the target location. This shows that our attention is automatically guided by other people's gaze, even in situations where this doesn't serve any purpose. (And even when the face is just a smiley!)
The experiment consists of a practice and an experimental phase. Visual feedback will be presented after every block of trials, and a sound will be played after every incorrect response.
Experimental design
This design:
- is within-subject, because all participants do all conditions
- is fully-crossed (or full factorial), because all combinations of conditions occur
- has three factors (or independent variables):
- gaze side with two levels (left, right)
- target side with two levels (left, right)
- target letter with two levels (F, H)
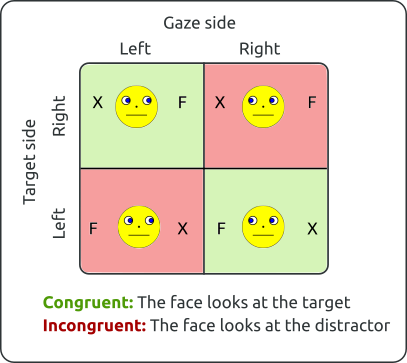
Figure 3. The factors in the current experiment are fully crossed. This figure shows the four combinations of the factors gaze side and target side.
Step 1: Create the main sequence
When you start OpenSesame, you'll see a 'Get started!' tab, which shows you a list of templates as well as recently opened experiments (Figure 4). As before, we will use the 'Extended template'.
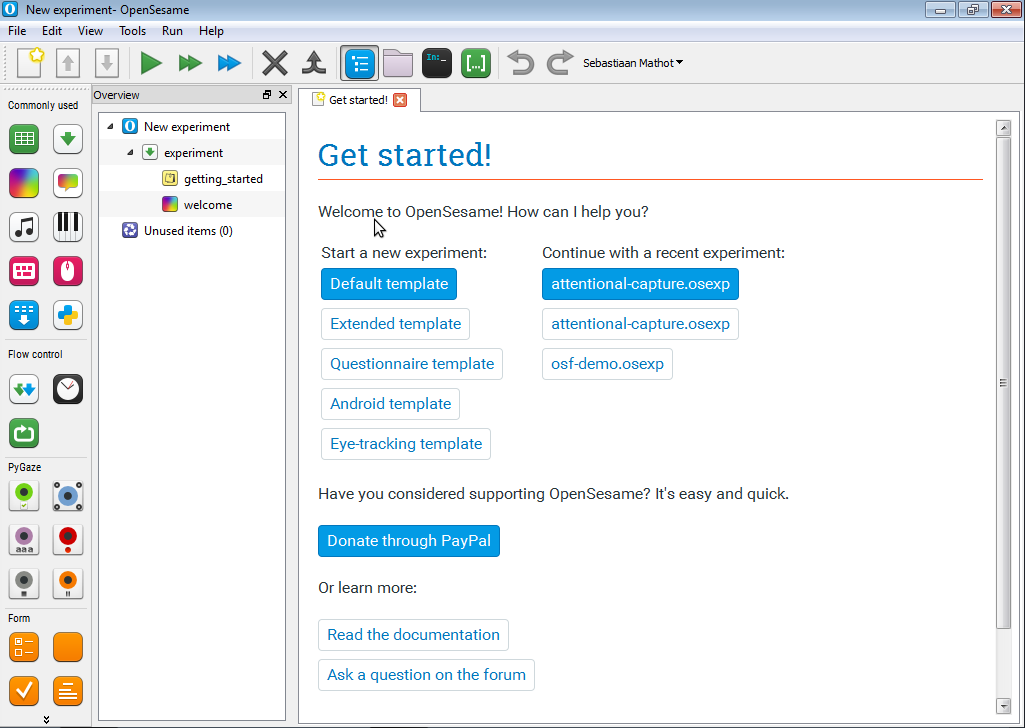
Figure 4. OpenSesame's welcome window. Here, we use the 'extended template'.
After opening the extended template, we start by saving our experiment. To do this, click File -> Save, brows to the appropriate folder and give your experiment a meaningful name.
Figure 5. The 'Get started' dialog on OpenSesame start-up.
Tip -- Figure 6 schematically shows the structure of the experiment that you will create. If you get confused during the tutorial, you can refer to Figure 6 to see where you are.
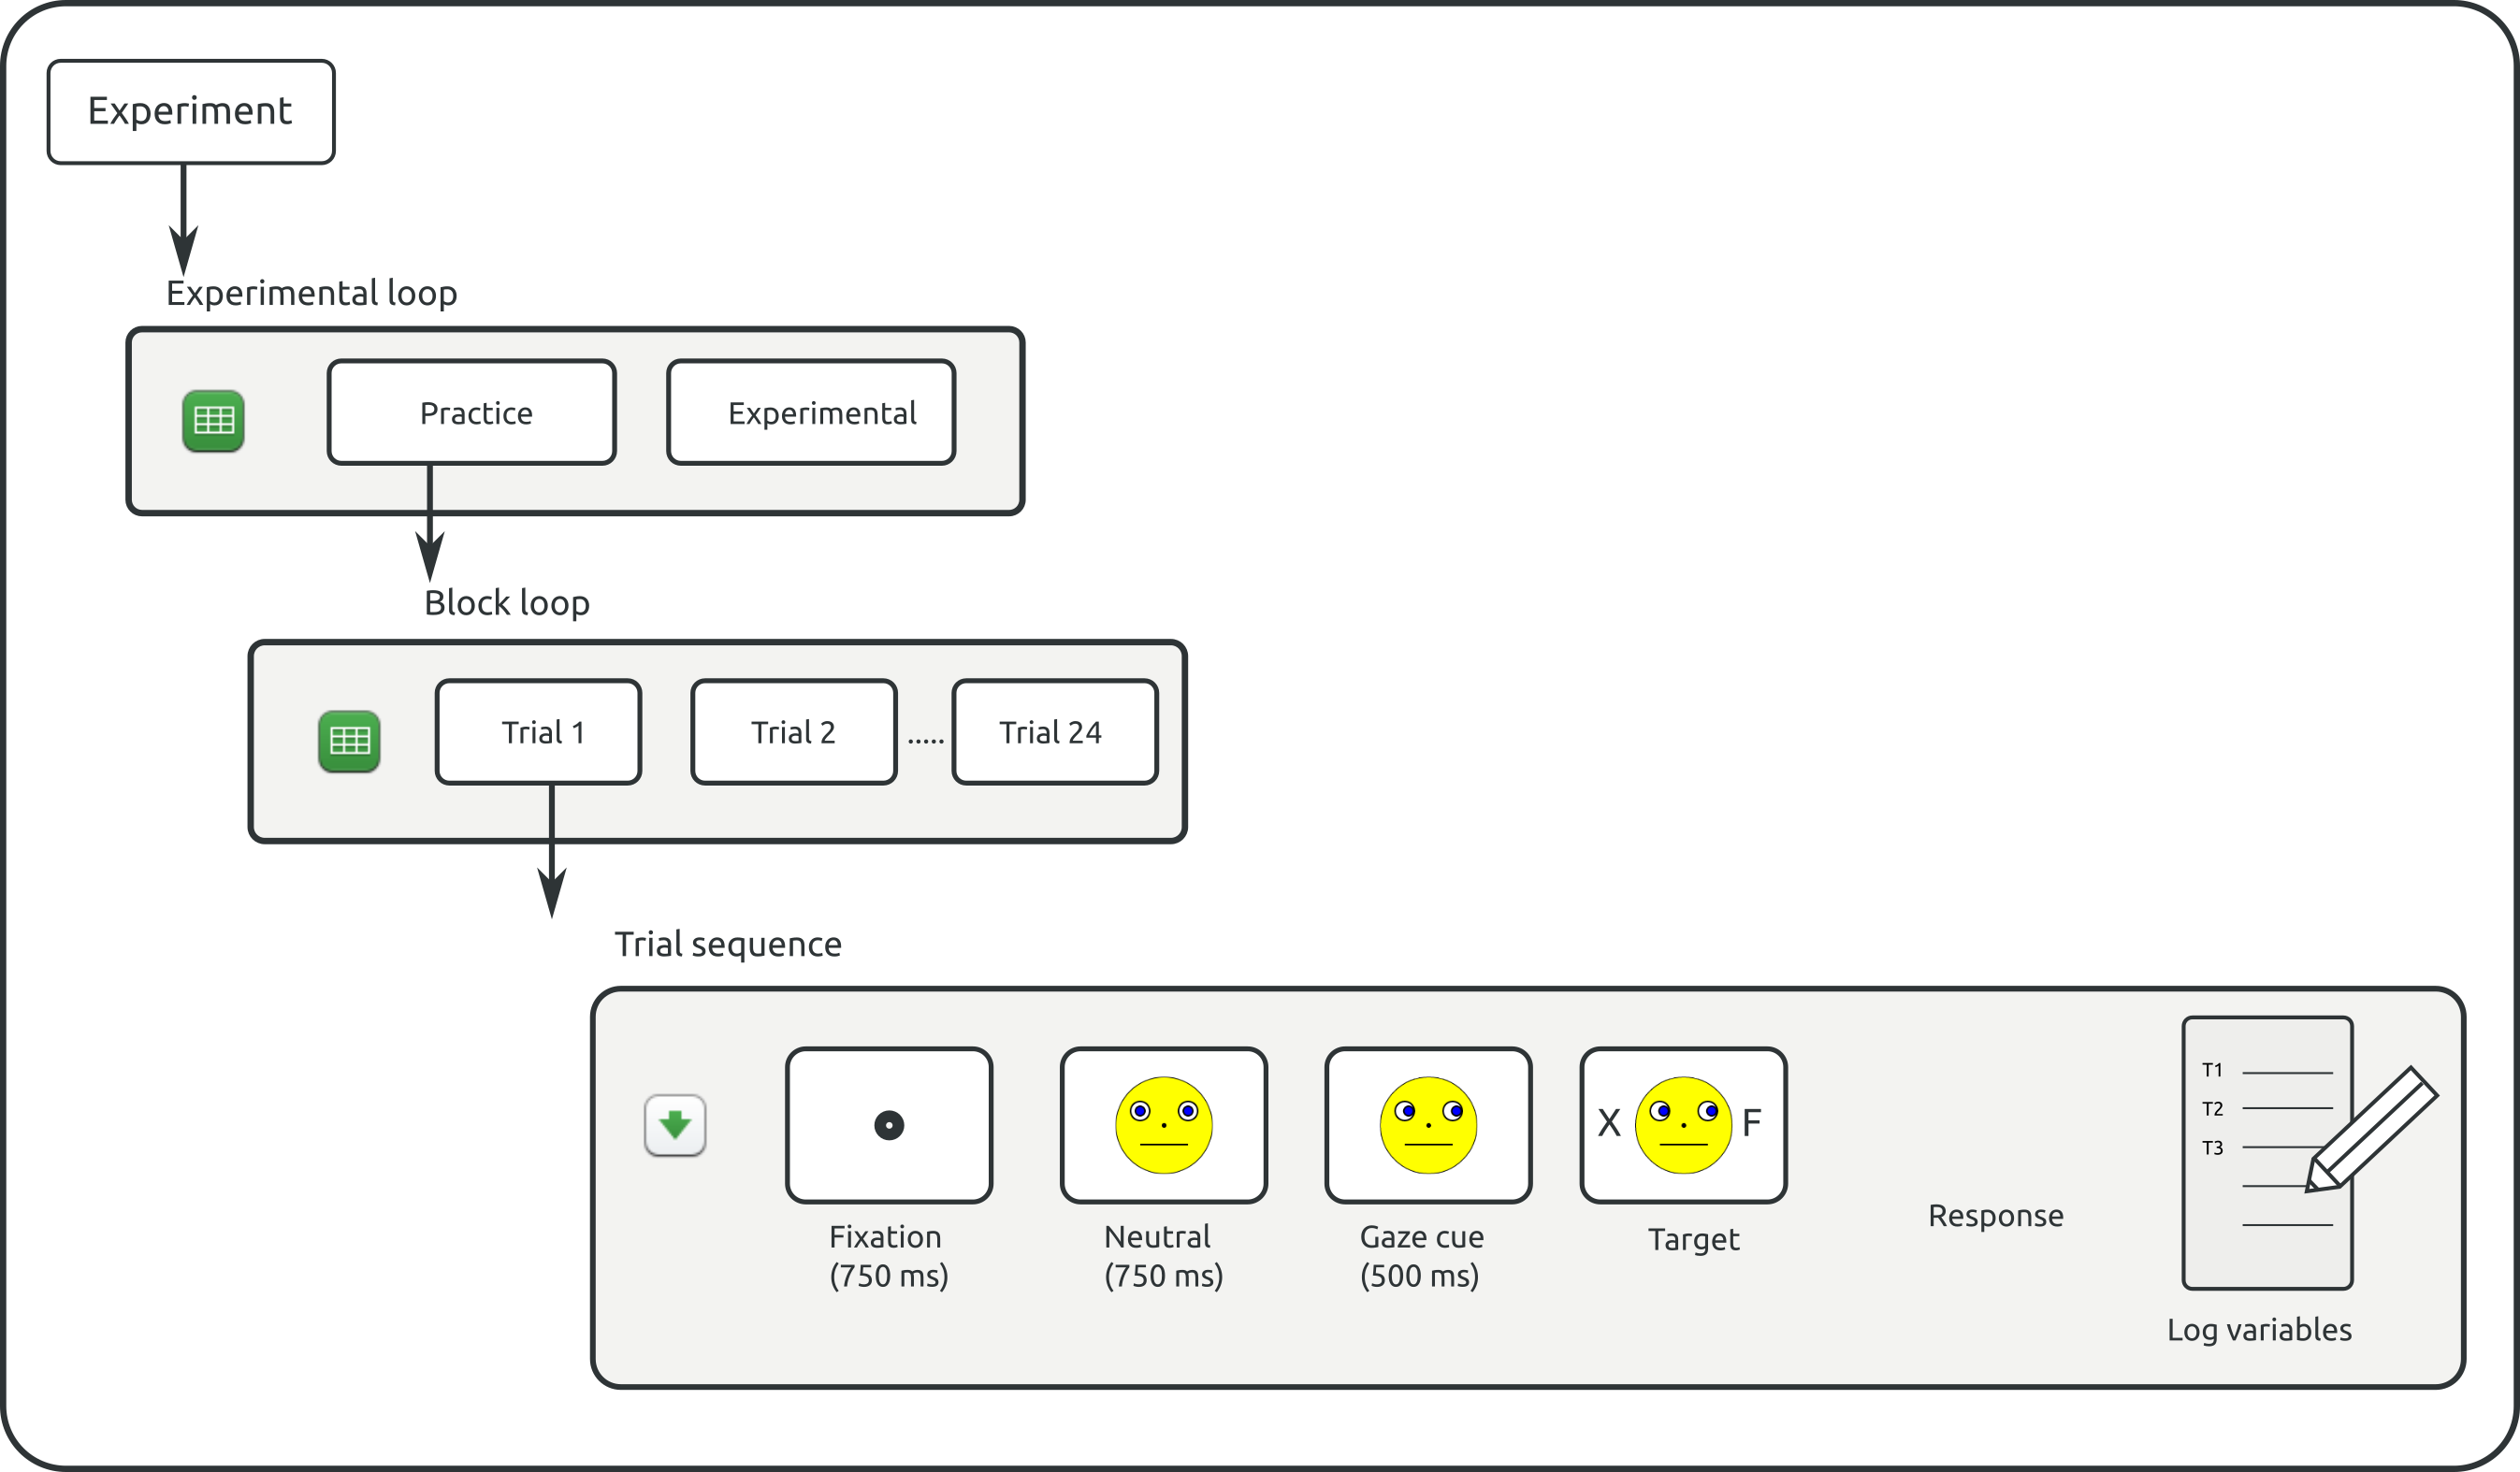
Figure 6. A schematic representation of the structure of the 'Gaze cuing' experiment.
Removing some items from the overvew area
As a start, remove the following items from the experimental hierarchy (right mouse click -> remove or shortcult Del):
- about_this_template
- instructions
- end_of_practice
- end_of_experiment
Next, remove the items from the 'Unused items' bin, by clicking on this part of the overview area and clicking 'Permanently delete unused items'.
Append a form_text_display item for the instruction display
As the name suggests, a form_text_display is a form that displays text. We are going to use a form_text_display (instead of a sketchpad item) to give instructions to the participant at the beginning of the experiment.
Drag a form_text_display from the item toolbar (under 'Form') onto the experiment sequence in the overview area. When you let go, a new form_text_display item will be inserted into the experiment sequence. Rename this item to instructions. Make sure the item appears at the very beginning of the experiment.
Append a new form_text_display item, for the goodbye message
When the experiment is finished, we should say goodbye to the participant. For this we need another form_text_display item. Drag a form_text_display from the item toolbar onto experimental_loop. In the pop-up menu that appears, select 'Insert after experimental_loop'. Rename this item to goodbye.
The overview area of your experiment now looks like Figure 7. This would be a good time to save your experiment (shortcut: Ctrl+S).
Figure 7. The overview area at the end of the step 1.
Background box
Tip — If you don't like having many tabs open, you can close all tabs except the currently opened one by clicking on the 'Close other tabs' button in the main toolbar (shortcut: Ctrl+T).
Step 2: Fill the block loop with independent variables
As the name suggests, block_loop corresponds to a single block of trials. In the previous step we created the block_loop, but we still need to define the independent variables that will be varied within the block. Our experiment has three independent variables:
- gaze_cue can be 'left' or 'right'.
- target_pos (the position of the target) can be '-300' or '300'. These values reflect the X-coordinate of the target in pixels (0 = center). Using the coordinates directly, rather than 'left' and 'right', will be convenient when we create the target displays (see Step 5).
- target_letter (the target letter) can be 'F' or 'H'.
Therefore, our experiment has 2 x 2 x 2 = 8 levels. Although 8 levels is not that many (most experiments will have more), we don't need to enter all possible combinations by hand. Click on block_loop in the overview to open its tab. Now click on the 'Full-factorial design' button. In the variable wizard, you simply define all variables by typing the name in the first row and the levels in the rows below the name (see Figure 8). If you select 'Ok', you will see that block_loop has been filled with all 8 possible combinations.
In the resulting loop table, each row corresponds to one run of trial_sequence. Because, in our case, one run of trial_sequence corresponds to one trial, each row in our loop table corresponds to one trial. Each column corresponds to one variable, which can have a different value on each trial.
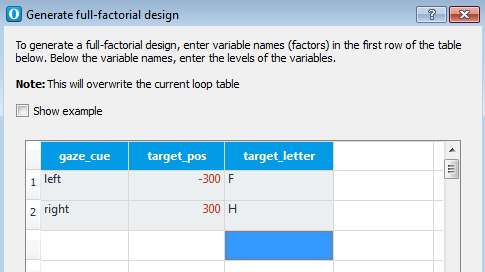
Figure 8. The loop variable wizard in Step 2.
But we are not done yet. We need to add three more variables: the location of the distractor, the correct response, and the congruency.
- dist_pos -- On the first row of the first empty column, enter 'dist_pos'. This automatically adds a new experimental variable named 'dist_pos'. In the rows below, enter '300' wherever 'target_pos' is -300, and '-300' wherever 'target_pos' is 300. In other words, the target and the distractor should be positioned opposite from each other.
- correct_response -- Create another variable, in another empty column, with the name 'correct_response'. Set 'correct_response' to 'z' where 'target_letter' is 'F', and to 'm' where 'target_letter' is 'H'. This means that:
- The participant should press the 'z' key if he/she sees an 'F'
- and the 'm' key if he/she sees an 'H'.
- congruency -- Create another variable with the name 'congruency'. Set 'congruency' to 'congruent' where 'target_pos' is '-300' and 'gaze_cue' is 'left', and where 'target_pos' is '300' and 'gaze_cue' is 'right'. In other words, a trial is congruent if the face looks at the target. Set 'congruency' to 'incronguent' for the trials on which the face looks at the distractor. The 'congruency' variable is not necessary to run the experiment; however, it is useful for analyzing the data later on.
We need to do one last thing. 'Repeat' is currently set to '1,00'. This means that each cycle will be executed once. So the block now consists of 8 trials, which is a bit short. A reasonable length for a block of trials is 24, so set 'Repeat' to 3,00 (3 repeats x 8 cycles = 24 trials). You don't need to change 'Order', because 'random' is exactly what we want.
The block_loop now looks like Figure 9. Remember to save your experiment regularly.

Figure 9. The block_loop at the end of Step 3.
Tip -- You can set 'Repeat' to a non-integer number. For example, by setting 'Repeat' to '0,5', only half the trials (randomly selected) are executed.
Step 3: Add images and sound files to the file pool
For our stimuli, we will use images from file. In addition, we will play a sound if the participant makes an error. For this we need a sound file.
You can download the required files here (in most webbrowsers you can right-click the links and choose 'Save Link As' or a similar option):
After you have downloaded these files (to your desktop, for example), you can add them to the file pool. If the file pool is not already visible (by default on the right side of the window), click on the 'Show file pool' button in the main toolbar (shortcut: Ctrl+P). The easiest way to add the four files to the file pool is to drag them from the desktop (or wherever you have downloaded the files to) into the file pool. Alternatively, you can click on the '+' button in the file pool and add files using the file select dialog that appears. The file pool will be automatically saved with your experiment.
Your file pool now looks like Figure 10. Remember to save your experiment regularly.
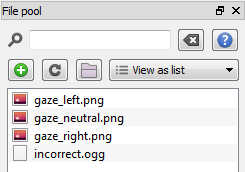
Figure 10. The file pool at the end of Step 4.
Step 4: Fill the trial sequence with items
A trial in our experiment looks as follows (see Figure 11):
- Fixation dot -- 750 ms,
sketchpaditem - Neutral gaze -- 750 ms,
sketchpaditem - Gaze cue -- 500 ms,
sketchpaditem - Target -- 0 ms,
sketchpaditem - Response collection --
keyboard_responseitem - Play a sound if response was incorrect --
sampleritem - Log response to file --
loggeritem
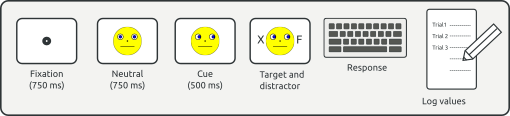
Figure 11. A typical trial sequence in the gaze-cuing experiment.
As you can see in the overview area, our trial_sequence already contains one sketchpad, as well as a keyboard_response item and and a logger.
To add the remaining items:
Pick up a sketchpad from the item toolbar and drag it into the trial_sequence. Repeat this two more times, so that trial_sequence contains four sketchpads. Next, select and append a sampler item. Make sure the sampler item appears right after the keyboard_response, but before the logger.
Again, we will rename the new items, to make sure that the trial_sequence is easy to understand. Rename:
- the first sketchpad to fixation_dot
- the second sketchpad to neutral_gaze
- the third sketchpad to gaze_cue
- the fourth sketchpad to target
- the
sampleritem to incorrect_sound
The incorrect_sound item should only be executed if an error was made. To do this, we need to change the 'Run if …' statement to [correct] = 0 in the trial_sequence tab. This works, because the keyboard_response item automatically creates a correct variable, which is set to 1 (correct), 0 (incorrect), or undefined (this relies on the correct_response variable that was defined in Step 3). The square brackets indicate that correct should be interpreted as the name of a variable and not as text. To change a run-if statement, double click on it (shortcut: F3).
The trial_sequence now looks like Figure 12.
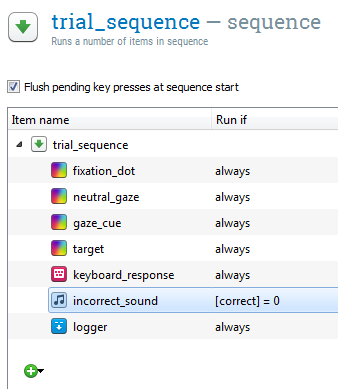
Figure 12. The trial_sequence at the end of Step 5.
Tip -- Variables and conditional "if" statements are very powerful! To learn more about them, see:
Step 5: Draw the sketchpad items
The sketchpad items that we have created in Step 5 are still blank. It's time to do some drawing!
Draw the fixation dot
- Open the fixation_dot tab by clicking on this item in the overview area. Because we chose the 'Extended template', OpenSesame already created a fixation point for us. The only thing we need to change is how long the fixation dot will remain on screen
- Click on the 'Duration' box and change its value to 750 (see Figure 11).
Draw the neutral gaze
Open the neutral_gaze item. Now select the image tool by clicking on the button with the moon-mountain-landscape-like icon. Click on the center of the screen (0, 0). The 'Select file from pool' dialog will appear. Select the file gaze_neutral.png and click on the 'Select' button. The neutral gaze image will now stare at you from the center of the screen! Finally, like before, change the 'Duration' field from 'keypress' to '750'.
Draw the gaze cue
Open the gaze_cue item, and again select the image tool. Click on the center of the screen (0, 0) and select the file gaze_left.png.
Obviously, we are not done yet, because the gaze cue should not always be 'left', but should depend on the variable gaze_cue, which we have defined in Step 3. However, by drawing the gaze_left.png image to the sketchpad, we have generated a script that needs only a tiny modification to make sure that the proper image is shown. Click on the 'Select view' button at the top-right of the gaze_cue tab and select 'View script'. You will now see the script that corresponds to the sketchpad that we have just created:
set duration keypress
set description "Displays stimuli"
draw image center=1 file="gaze_left.png" scale=1 show_if=always x=0 y=0 z_index=0
The only thing that we need to do is replace gaze_left.png with gaze_[gaze_cue].png. This means that OpenSesame uses the variable gaze_cue (which has the values left and right) to determine which image should be shown.
While we are at it, we might as well change the duration to '500'. The script now looks like this:
set duration 500
set description "Displays stimuli"
draw image center=1 file="gaze_[gaze_cue].png" scale=1 show_if=always x=0 y=0 z_index=0
Click the 'Apply and close' button at the top right to apply your changes to the script and return to the regular item controls. OpenSesame will warn you that the image cannot be shown, because it is defined using variables, and a placeholder image will be shown instead. Don't worry, the correct image will be shown during the experiment!
Draw the target
We want three objects to be part of the target display: the target letter, the distractor letter, and the gaze cue (see Figure 2). As before, we will start by creating a static display using the sketchpad editor. After this, we will only need to make minor changes to the script so that the exact display depends on the variables.
Click on target in the overview to open the target tab and like before, draw the gaze_left.png image at the center of the screen. Now select the draw text tool by clicking on the button with the 'A' icon. The default font size is 18 px, which is a bit small for our purpose, so change the font size to 32 px. Now click on (-320, 0) in the sketchpad (the X-coordinate does not need to be exactly 320, since we will change this to a variable anyway). Enter "[target_letter]" in the dialog that appears, to draw the target letter (when drawing text, you can use variables directly). Similarly, click on (320, 0) and draw an 'X' (the distractor is always an 'X').
Now open the script editor by clicking on the 'Select view' button at the top-right of the tab and selecting 'View script'. The script looks like this:
set duration keypress
set description "Displays stimuli"
draw image center=1 file="gaze_left.png" scale=1 show_if=always x=0 y=0 z_index=0
draw textline center=1 color=black font_bold=no font_family=mono font_italic=no font_size=32 html=yes show_if=always text="[target_letter]" x=-320 y=0 z_index=0
draw textline center=1 color=black font_bold=no font_family=mono font_italic=no font_size=32 html=yes show_if=always text=X x=320 y=0 z_index=0
Like before, change gaze_left.png to gaze_[gaze_cue].png. We also need to make the position of the target and the distractor depend on the variables target_pos and dist_pos respectively. To do this, simply change -320 to [target_pos] and 320 to [dist_pos]. Make sure that you leave the 0, which is the Y-coordinate. The script now looks like this:
set duration "keypress"
set description "Displays stimuli"
draw image center=1 file="gaze_[gaze_cue].png" scale=1 show_if=always x=0 y=0 z_index=0
draw textline center=1 color=black font_bold=no font_family=mono font_italic=no font_size=32 html=yes show_if=always text="[target_letter]" x=[target_pos] y=0 z_index=0
draw textline center=1 color=black font_bold=no font_family=mono font_italic=no font_size=32 html=yes show_if=always text=X x=[dist_pos] y=0 z_index=0
Click on the 'Apply and close' button to apply the script and go back to the regular item controls.
Finally, set the 'Duration' field to '0'. This does not mean that the target is presented for only 0 ms, but that the experiment will advance to the next item (the keyboard_response) right away. Since the keyboard_response waits for a response, but doesn't change what's on the screen, the target will remain visible until a response has been given.
Remember to save your experiment regularly.
Tip -- Again, make sure that the (foreground) color is set to black. Otherwise you will draw white on white and won't see anything!
Step 7: Configure the keyboard response item
Click on keyboard_response in the overview to open its tab. You see three options: Correct response, Allowed responses, and Timeout.
We have already set the correct_response variable in Step 3. Unless we explicitly specify a correct response, OpenSesame automatically uses the correct_response variable if it is available. Therefore, we don't need to change the 'Correct response' field here.
We do need to set the allowed responses. Enter 'z;m' in the allowed-responses field (or other keys if you have chosen different response keys). The semicolon is used to separate responses. The keyboard_response item now only accepts 'z' and 'm' keys. All other key presses are ignored, with the exception of 'escape', which pauses the experiment.
We also want to set a timeout, which is the maximum interval that the keyboard_response waits before deciding that the response is incorrect and setting the 'response' variable to 'None'. '2000' (ms) is a good value.
The content of the keyboard_response item now looks like Figure 13.
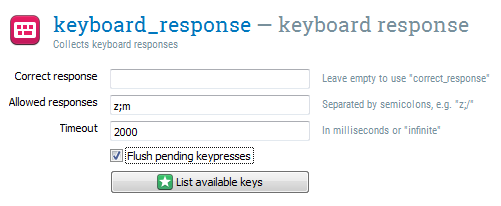
Figure 13. The keyboard_response at the end of Step 7.
Step 8: Configure the incorrect (sampler) item
The incorrect_sound item doesn't need much work: We only need to select the sound that should be played. Click on incorrect_sound in the overview to open its tab. Click on the 'Browse' button and select incorrect.ogg from the file pool.
The sampler now looks like Figure 14.
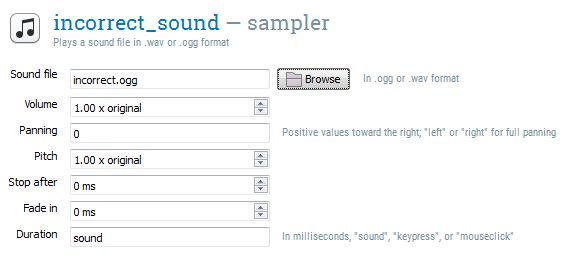
Figure 14. The incorrect_sound item at the end of Step 8.
Step 9: Configure the variable logger
Actually, we don't need to configure the logger item, but let's take a look at it anyway. Click on logger in the overview to open its tab. You see that the option 'Log all variables (recommended)' is selected. This means that OpenSesame logs everything, which is fine.
The one tip to rule them all -- Always triple-check whether all the necessary variables are logged in your experiment! The best way to check this is to run the experiment and investigate the resulting log files.
Step 10: Draw the feedback item
After every block of trials, we want to present feedback to the participant to let him/ her know how well he/ she is doing. Therefore, in Step 2, we added a feedback item, simply named feedback to the end of block_sequence.
Click on feedback in the overview to open its tab, select the draw text tool, change the foreground color to 'black' (if it isn't already), and click at (0, 0). Now enter the following text:
End of block

Your average response time was [avg_rt] ms
Your accuracy was [acc] %

Press any key to continue
Because we want the feedback item to remain visible as long as the participant wants (i.e. until he/ she presses a key), we leave 'Duration' field set to 'keypress'.
The feedback item now looks like Figure 15.

Figure 15. The feedback item at the end of Step 10.
Background box
Feedback and variables -- Response items automatically keep track of the accuracy and average response time of the participant in the variables 'acc' (synonym: 'accuracy') and 'avg_rt' (synonym: 'average_response_time') respectively. See also:
Tip -- Make sure that the (foreground) color is set to black. Otherwise you will draw white on white and won't see anything!
Step 11: Set the length of the practice phase and experimental phase
We have previously created the practice_loop and experiment_loop items, which both call block_sequence (i.e., a block of trials). However, right now they call block_sequence only once, which means that both the practice and the experimental phase consist of only a single block of trials.
Click on practice_loop to open its tab and set 'Repeat' to '2,00'. This means that the practice phase consists of two blocks.
Click on experimental_loop to open its tab and set 'Repeat' to '8,00'. This means that the experimental phase consists of eight blocks.
Tip -- You can create a variable practice in both practice_loop and experimental_loop and set it to 'yes' and 'no' respectively. This is an easy way of keeping track of which trials were part of the practice phase.
Step 12: Write the instruction, end_of_practice and end_of_experiment forms
I think you can handle this step your own! Simply open the appropriate items and add some text to present instructions, an end-of-practice message, and an end-of-experiment message.
Step 13: Run the experiment!
You're done! Click on the 'Run in window' (shortcut: Ctrl+W) or 'Run fullscreen' (shortcut: Ctrl+R) buttons in the toolbar to run your experiment.
Background box
Tip -- A test run is executed even faster by clicking the orange 'Run in window' button (shortcut: Ctrl+Shift+W), which doesn't ask you how to save the logfile (and should therefore only be used for testing purposes).
References
Friesen, C. K., & Kingstone, A. (1998). The eyes have it! Reflexive orienting is triggered by nonpredictive gaze. Psychonomic Bulletin & Review, 5, 490–495. doi:10.3758/BF03208827
Mathôt, S., Schreij, D., & Theeuwes, J. (2012). OpenSesame: An open-source, graphical experiment builder for the social sciences. Behavior Research Methods, 44(2), 314-324. doi:10.3758/s13428-011-0168-7