

Stop-signal task (working with coroutines)
- About OpenSesame
- About this tutorial
- Resources
- The experiment
- Experimental design
- Step 1: Create the basic structure of the experiment
- Step 2: Add a consent form and instruction screen
- Step 3: Create the trial loop
- Step 4: Create the trial items
- Step 5: Add the coroutine item
- Step 6: Configure the coroutines item
- Step 7: Test the experiment
- Finished
- References
About OpenSesame
OpenSesame is a user-friendly program for the development of behavioral experiments for psychology, neuroscience, and experimental economy. For beginners, OpenSesame has a comprehensive graphical, point-and-click interface. For advanced users, OpenSesame supports Python (desktop only) and JavaScript (desktop and browser).
OpenSesame is freely available under the General Public License v3.
About this tutorial
This tutorial shows how to create a stop-signal task in OpenSesame using the coroutines plugin. The experiment is based on the simple reaction-time version of Logan, Cowan and Davis (1984). The main goal of this tutorial is not only to build the task, but also to understand how coroutines allow several events to be placed on a single trial timeline.
Resources
- Download — This tutorial assumes that you are running OpenSesame version 4.1 or later, and that you are running the experiment on the desktop. You can download the most recent version of OpenSesame from:
- Documentation — A dedicated documentation website can be found at:
- Forum — A support forum can be found at:
- Sigmund — SigmundAI is an AI assistant with expert knowledge of OpenSesame and can be found at:
The experiment
In this experiment, participants respond as quickly as possible to letters that appear on the screen. On most trials, they should press the spacebar when a letter appears. On some trials, a tone is played shortly after the letter appears, and participants should try to withhold their response. The goal of the task is to estimate the stop-signal reaction time (SSRT), a latent measure of the speed of the inhibitory process. Reliable estimation of SSRT requires participants to respond quickly on go trials and to attempt to inhibit their response only when the stop signal is presented.
The experiment uses four letters: E, F, H, and L. The response is always the same, regardless of which letter is shown. This makes the task a simple reaction-time version of the stop-signal paradigm.
Each trial has the following structure:
- A fixation dot is shown for 500 ms.
- A letter is shown after fixation.
- A response window opens when the letter appears.
- On stop trials, a 900-Hz tone is played after a short delay.
- A mask follows the letter.
- The total trial duration is fixed at 3500 ms.
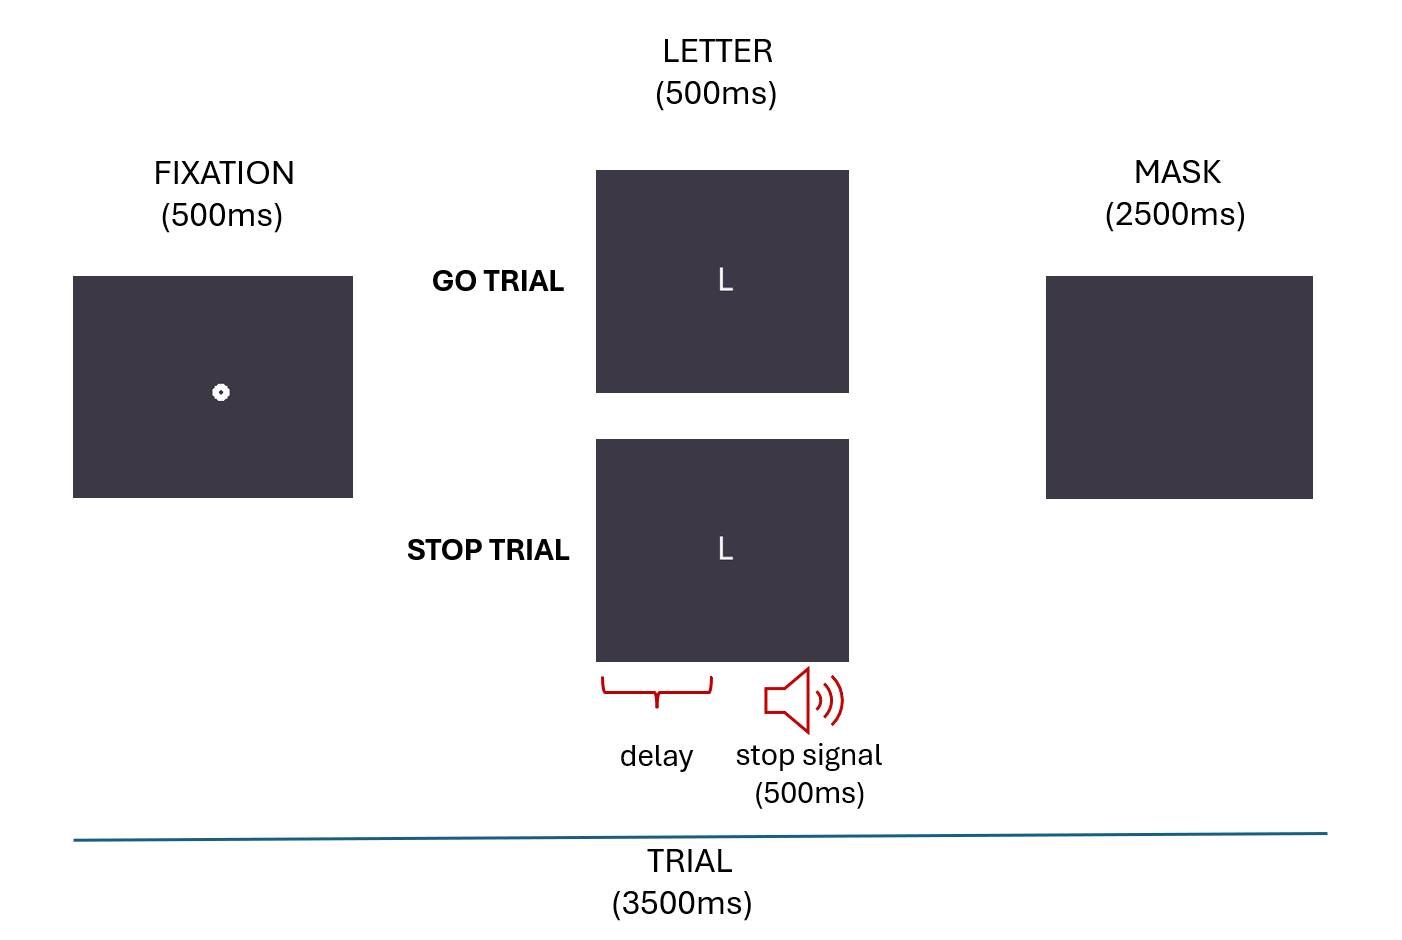
Figure 1. A schematic overview of the stop-signal paradigm implemented in this tutorial.
Tasks like this generally show that participants are less likely to inhibit their response when the stop-signal delay is long than when it is short. Participants may sometimes strategically slow down if they expect a stop signal. For this reason, the instructions should emphasize that participants should respond quickly and should not wait for the tone.
Experimental design
This design:
- is within-subject, because all participants complete all trial types
- includes go trials and stop trials
- includes four stop-signal delays on stop trials:
50100150200
- includes four letters:
EFHL
The loop table contains 80 rows and is repeated four times, resulting in four blocks of 80 trials.
We will now build the experiment step by step.
Step 1: Create the basic structure of the experiment
Start OpenSesame and create a new experiment. In this tutorial, the main sequence is called experiment and contains:
new_form_consentinstructionssimple_rt
The simple_rt item is a loop that contains the trial structure of the experiment.
The overview area should now look like this:
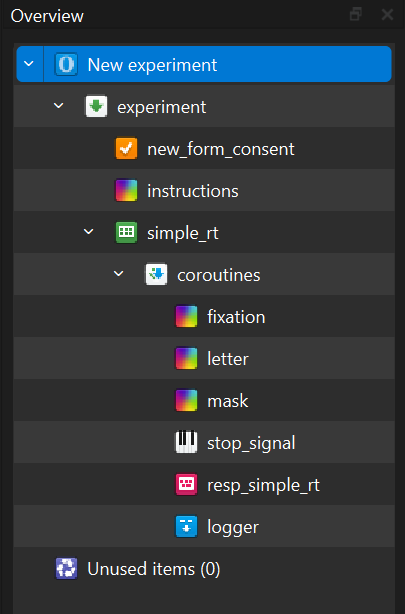
Figure 2. The overview area of the stop-signal experiment.
Step 2: Add a consent form and instruction screen
The example experiment begins with a consent form. This is optional from a technical point of view, but in many real experiments it is useful or necessary to ask participants for informed consent before the task begins.
After the consent form, participants see an instruction screen. The instructions explain that participants should press the spacebar whenever a letter appears, but try to withhold the response when they hear the stop tone. The instructions should also emphasize that participants should not wait for the tone before responding.
The instruction item can look like this:
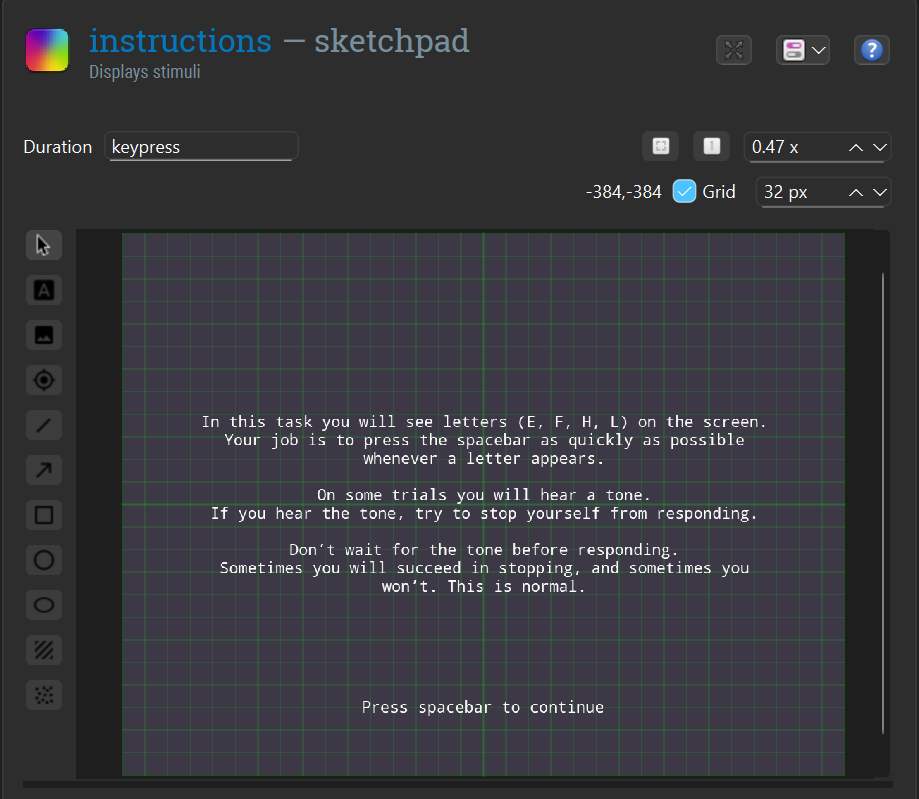
Figure 3. The instruction screen shown before the experiment starts.
Step 3: Create the trial loop
The trial structure is defined in a loop called simple_rt. This loop contains 80 rows and is repeated four times. The order of trials is randomized within each repetition.
Each row defines at least the following variables:
lettersis_stopdelaycorrect_response
For go trials:
is_stopisnodelayis0correct_responseisspace
For stop trials:
is_stopisyesdelayis one of50,100,150, or200correct_responseisNone
This is a convenient way to use the built-in scoring of the keyboard_response item. On go trials, pressing space is correct. On stop trials, withholding the response is correct because the correct response is defined as None.
The loop table should look like this:
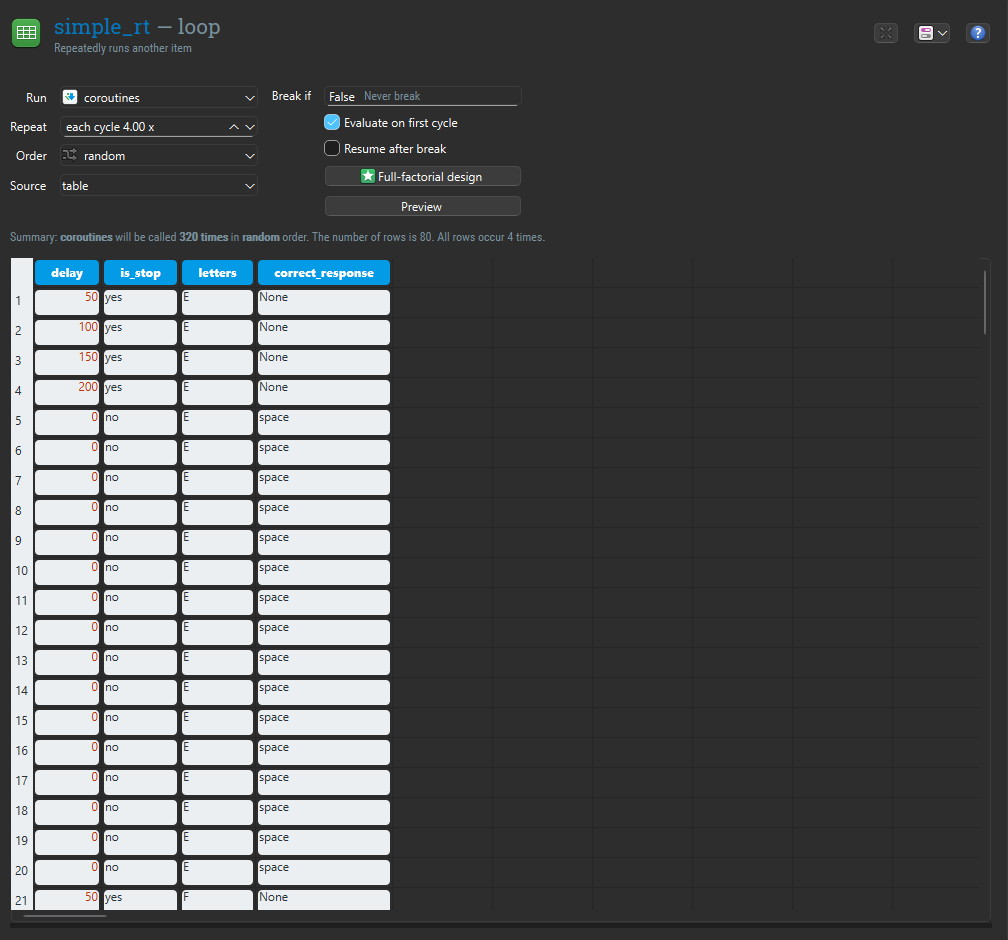
Figure 4. The loop table that defines go trials and stop trials.
Step 4: Create the trial items
The coroutine uses several items that should be created separately first.
4.1 Fixation
Insert a new sketchpad and rename it to fixation. Draw a central fixation dot on it. Although sketchpads have their own duration setting, the timing of this item will later be controlled by the coroutine.
4.2 Letter display
Insert a new sketchpad and rename it to letter. Add a text element that shows the value of the variable {letters}, so that the displayed letter changes from trial to trial. The curly braces around {letters} indicate that this is not literal text, but the value of the experimental variable letters, which is defined in the loop table.
The letter sketchpad should look like this:
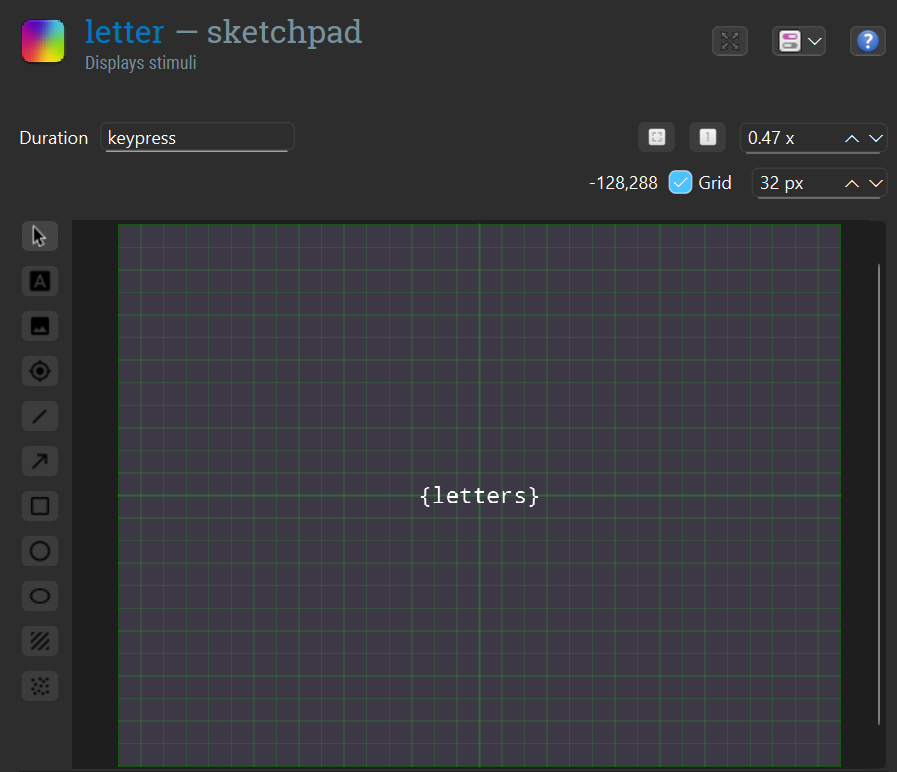
Figure 5. The letter sketchpad, which shows the value of the variable letters.
4.3 Mask
Insert a new sketchpad and rename it to mask. In the current experiment this sketchpad is empty, so it functions mainly as a placeholder on the trial timeline. As with the other sketchpads, its effective timing will later be determined by the coroutine.
4.4 Response item
Insert a new keyboard_response item and rename it to resp_simple_rt. Set the allowed response to space. When this item is used inside the coroutine, the response window will be controlled by the coroutine timeline rather than by the item's own timeout setting.
The keyboard response settings should look like this:

Figure 6. The keyboard response item configured to collect a spacebar response.
4.5 Stop signal
Insert a new synth item and rename it to stop_signal. Set:
- waveform to
sine - frequency to
900 - length to
500 - duration to
0
A duration of 0 ensures that the sound starts and the coroutine continues immediately, instead of waiting for the sound to finish.
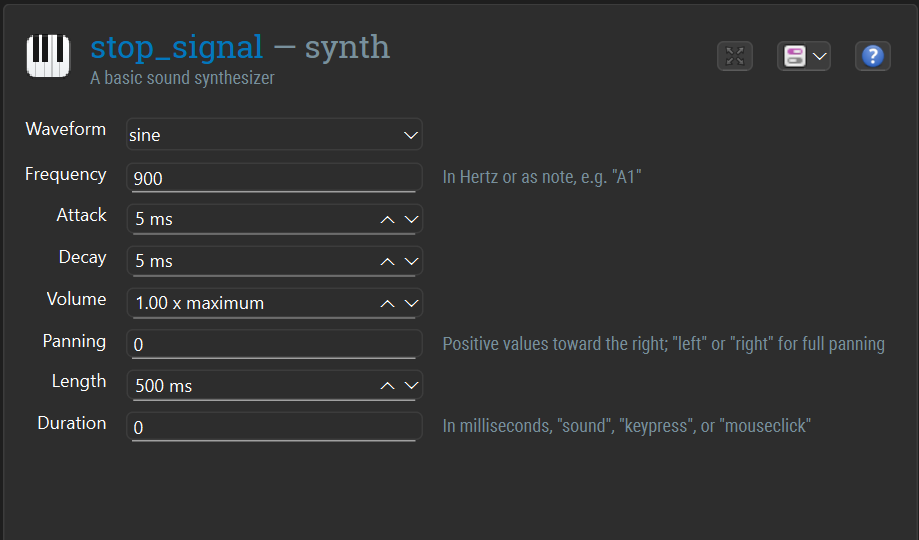
Figure 7. The synth item configured to produce a 900-Hz tone lasting 500 ms.
4.6 Logger
Insert a new logger item and rename it to logger. Turn automatic logging off and log the critical variables manually. In particular, make sure that variables such as letters, is_stop, delay, response, response_time, and correct are included.
The logger settings should look like this:

Figure 8. The logger item configured to log the critical stop-signal variables.
Step 5: Add the coroutine item
Now insert a coroutines item and rename it to coroutines. This item will define the timing of each trial on a shared timeline.
Set the total coroutine duration to 3500, and add the trial items so that they are placed on the same trial timeline.
At this stage, it is important to keep in mind that not every OpenSesame item can be used inside a coroutine. Supported items include at least:
feedbackinline_scriptkeyboard_responseloggermouse_responsesamplersynthsketchpad
If an item does not support coroutines, it cannot be placed on the shared coroutine timeline.
Step 6: Configure the coroutines item
The coroutines item is the temporal core of the experiment. It allows multiple trial events to be coordinated on a single timeline, so that presentation, response collection, and sound scheduling can overlap in time.
This is especially useful for the stop-signal task. The fixation display appears first, the letter appears later, the participant can respond while the trial continues, and the stop tone is presented only on some trials and only after a variable delay. A normal sequence item is not well suited for this kind of temporal overlap, whereas a coroutine is designed for exactly this purpose.
6.1 The coroutine timeline
In this experiment:
fixationstarts at0letterstarts at500resp_simple_rtstarts at500maskstarts at1000stop_signalstarts at{delay + 500}on stop trials onlyloggerruns at the end of the trial
The value of delay comes from the loop table. Because the letter appears at 500 ms, the expression {delay + 500} schedules the stop signal relative to letter onset rather than relative to the beginning of the whole trial.
6.2 How start, end, and run_if work
Each row in a coroutine specifies when an item should run and, in some cases, when it should stop.
startindicates when the item begins, in milliseconds after the start of the coroutine.endindicates when the item stops, if the item remains active over an interval.run_ifindicates whether the item should run at all.
This means that the coroutine does more than simply list items. It defines a timeline and places each item on that timeline.
For example:
letterstarts at500, which means that the letter appears 500 ms after the beginning of the trial.resp_simple_rtalso starts at500, which means that response collection begins when the letter appears.stop_signaluses arun_ifcondition so that it is only played on stop trials.
A typical run_if expression for the stop signal is:
is_stop == "yes"
This expression is evaluated for each trial. On stop trials, the synth item is run. On go trials, it is skipped.
6.3 When end is applicable
Not every item in a coroutine uses end in the same way.
Some items are effectively one-shot items. A sketchpad, for example, prepares a display and shows it when it is started. In practice, the important setting for such an item is usually the start time. The display change happens at that moment, and the sketchpad itself does not need to remain active in the same way as a response item or sound item.
Other items do remain active over a period of time. A keyboard_response, for example, can remain active for a response window, and a sound item can remain active while audio is being played. For these items, end is meaningful because it determines when the item stops being active on the coroutine timeline.
So, in general:
startis relevant for all itemsendis mainly relevant for items that stay active over an intervalrun_ifis relevant whenever an item should run only under certain conditions
6.4 How this applies to the stop-signal task
In the present experiment:
fixation,letter, andmaskare mainly used to update the display at specific momentsresp_simple_rtremains active during the response windowstop_signalis started only whenis_stop == "yes"loggeris run at the end of the trial
This means that the sketchpads mainly rely on their start times, whereas the response item and the stop-signal item are better understood as items that are active for part of the trial timeline.
6.5 How item duration relates to coroutine timing
When working with coroutines, it is important to remember that the coroutine controls when items are active. In other words, the effective timing is determined by the start, end, and run_if settings of the coroutine, not primarily by the duration or timeout settings inside the individual items.
This is why the sketchpads in this experiment do not need their own durations to define the trial structure. Their role in the timeline is determined by the coroutine. The same logic applies to the keyboard_response: even if the item has its own timeout setting, the response window is effectively defined by the coroutine timeline.
The stop_signal synth illustrates this clearly. Its sound properties, such as waveform and length, are defined in the synth item itself, but the moment at which it starts is defined by the coroutine.
6.6 Why the stop-signal synth uses duration = 0
The stop_signal item has a sound length of 500 ms and a duration of 0. This is important because it means that the sound starts and the coroutine continues immediately, instead of waiting for the sound to finish.
As a result, the tone can play while the rest of the coroutine timeline continues. This is exactly what is needed in a stop-signal task: the signal must occur at a precise moment, but it must not pause response collection or the rest of the trial.
The coroutine settings should look like this:
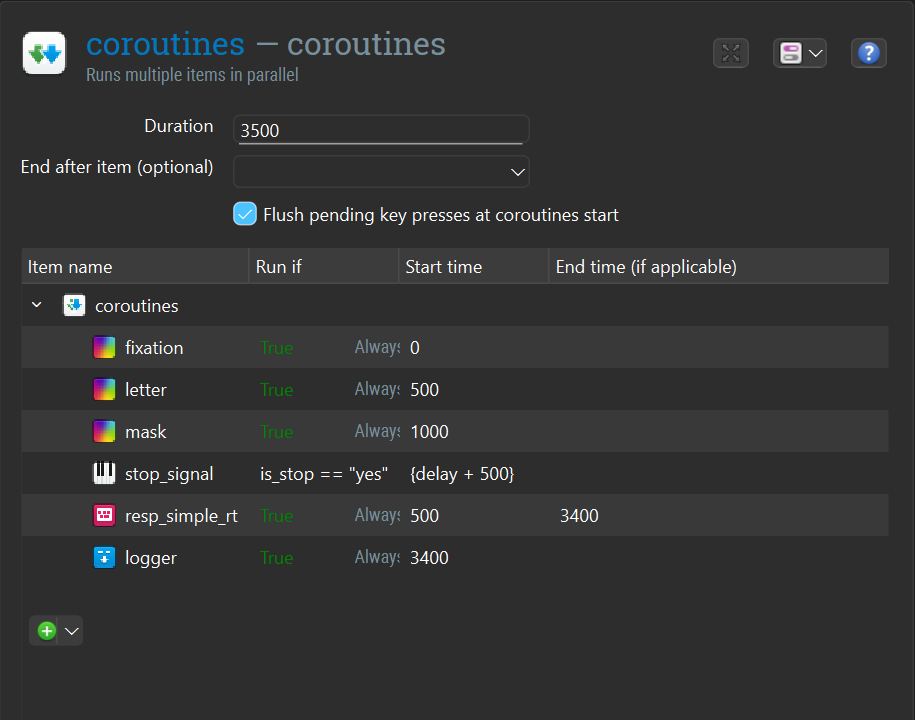
Figure 9. The coroutine item that controls the shared trial timeline.
6.7 Why the logger is placed at 3400
In the example experiment, the total coroutine duration is 3500 ms, but both resp_simple_rt and logger are set to 3400. This means that the response window closes at 3400 ms and the trial is logged at the same point, rather than at the very end of the coroutine.
This is useful because it ensures that response collection does not continue beyond the moment at which the trial is logged. At the same time, the final 100 ms of the coroutine remain unused as a small safety margin before the coroutine itself ends.
In practice, this means that when the logger runs, the relevant response variables, such as response, response_time, and correct, have already been set.
Step 7: Test the experiment
When the experiment structure is complete, give it a test run and verify that:
- the fixation dot appears first
- the letter appears after 500 ms
- the response window opens with letter onset
- the stop tone is played only on stop trials
- the stop tone timing depends on
delay - the trial duration is always 3500 ms
It is also useful to inspect the log file to check that letters, is_stop, delay, response, response_time, and correct are stored correctly.
Finished
Congratulations, the experiment is complete. You can now give it a test run by pressing the blue double-arrow button (shortcut: Ctrl+W).
Below is a demonstration of a shortened version of the experiment created for tutorial purposes.
Video 1. Demonstration of the completed stop-signal task.
References
Logan, G. D., Cowan, W. B., & Davis, K. A. (1984). On the ability to inhibit simple and choice reaction time responses: A model and a method. Journal of Experimental Psychology: Human Perception and Performance, 10(2), 276–291.
Mathôt, S., Schreij, D., & Theeuwes, J. (2012). OpenSesame: An open-source, graphical experiment builder for the social sciences. Behavior Research Methods, 44(2), 314–324.