


Implicit Association Task
Implicit Association Task
The implicit association task measures the strength of associations between concepts (e.g. young people and old people) and evaluations (e.g. good and bad). The idea is that making a response is easier (and therefore faster) when related items share the same response key.
Here, we will measure the association between young and old, and good and bad. We hypothesize that young participants (subconsciously) associate positive words with young faces rather than with old faces.
Tutorial screencast
This tutorial is also available as a screencast:
Experimental hierarchy
To test this prediction, participants perform four blocks of trials (Figure 1)
- Block 1 -- Participants categorize words as either POSITIVE or NEGATIVE. The category names appear at the top left and top right side of the screen, and participants press a button with their left or right hand to indicate to which category a centrally presented word belongs
- Block 2 -- Participants categorize faces as OLD or YOUNG, again by making a left- or right-hand resonse
- Block 3 -- Is a combination of block 1 and 2. In this example, the words POSITVE and YOUNG appear at the top left while the words NEGATIVE and OLD appear at the top right. Because we assume that (young) participants have a more positive attitude towards young faces, we call this mapping congruent
- Block 4 -- Is again a combination of block 1 and 2, but this time the mapping is incongruent
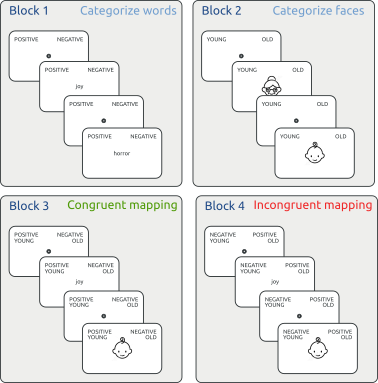
Figure 1. An overview of the four blocks of the implicit association task.
Prediction
The prediction is that participants have a preference for young people compared to old people, such that it is easier to categorize words when young and positive share a response key, and old and negative share a response key (as compared to the reverse mapping). This should result in faster responses in the congruent than in the incongruent block (Figure 2).
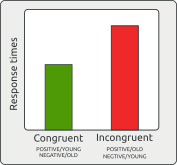
Figure 2. We predict that participants find it easier to categorize words and faces if the categories POSITIVE/YOUNG and NEGATIVE/OLD are combined (as compared to the reverse).
Trial sequence
In order to test this prediction, we're going to create the following trial sequence (Figure 3):
- Each trial starts with a fixation point (500 ms)
- Next, the two category names appear on the upper left and right side of the screen.
- The to-be-categorized stimulus appears at the center
- Participants indicate with a key press whether the stimulus belongs to the category on the left or on the right
- The variables of the current trial are logged
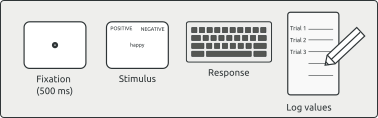
Figure 3. Schematic representation of a typical trial sequence of the (first block of the) IAT.
Launch OpenSesame
When you start OpenSesame, you'll see a 'Get started!' tab, which shows you a list of templates as well as recently opened experiments (Figure 4). To save some time, we'll use the 'Extended template'.
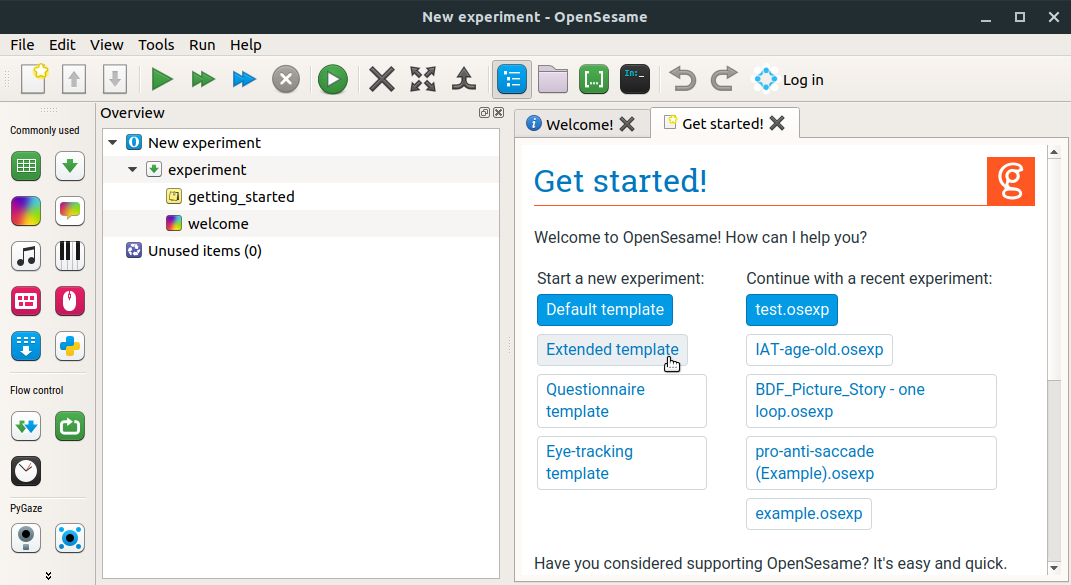
Figure 4. OpenSesame's welcome window. Here, we use the 'Extended template'.
After opening the extended template, we save our experiment. To do this, click File -> Save (shortcut: Ctrl+S), browse to the appropriate folder and give your experiment a meaningful name.
Overview area
The overview area shows the hierarchical structure of our experiment. To simplify our structure, we start by deleting the practice block. In order to do so:
- Right click on the item called practice loop
- Click 'Delete' (shortcut:
Del) - Do the same for the end_of_practice' item
The overview area of your experiment should now look like this:
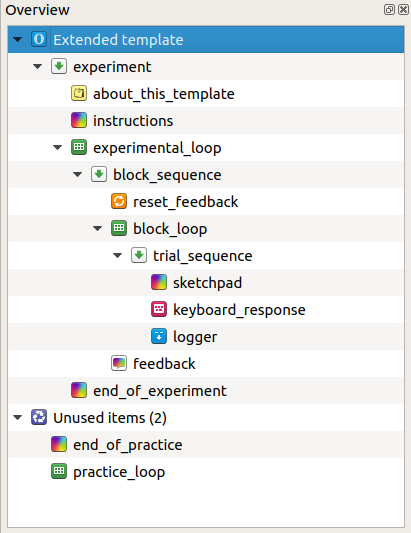
Figure 5. The overview area of your experiment.
Block 1: word categorization
Step 1: Modify the block loop
We start by creating the first block of the IAT (Block 1 in Figure 1) in which participants have to categorize words as either positive or negative. Because we will create more than one block, the name block_loop is not so informative. So we rename it:
- Right click on the block_loop item, choose rename (shortcut:
F2), and call it words_block_loop
Next, we want to define the following three variables in the block_loop item:
- stimulus -- The to-be-categorized word
- category -- The category that the word belongs to
- correct_response -- The response that participants are supposed to give
To create these variables:
- Open the tab of the words_block_loop by clicking on it in the overview area
- You'll initially see an empty table
- Double click on the header of the first column (initially called 'empty_column') and call it 'stimulus'
- Fill the first column with six positive and six negative words, one per row
- Create a second column with the header 'category' and indicate to which category (POSITIVE or NEGATIVE) each stimulus belongs
- Create a third column, call it correct_response and indicate the correct response for each stimulus
- To determine the response rule, let's say that:
- The word POSITIVE will appear on the left side of the screen, whereas the word NEGATIVE will appear on the right side
- To indicate that a word belongs to the left side, participants have to press 'e', whereas for the right side, they have to press 'i'.
Tip -- correct_response is a built-in variable which allows OpenSesame to keep track of participants' performance, such as 'acc' (for accuracy or percentage correct).
The content of your words_block_loop should now look something like this:
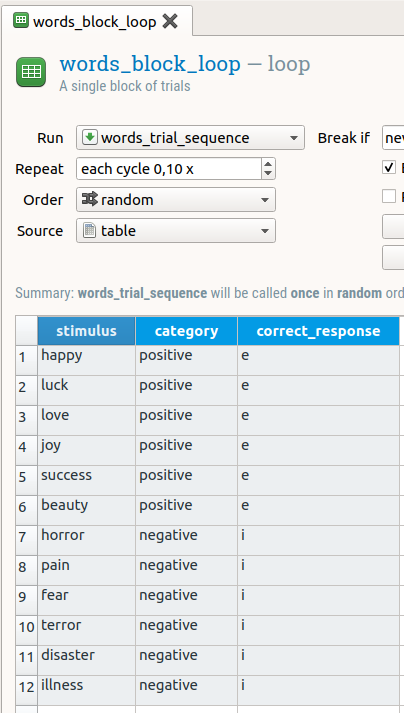
Figure 6. The loop table of the first block of the IAT contains the three experimental variables and their values.
Step 2: Modify the trial sequence
As shown in Figure 3, on every trial we want to:
- Show a fixation point
- Show the stimulus at the center and the two categories at either upper side of the screen
- Collect a keypress response
- Safe the variables to the output file
These four steps are called events, and we're going to realize them by using items in the trial sequence. But first, because the trial sequence will be slightly different for each block of the experiment (see Figure 1), let's rename it to words_trial_sequence.
For the first two events, we'll use sketchpad items. The advanced template already contains one sketchpad item. To append a second one:
- Grab a
sketchpaditem from the item toolbar - Drag and drop it into the words_trial_sequence
Tip -- To make a given item appear after another item, drop it onto this other item.
By default, OpenSesame gives its items names such as sketchpad, new_sketchpad and new_sketchpad_1. Because these names are not informative, we rename the items into something more meaningful. To do so:
- Right-click on the item in the overview area (shortcut:
F2) - Choose 'Rename'
- Respectively call the two
sketchpaditems fixation and word
The two last events of the trial sequence (collecting the response and saving the data) are already represented by the keyboard_response item and the logger item, respectively.
Your overview area should now look like this:
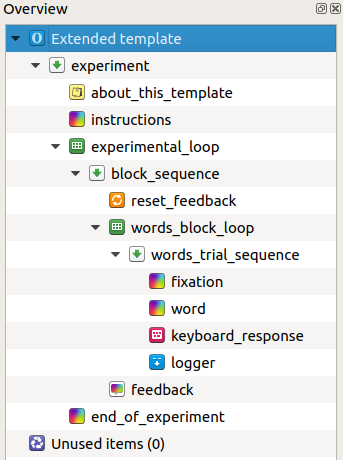
Figure 7. New overview of (the first part of) the experiment.
Step 3: Modify the items in the trial sequence
Fixation
The next step is to add content to the items in the trial sequence. We start with the sketchpad that represents the fixation point at the beginning of each trial.
- Open the tab fixation by clicking on it in the overview area. Because we chose the 'Extended template', OpenSesame already created a fixation point for us. The only thing we need to change is how long the fixation dot will remain on screen
- Click on the 'Duration' box and change its value to 500
Word
Draw the category names
After the fixation point disappears, we want to show the two category names at the upper left and right side of the display (see Figure 3). To do so,
- Open the word tab by clicking on it in the overview area
- Select the
Draw textlineelement from the black-and-white toolbar - Click somewhere in the upper left quandrant of the sketchpad
- Type 'POSITIVE'
- Repeat this procedure to make the word 'NEGATIVE' appear on the opposite site
Draw the stimulus
Next, we want to show the to-be-categorized stimulus at the center of the screen. Importantly, the stimulus is variable. This means that which word is shown, depends on which line from the words_block_loop is currently run. In order to let OpenSesame know that it can find the value of the word variable in the block loop, we use the square-bracket syntax. To do so:
- Select the
draw textlinesketchpad element - Click on the center of the screen
- Type:
[stimulus]
Tip -- The word that you type between brackets should correspond exactly to the column header you created in the word_block_loop.
This method is very convenient, because it avoids having to make separate sketchpads for each positive and negative word.
Change the duration
Finally, we change the duration of the current sketchpad to 0. This doesn't mean that the current sketchpad will be shown only 0 ms. Instead, because a keyboard_response item follows right after it, it will stay on screen until the participant pressed a key.
Your sketchpad should now look like this:
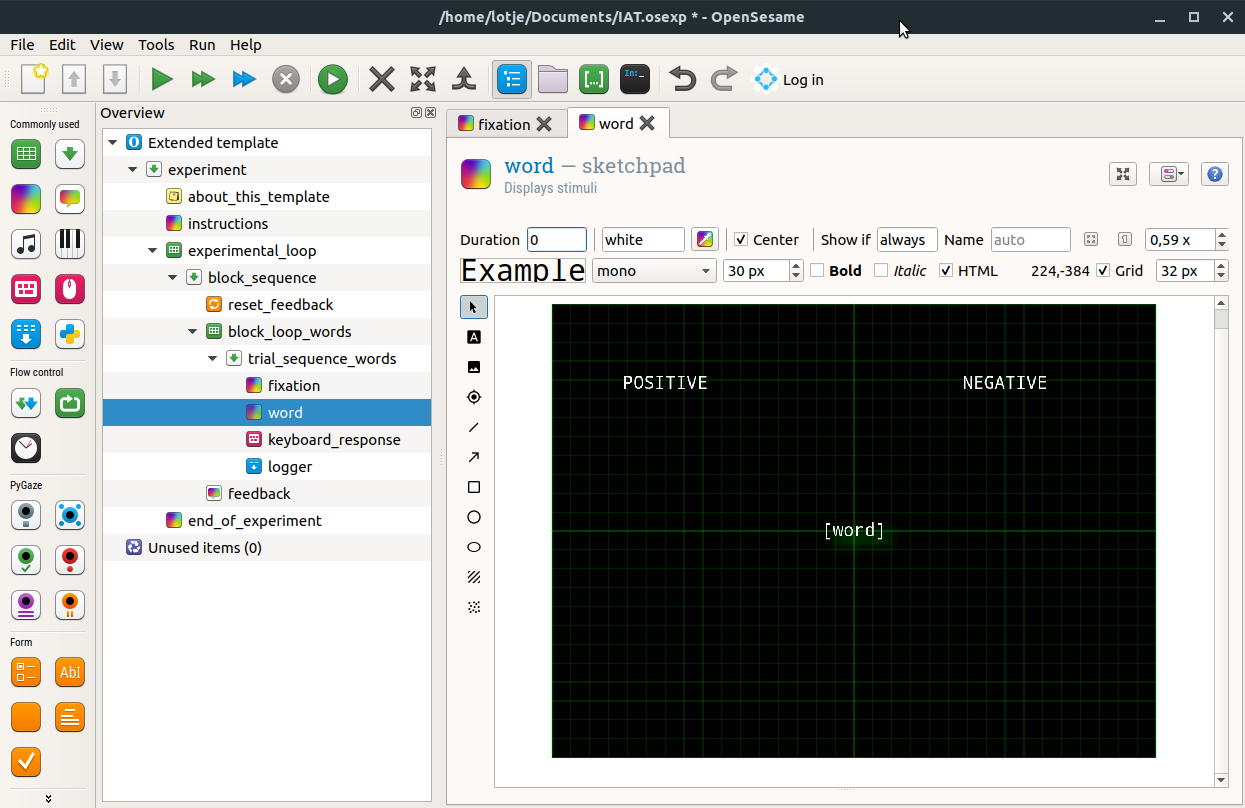
Figure 8. The sketchpad item that is used to draw the category names and the stimulus to the display.
It's good practice to try to run your experiment often, such that you can debug it right away. At this point, let's do a test run by pressing one of the three 'run' arrows.
Tip -- If you want to do a quick test run of your experiment, you might not have to run all items from a given block. To shorten the number of trials, you can do the following:
- Open your block loop table
- Change the value in the 'Repeat' box to something smaller than 1,00 (e.g. 0,1)
- (On some systems, decimals are indicated by a comma rather than a period)
- In our example, this means that OpenSesame will only run one row (randomly selected) instead of all 12 of them
- Don't forget to put 'Repeat' back to 1,00 when you're done testing
Experimental hierarchy
The IAT contains more blocks than the current one. It also contains a block in which pictures of faces have to be categorized as young or old, and two blocks that contain both tasks intermingled (see Figure 1). This means that we will have to create another three blocks of trials, each containing their own trial sequence. The hierarchical strcuture of the experiment therefore looks as follows (and when we're done programming, our overview area should resemble this):
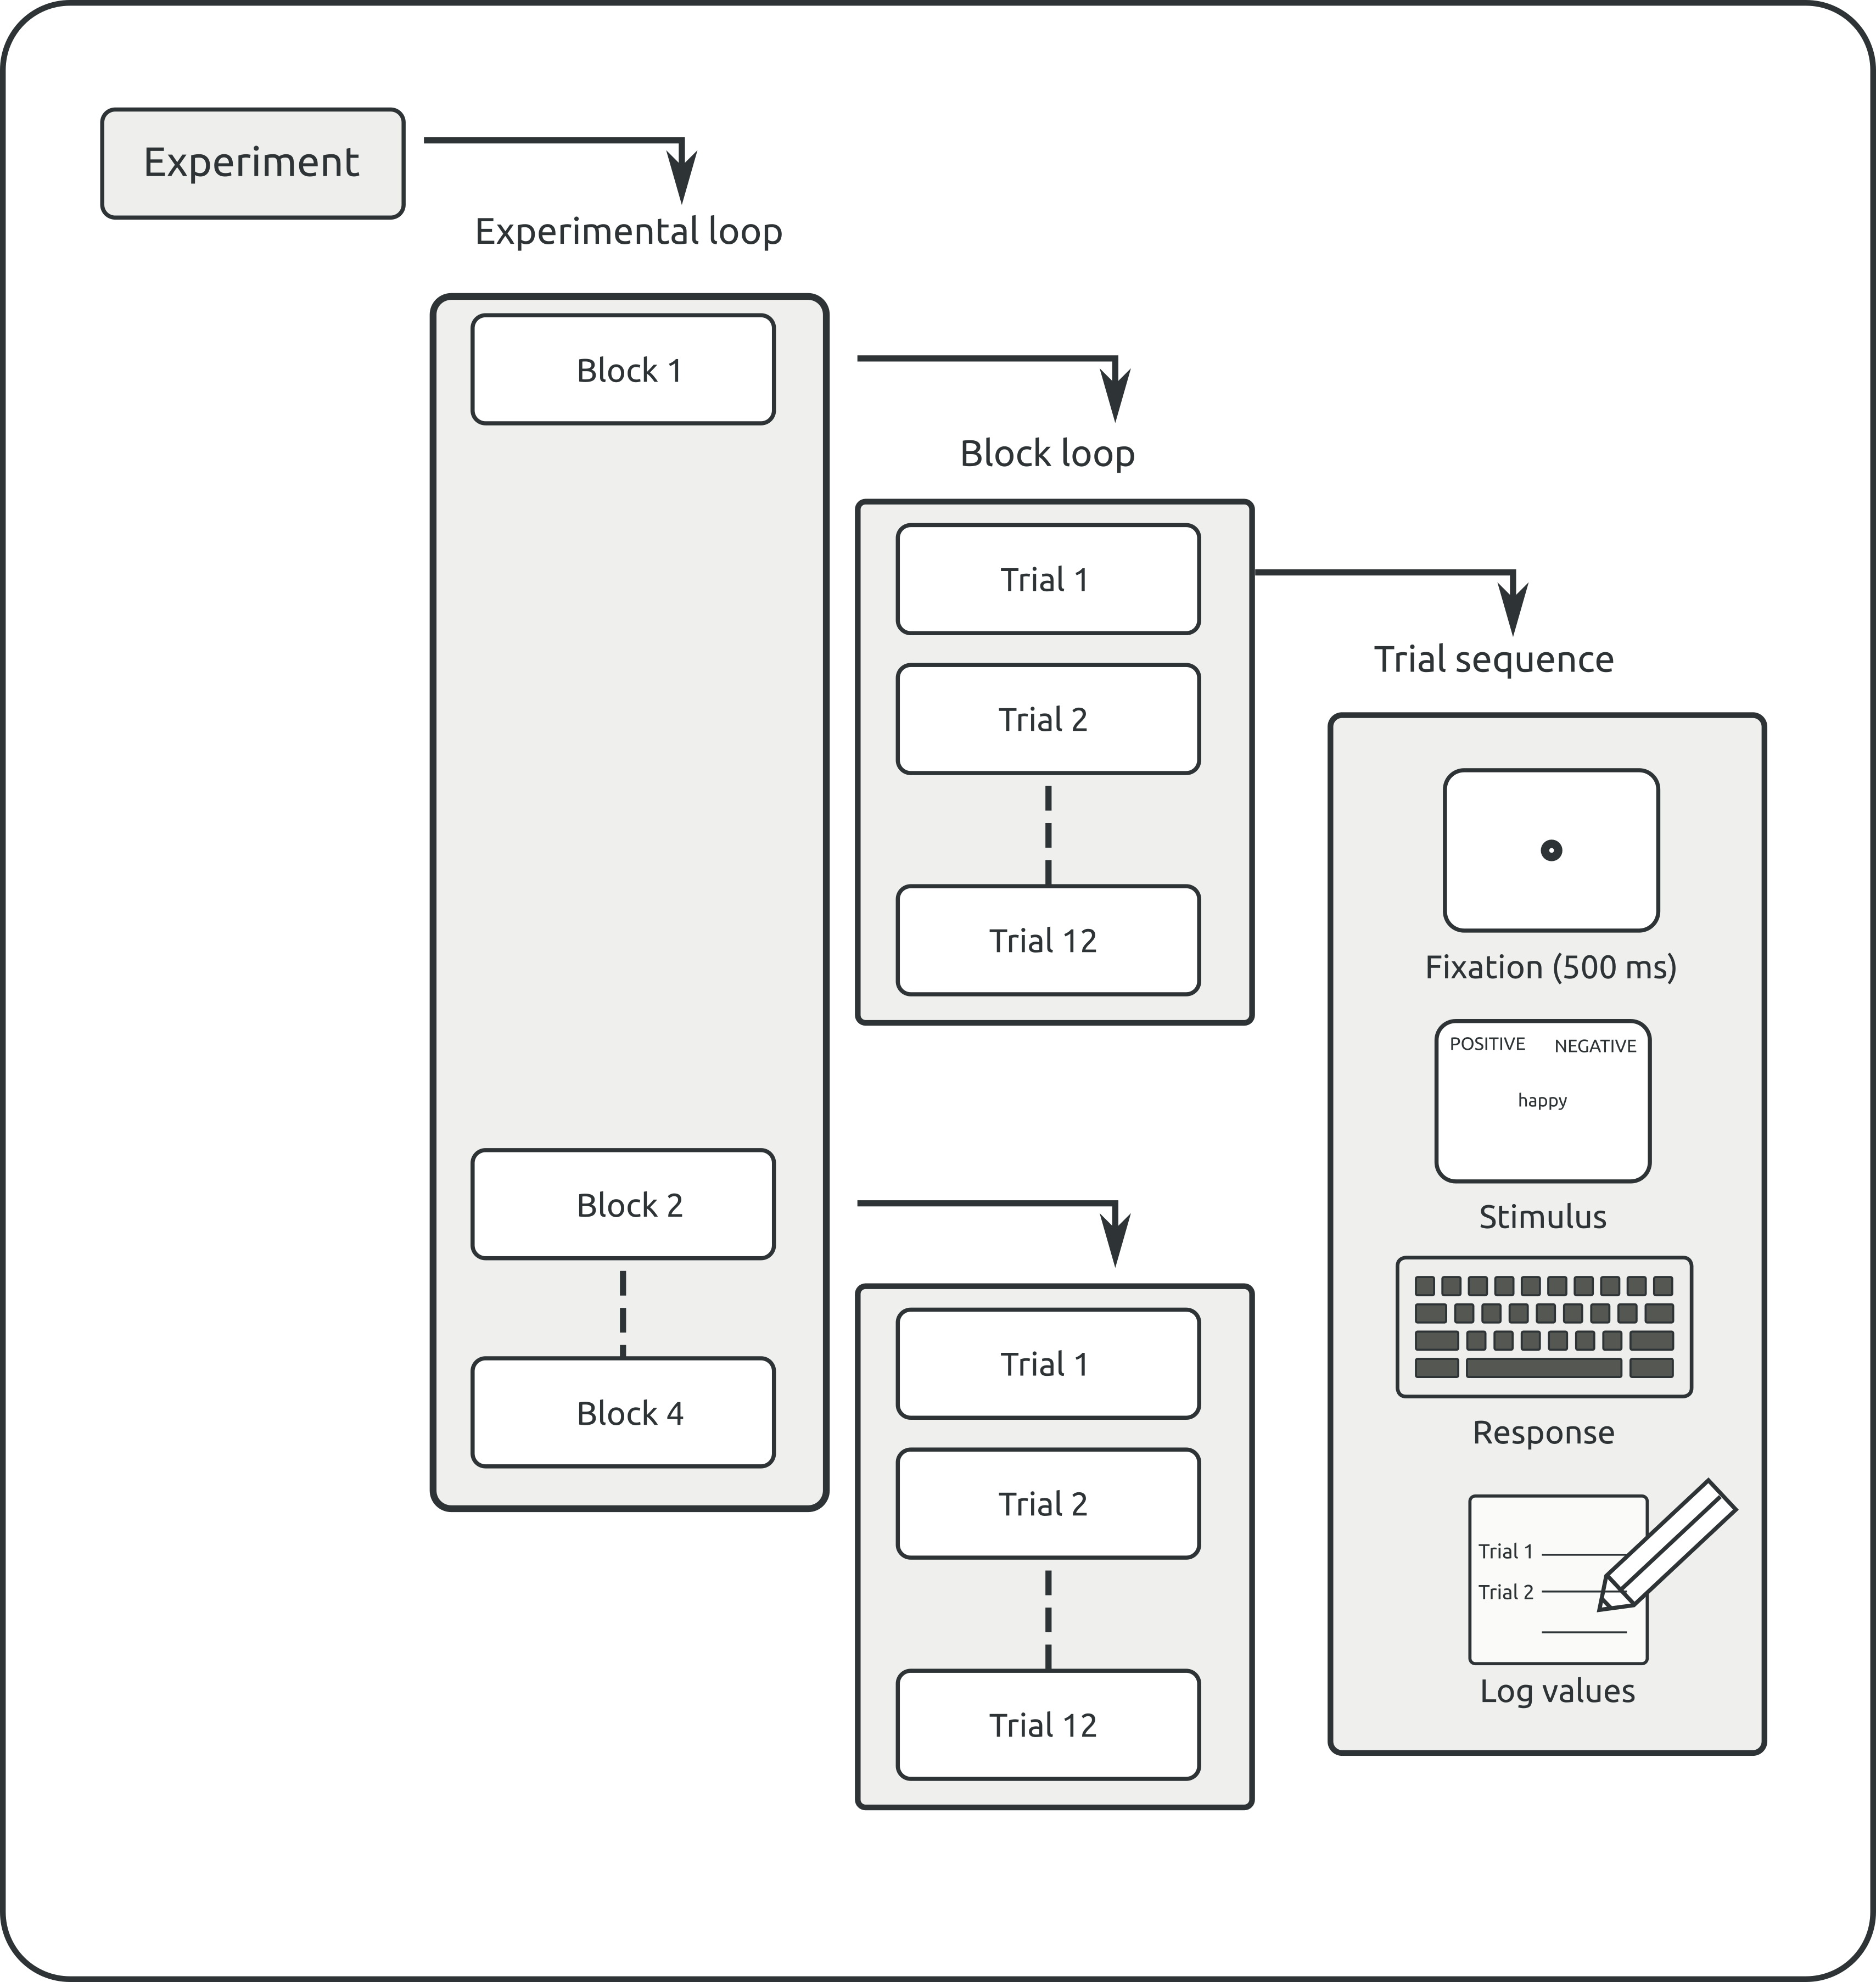
Figure 9. The experimental hierarchy of the IAT.
Block 2: face categorization
Let's first concentrate ourselves on the face-categorization task. More precisely, we will
- Create an additional block loop and trial sequence
- Re-use everything that we can re-use from the previous part of the experiment
- Add new variables and events that are specific to the face-categorization task
Step 4: Create an additional block_loop
- Grab a
loopitem from theitem toolbar - Drag and drop it to the overview area
- To make the new block appear after the first one, drop it onto the
words_block_loopitem (see Video 3) - OpenSesame asks you whether you want to insert the current item into the
words_block_loop, or after. Choose the latter
Tip -- If you accidentally put the new item into the block loop, you can always undo this by pressing Ctrl+Alt+Z).
- Give the new loop a meaningful name, for example faces_block_loop
Step 5: Append a new trial sequence
Although the trial sequence of the face-categorization task has some overlap with the word-categorization task, they are not identical. Therefore, we can't re-use the trial sequence that we previously made.
In order to make a new one:
- Grab a
sequenceitem from the item toolbar - Drop it into the faces_block_loop
- This time, choose 'insert into' (see Video 3)
- Rename the item as faces_trial_sequence
Step 6: Choose the face stimuli
Download the face stimuli
In the face equivalent of the task, we need images of six young and six old faces. To avoid gender biases from influencing our results, it seams best to use an equal number of male and female faces per category (here: three).
You can download an example set of stimuli (in JPG format) here:
In most web browsers you can right-click the link and choose 'Save Link As' or a similar option. After you have downloaded these files (to your Downloads folder, for example), you can unzip them.
Add the JPG files to the file pool
- If the file pool is not already visible (by default on the right side of the window), click on the 'Show file pool' button in the main toolbar (shortcut:
Ctrl+P). - Click on the plus sign in order to add files
- Browse to your Downloads folder (or wherever you saved and unzipped the face-stimuli folder) and add the 12 JPG files.
The file pool should now look similar to Figure 10
Step 7: Content of the loop table
Just like in the previous part of the experiment (see Step 1), we need three columns to define the experimental variables: stimulus, category, and correct_response. The only difference is that this time the stimuli are the JPG files that we just added to the file pool.
Regarding the correct_response, let's say that:
- The YOUNG category appears at the left side of the screen, whereas the OLD category appears at the right
- The response rule is as before
Create the aforementioned columns and make sure your block loop ends up looking like this:
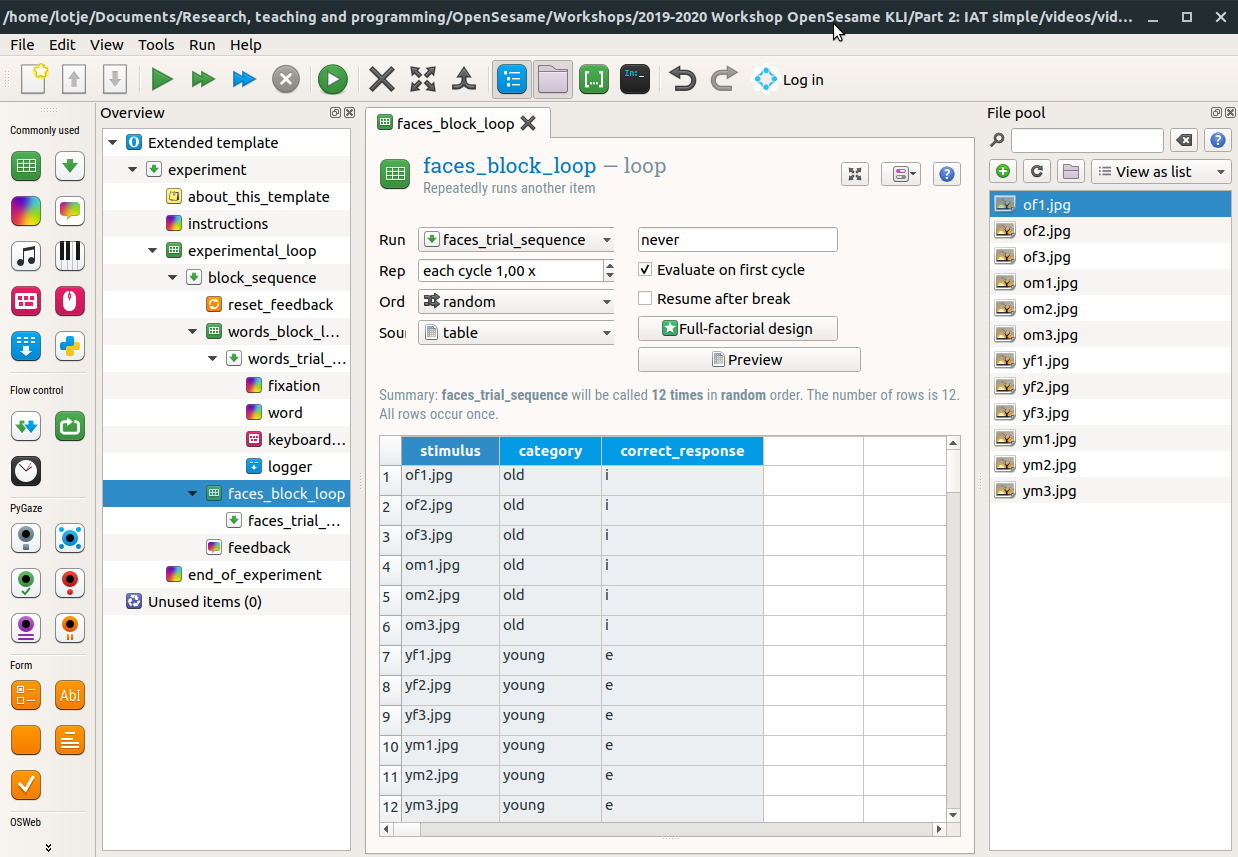
Figure 10. Content of the file pool and the loop table corresponding to Block 2 (categorizing faces) of the IAT.
Tip -- The values in the column stimulus should correspond exactly to the names of the files in the file pools. Otherwise, OpenSesame won't be able to find the JPGs if we're going to refer to them later.
Step 8: Modify the trial sequence
Right now, our new trial sequence is still empty. We need to fill it with the following events (see Figure 3):
- Show a fixation dot for 500 ms
- Show a picture of a face, along with the two category names (OLD and YOUNG)
- Collect a keyboard response
- Write all variables to the output file
Copy re-usable items
Event 1, 3 and 4 are identical to the word part of the experiment. We can therefore re-use the corresponding items by copying them. To do this:
- Right click on fixation (as part of the words_trial_sequence) in the overview area
- Choose 'copy (linked)', because we want to create another occurrence of the same item
- Right click on faces_trial_sequence (i.e., the new sequence)
- Choose 'Paste'
- Choose 'Insert into...'
- Repeat this procedure for the items keyboard_response and logger (see Video 4)
Tip -- If the order of the items in the sequence is messed up, you can correct this by dragging and dropping
Tip -- If you accidentally dropped a copy somewhere else in the overview area (i.e., outside the trial sequence that you targeted), you can always undo this by pressing Ctrl+Alt+Z
Step 9: Create the face display
Finally, we need to create a new sketchpad item to show the face stimuli. To do so:
- Grab a
sketchpaditem from the overview area - Drop it into the faces_trial_sequence
- Make sure it appears right after the fixation dot
- Rename the item as face
Right now, your overview area should resemble this:
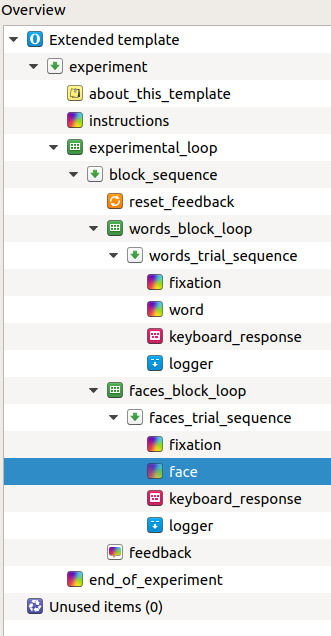
Figure 11. Overview area after having added all items to the faces_trial_sequence.
Step 10: Configure the content of the face sketchpad
Draw the category names
- As before, show the two categories (here: YOUNG in the upper left, and OLD in the upper right quandrant) by using the
Draw textlineelement - Set the duration of the sketchpad to 0 ms
Show the face stimulus
Next, we want to show a picture of a face at the center of the screen. As before, the stimulus is variable, such that which face is shown depends on the row in the block loop that is currently run. Therefore, we will use the square-bracket syntax again. But first:
- Select the
Draw imagesketchpad element - Click on the center
- Select one of the jpg files
Next, we want to make the jpg file variable rather than static. To do this, we need to make a tiny adjustment to the script of the sketchpad item:
- Click on the 'Select view' button at the top-right of the face tab and select 'View script'. You will now see the script that corresponds to the sketchpad that we have just created:
set duration 0
set description "Displays stimuli"
draw image center=1 file="of1.jpg" scale=1 show_if=always x=0 y=0 z_index=0
draw textline center=1 color=white font_bold=no font_family=mono font_italic=no font_size=30 html=yes show_if=always text="YOUNG<br />" x=-320 y=-192 z_index=0
draw textline center=1 color=white font_bold=no font_family=mono font_italic=no font_size=30 html=yes show_if=always text=OLD x=320 y=-192 z_index=0
- The only thing that we need to do is replace the string 'of1.jpg' with
[stimulus]. This means that OpenSesame uses the variable[stimulus](which contains all the JPG names) to determine which image should be shown.
set duration 0
set description "Displays stimuli"
draw image center=1 file=[stimulus] scale=1 show_if=always x=0 y=0 z_index=0
draw textline center=1 color=white font_bold=no font_family=mono font_italic=no font_size=30 html=yes show_if=always text="YOUNG<br />" x=-320 y=-192 z_index=0
draw textline center=1 color=white font_bold=no font_family=mono font_italic=no font_size=30 html=yes show_if=always text=OLD x=320 y=-192 z_index=0
- Click 'apply and close'
Next, it's time to test whether your experiment works up to this point.
The mixed blocks
Congruent mapping
The third block is a mix of block 1 and 2, such that participants have to categorize both words and faces. The mapping is congruent, such that POSITIVE words and YOUNG faces require a left hand response, whereas NEGATIVE words and OLD faces require a right hand response (see Figure 1).
Step 11: Create a third block loop and trial sequence
In order to create the third block of the IAT, we need to:
- Create a new block loop (and rename it to congruent_block_loop) (cf. Step 4)
- Create a new trial sequence (within the new block loop) and call it congruent_trial_sequence (cf. Step 5).
Your experimental overview should now look like so (Figure 5WithCongruent):
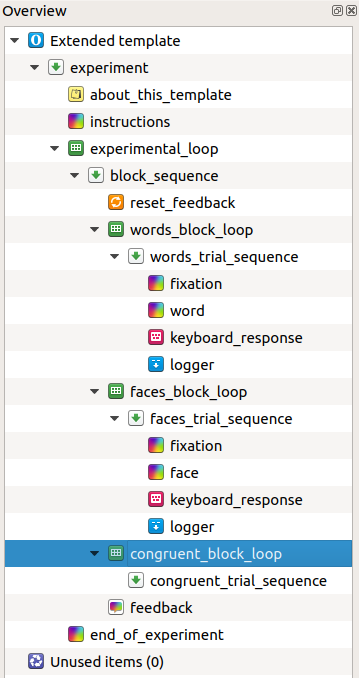
Figure 12. Experimental overview after having inserted a third block loop and trial sequence.
Step 12: Fill the congruent_block_loop
The content of the congruent block loop is very similar to the word and the face block loop, except that it now contains both types of stimuli. Therefore:
- Copy-paste the content of the word_block_loop to the congruent_block_loop. This will take up row 1 to 12
- Do the same for the content of the faces_block_loop. This will take up row 13 to 24
- (Make sure you don't copy the column headers twice)
Step 13: Fill the congruent_trial_sequence
- As in Step 8, copy the items fixation, keyboard_response and logger to the new trial sequence
- Unfortunately, we can't use copies of the word sketchpad and the face sketchpad, because we want to show both categories (i.e. POSITIVE vs NEGATIVE and YOUNG vs OLD) on the left and right side of the display
- Therefore, we append a new
sketchpaditem to the congruent_trial_sequence and call it congruent_stimulus - Make sure that the new sketchpad appears right after the fixation point, and before the
keyboard_response item
Your experimental overview should now look like this (Figure 5WithCongruent):
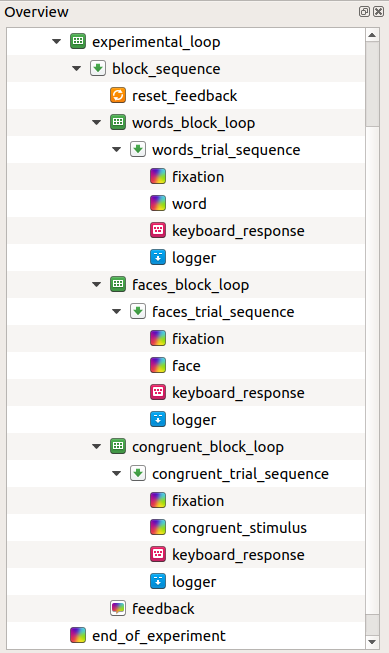
Figure 13. Experimental overview after having filled in the trial sequence of the congruent block.
Step 14: Adjust the content of the congruent_sketchpad
Open the tab of the congruent_stimulus sketchpad and change its duration to 0 instead of 'keypress'.
Category names
- Make sure that both category names appear on the upper left and right side of the screen (see Figure 1). Use the following mapping:
- The category names POSITIVE and YOUNG appear at the left side
- NEGATIVE and OLD appear at the right side
Word stimuli
Draw the word stimulus at the center of the screen in the same way as we did for block 1 (see Step 3). Use the `square-bracket syntax'.
Face stimuli
Draw the face stimulus at the center of the screen in the same way as we did for block 2 (see Step 9).Add
Tip -- Don't worry if your sketchpad looks messy. We will take care of that shortly.
Step 15: Using Show-if statements
In the mixed part of the experiment, we want OpenSesame to determine whether it should show a face or a word. We can do this by using Show-if statements. More precisely, we want that the stimulus_sketchpad:
- Shows a word only when the stimulus is a word (i.e., when the current cell in the stimulus column in the block loop is a word)
- Shows a face only when the stimulus is a face
To achieve this:
- Add a column to the congruent_block_loop and call it stimulus_type
- Give the cells the value 'word' or 'face', depending on the stimulus (see Figure 14)

Figure 14. Content of the block loop of the congruent part of the experiment.
Next, to make the content of the sketchpad dependent on the values in the newly created column:
- Select the black arrow in the element tool bar of the sketchpad
- Click on the question mark (which indicates the
Draw image elementthat takes care of the presentation of the JPG files) - Click on the
Show ifbox belonging to this element, which by default is set to 'always' - Use the square-bracket syntax to indicate that this part of the sketchpad should only be drawn if the current trial contains a face image by typing:
[stimulus_type] = face
- Do the same for the
Draw text elementthat controls the presentation of the written words. This time, the Show-if statement should be
[stimulus_type] = word
Test whether the first three blocks of your experiment works as desired.
Incongruent mapping
Step 16: Create the incongruent block of the experiment
Assignment
Use what you learned in the previous steps to build the final, incongruent part of the experiment.
Some tips:
- Give new items (e.g. the new
loopandsequenceitems) meaningful names (e.g. incongruent_block_loop, incongruent_trial_sequence) - Copy the items that are identical for each block (i.e. the fixation point, the keyboard_response and the logger)
- You can't copy the stimulus sketchpad, because the mapping of the categories (appearing at the upper left and right side) should be swapped, such that:
- The left side shows POSITIVE and OLD
- The right side shows NEGATIVE and YOUNG (see Figure 1)
- The values in the correct_response column should be changed accordingly
Tip You can use an unlinked copy of the congruent_stimulus sketchpad in order to create the incongruent_stimulus sketchpad (which is almost identical except that the category names OLD and YOUNG are swapped).
In contrast to a linked copy, an unlinked copy will initially look identical (except for its name), but you can edit the original without affecting the unlinked copy, and vice versa.
Extra assignments:
Easy: add an instruction and goodbye screen
sketchpadandform_text_displayitems can present text- Good instructions are short and concrete
Medium: provide feedback on every trial
- Use the built-in variable correct that has
- the value 1 if the participant responded correctly
- the value 0 if the participant made an error
- An easy way to provide feedback is by briefly presenting a red dot after an incorrect response, and a green dot after a correct response
- Use Show-if statements