


Wisconsin Card Sorting Test
- The basic steps
- Step 1: Download and start OpenSesame
- Step 2: Add a block_loop and trial_sequence
- Step 3: Import images and sound files
- Step 4: Create a static card display
- Step 5: Make the response card variable
- Step 6: Make the stimulus cards variable
- Step 7: Determine the correct response (for one matching rule)
- Step 8: Give feedback to the participant
- Step 9: Test the experiment
- Extra assignments
- Extra 1 (easy): Add a logger
- Extra 2 (easy): Inspect the data file
- Extra 3 (easy): Add instructions and goodbye screen
- Extra 4 (medium): Set the correct response and matching rule through Python inline script
- Extra 5 (difficult): Periodically change the matching rule
- Extra 6 (really difficult): Constrain the response card
- Solutions
The basic steps
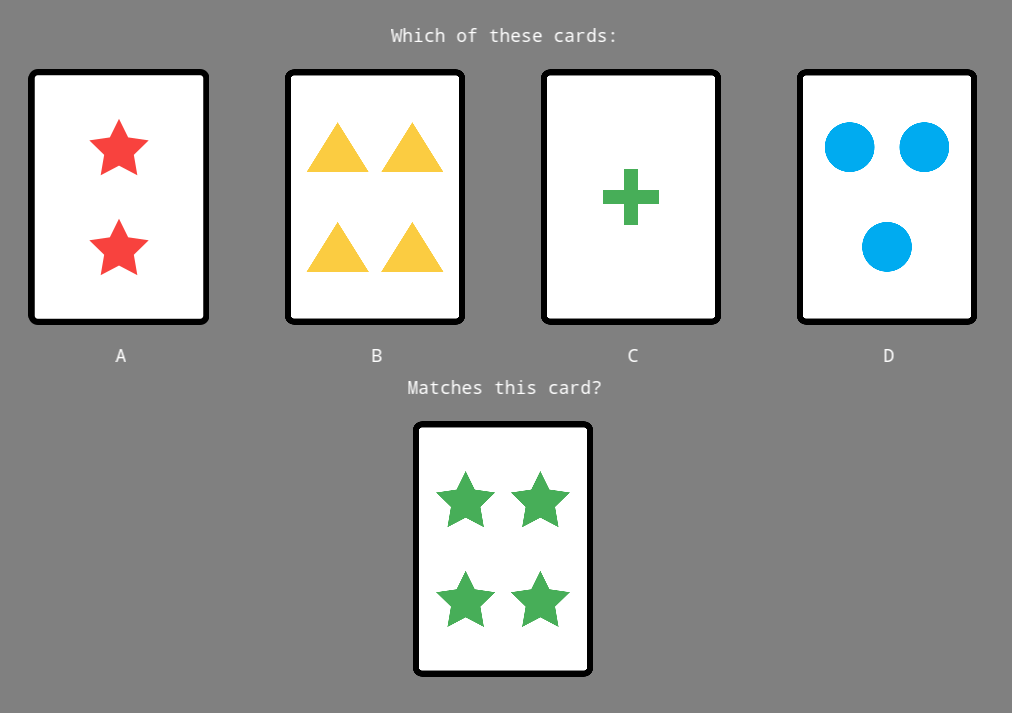
Figure 1. The Wisconsin Card Sorting Test (WCST) is a neuropsychological test of executive functions.
In this tutorial, you will implement the Wisconsin Card Sorting Test (WCST). You will also learn how to embed Python code in the experiment. (For the OSWeb implementation of this task, see this tutorial).
In the WCST, participants see four stimulus cards, which differ on three dimensions: color (red, green, blue, yellow), shape (circle, star, triangle, cross), and number of shapes (one, two, three, or four). Participants also see a single response card, which also has a color, shape, and number.
The participant's task is to match the response card to the correct stimulus card, based on a specific dimension (e.g. color), or matching rule. The participant initially doesn't know on which dimension to match, and his or her task is to figure out the matching rule through trial and error.
To make things more difficult, the matching rule changes after every five correct responses. Therefore, the participant needs to flexibly update their matching rule.
Step 1: Download and start OpenSesame
OpenSesame is available for Windows, Linux, and Mac OS. This tutorial is written for OpenSesame 3.2 or higher.
When you start OpenSesame, you will be given a choice of template experiments, and (if any) a list of recently opened experiments (see Figure 2).
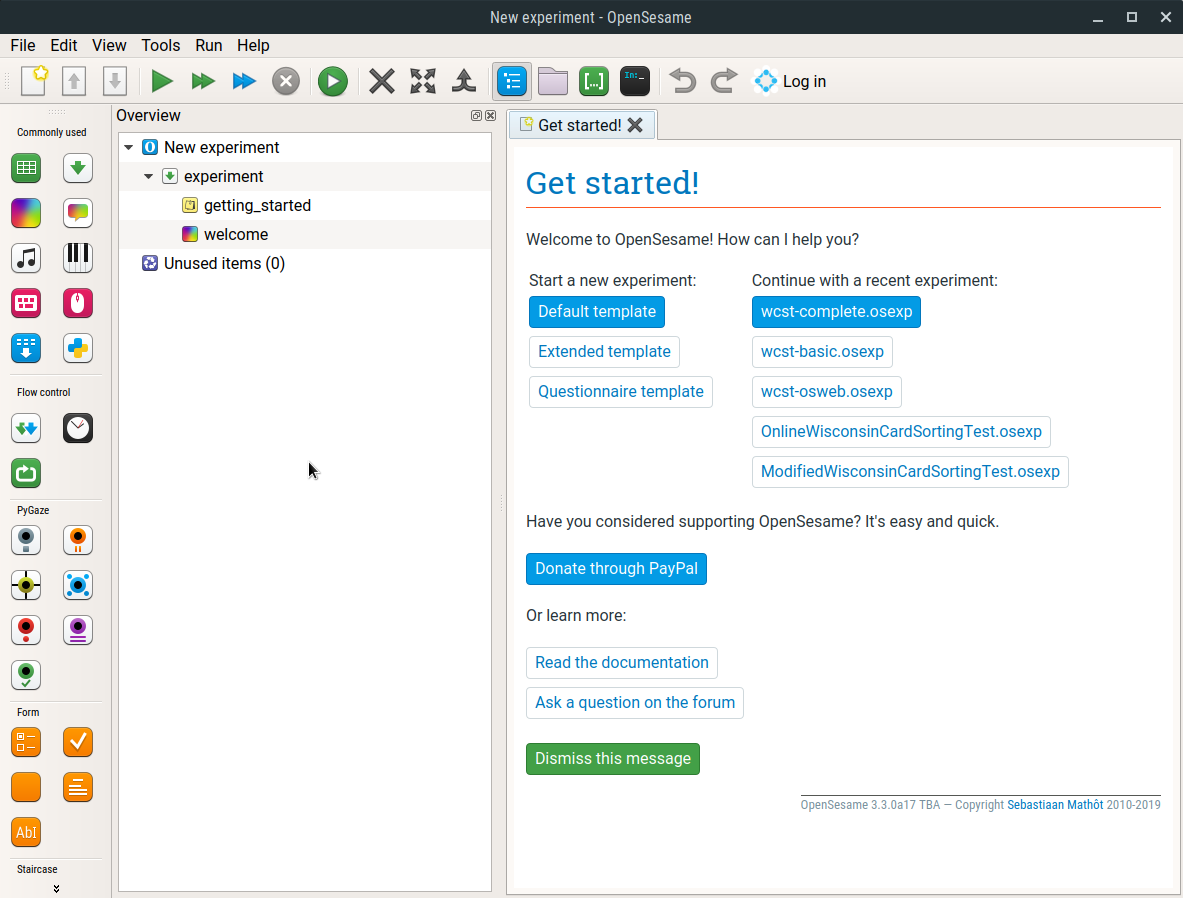
Figure 2. The OpenSesame window on start-up.
The Extended template provides a good starting point for creating many experiments that use a block-trial structure. However, in this tutorial we will create the entire experiment from scratch, and we will use the 'default template', which is already loaded when OpenSesame is launched (Figure 3). Therefore, simply close the 'Get started!' and (if shown) 'Welcome!' tabs.
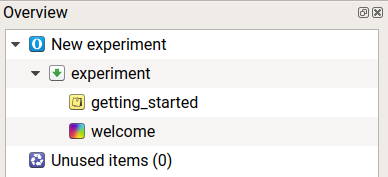
Figure 3. The structure of the 'Default template' as seen in the overview area.
Step 2: Add a block_loop and trial_sequence
The default template starts with three items: A notepad called getting_started, a sketchpad called welcome, and a sequence called experiment. We don't need getting_started and welcome, so let's remove these right away. To do so, right-click on these items and select 'Delete'. Don't remove experiment, because it is the entry for the experiment (i.e. the first item that is called when the experiment is started).
Our experiment will have a very simple structure. At the top of the hierarchy is a loop, which we will call block_loop. The block_loop is the place where we will define our independent variables. To add a loop to your experiment, drag the loop icon from the item toolbar onto the experiment item in the overview area.
A loop item needs another item to run; usually, and in this case as well, this is a sequence. Drag the sequence item from the item toolbar onto the new_loop item in the overview area. OpenSesame will ask whether you want to insert the sequence into or after the loop. Select 'Insert into new_loop'.
By default, items have names such as new_sequence, new_loop, new_sequence_2, etc. These names are not very informative, and it is good practice to rename them. Item names must consist of alphanumeric characters and/ or underscores. To rename an item, double-click on the item in the overview area. Rename new_sequence to trial_sequence to indicate that it will correspond to a single trial. Rename new_loop to block_loop to indicate that will correspond to a block of trials.
Finally, click on 'New experiment'to open the General Properties tab. Click on the title of the experiment, and rename it to 'Wisconsin Card Sorting Test'.
The overview area of our experiment now looks as in Figure 4.
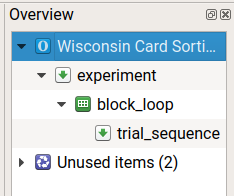
Figure 4. The overview area at the end of Step 2.
Step 3: Import images and sound files
For this experiment, we will use images for the playing cards. You can download these from here:
Download stimuli.zip and extract it somewhere (to your desktop, for example). Next, in OpenSesame, click on the 'Show file pool' button in the main toolbar (or: Menu →View → Show file pool). This will show the file pool, by default on the right side of the window. The easiest way to add the stimuli to the file pool is by dragging them from the desktop (or wherever you have extracted the files to) into the file pool. Alternatively, you can click on the '+' button in the file pool and add files using the file-selection dialog that appears. The file pool will automatically be saved with your experiment.
After you have added all stimuli, your file pool looks as in Figure 5.
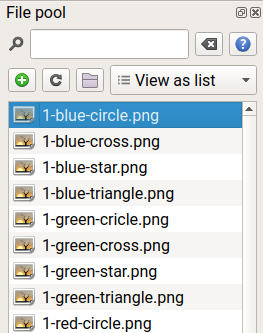
Figure 5. The file pool containing the stimuli.
Step 4: Create a static card display
To start with, we'll create a display with four stimulus cards and one response card. However, which cards are shown will not, for now, depend on variables; that is, we will create a static display.
Drag a a sketchpad into trial_sequence, and rename it to card_display. Use the image tool to draw four cards in a horizontal row somewhere near the top of the display; these will be the stimulus cards. Draw a single card near the bottom of the display; this will be the response card. Also add some text to indicate to the participant what he or she has to do, namely press a, b, c, or d to indicate which of the stimulus cards matches the response card. The exact text, layout, and cards are up to you! Tips: you can use the scale option to adjust the size of the cards; you can change the background color in the General Properties tab, which you can open by clicking on the top-level item of the experiment.
For me, the result looks like this:
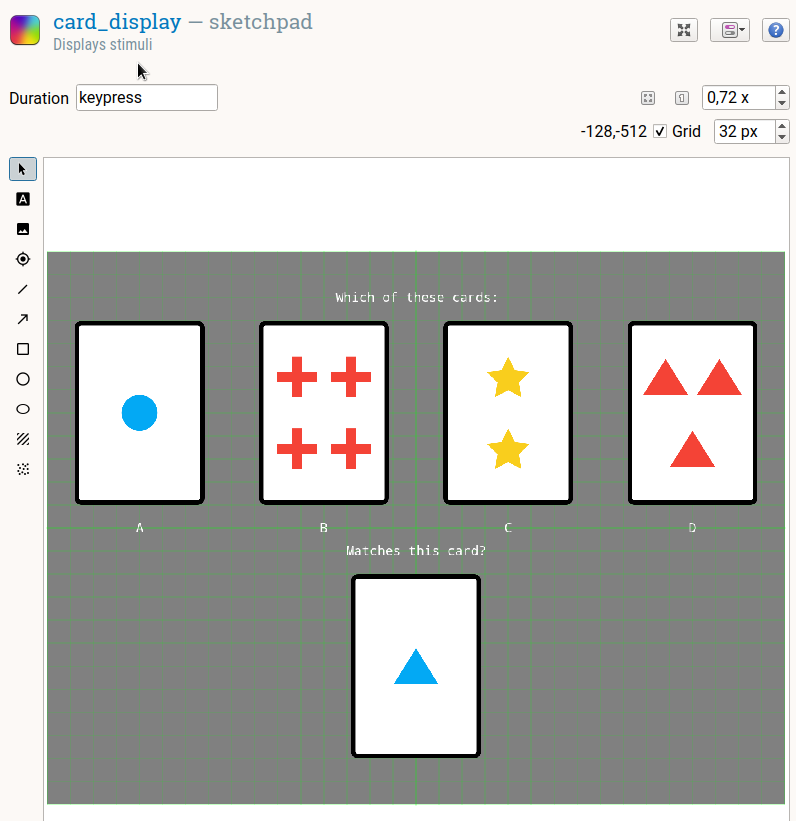
Figure 6. A sketchpad with statically defined cards.
Step 5: Make the response card variable
Right now we're always showing the same response card (in the example above a single blue triangle). But of course we want to show a different response card on every trial. To do so, we first need to define the variables that determine which response card we will show. We will do this in the block_loop.
Open the block_loop. The loop table is now empty. To determine the color, shape, and number of the response card, we could manually create three columns (response_color, response_shape, and response_number) and 64 rows for all possible combinations of colors, shapes, and numbers. But that would be a lot of work. Instead, we will use the full-factorial-design wizard, which you can open by clicking on the 'Full-factorial design' button. (A full-factorial design is a design in which all possible combinations of variable levels occur.) In this wizard, you create one column for each of the three variables, and in the cells below enter the possible values for that variable (see Figure 7).
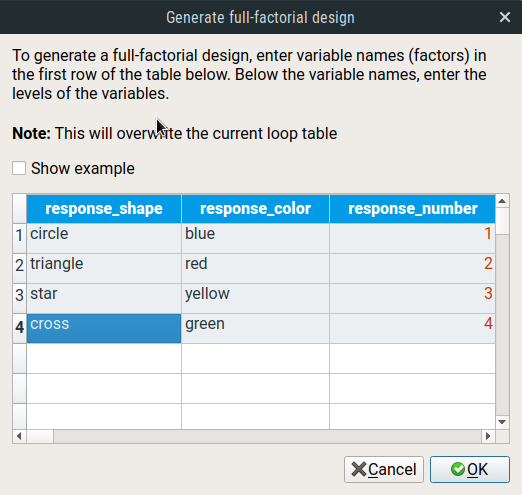
Figure 7. The full-factorial-design wizard allows you to easily generate large loop tables that correspond to full-factorial designs.
Next, click the OK button. The block_loop now contains all 64 combinations of colors, numbers, and shapes (see Figure 8).
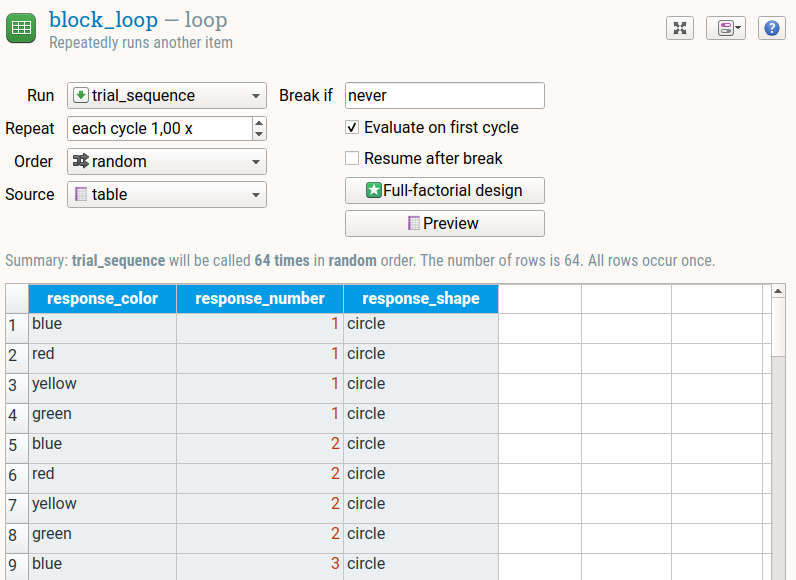
Figure 8. The block_loop at the end of step 5.
Now return to the card_display. Every item in OpenSesame is defined through a script. This script is generated automatically by the user interface. Sometimes it can be convenient (or even necessary) to edit this script directly. The most common reason for editing an item's script is to add variables to the script, which is also what we will do now!
To view the script, click on the 'View' button and select 'View script'. (The view button is the middle button at the top right of the item controls.) This will open a script editor.
The script for card_display mostly consists of draw commands, which define each of the five cards, and also the various text elements. Locate the line that corresponds to the response card. You can find it by looking at the Y coordinate, which should be positive (i.e. at the lower part of the display), or by looking at the name of the image file.
draw image center=1 file="1-blue-triangle.png" scale=0.5 show_if=always x=0 y=192 z_index=0
Right now, in my example, the image file for the response card is always "1-blue-triangle.png". But of course we don't always want to show a single blue triangle. Instead, we want to have the image file depend on the variables that we have defined in the block_loop. To do so, replace the number by [response_number], the color by [response_color], and the shape by [response_shape]: (The square brackets indicate that these refer to names of variables.)
draw image center=1 file="[response_number]-[response_color]-[response_shape].png" scale=0.5 show_if=always x=0 y=192 z_index=0
Click on Apply to accept the changes to the script. The response card has now been replaced by a question-mark icon. This is because OpenSesame doesn't know how to show a preview of an image that has been defined using variables. But don't worry: the image will be shown when you run the experiment!
Step 6: Make the stimulus cards variable
The stimulus cards should be more-or-less randomly selected, but each color, shape, and number should occur only once; that is, there should never be two red cards or two cards with triangles. (If there were, the matching procedure would become ambiguous.) To accomplish this, we can use horizontal shuffling, which is a powerful but unusual feature of the loop item.
First, open the block_loop and create 12 (!) new columns to define the stimulus cards: color1, for the color of the first card, color2, color3, color4, and shape1 … shape4, and number1 … number4. Each column has the same value on every row (see Figure 9).
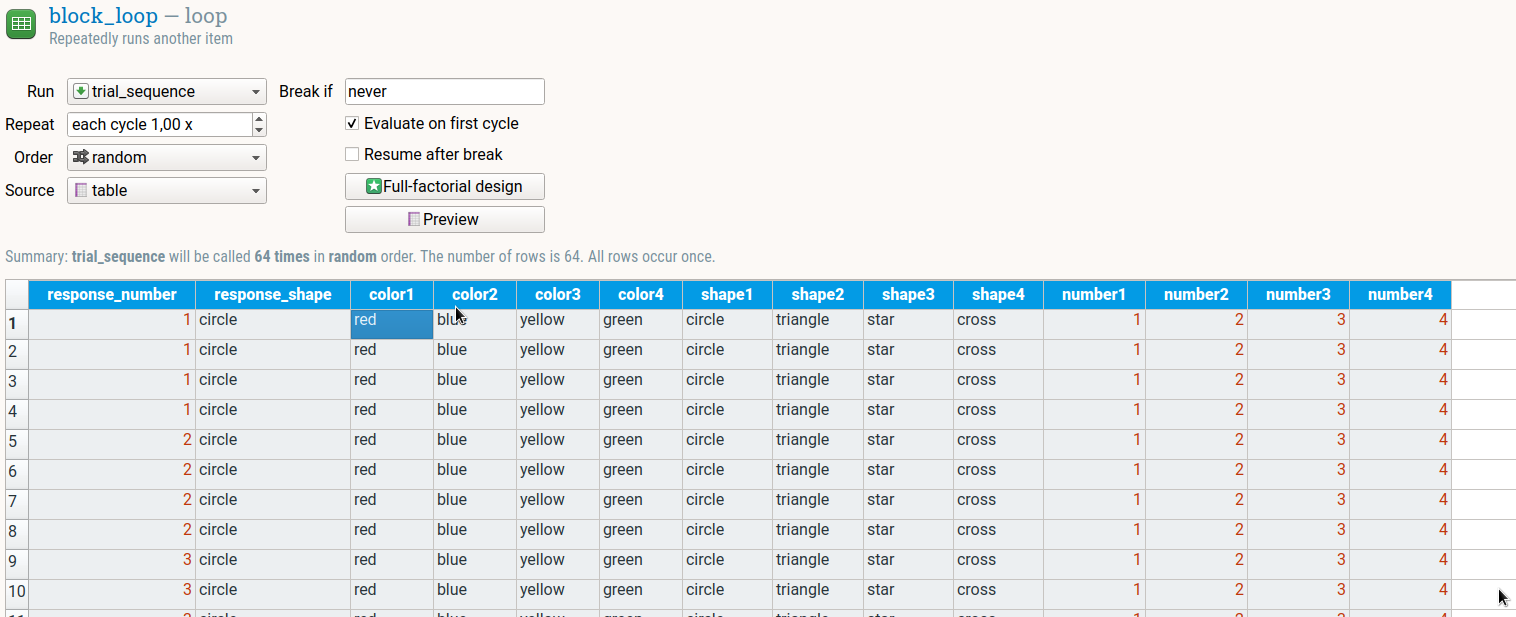
Figure 9. The block_loop during step 6.
But we're not done yet! Right now, the first stimulus card is always a single red circle, the second two blue triangles, etc. To randomize this we tell OpenSesame to randomly swap (horizontally shuffle) the values of the four color variables, the four shape variables, and the four number variables. To do so, open the script for the block_loop. At the semi-last line (right before run trial_sequence) add the following commands:
shuffle_horiz color1 color2 color3 color4
shuffle_horiz shape1 shape2 shape3 shape4
shuffle_horiz number1 number2 number3 number4
Click on Apply to accept the script. To see if this has worked, click on the Preview button. This will show a preview of how the loop table will be randomized during the experiment. Does it look good?
Now return to the card_display and have the image of the first stimulus card depend on the variable color1, shape1, and number1, and analogously for the other stimulus cards. (If you're unsure how to do this, revisit step 5.)
Step 7: Determine the correct response (for one matching rule)
For now, we're going to assume that participants always match by shape. (One of the Extra Assignments is to improve this.)
Right now, the duration of card_display is set to 'keypress'. This means that the card_display is shown until a key is pressed, but it provides no control over how this key press is handled. Therefore, change the duration to 0, and insert a keyboard_response directly after the card_display. Rename the keyboard_response to press_a, and specify that the correct response is 'a' and that the allowed responses are 'a;b;c;d'.
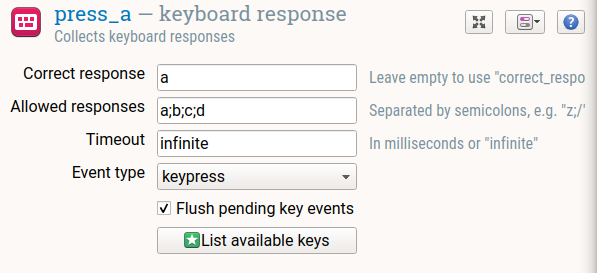
Figure 10. One of the keyboard_response items defined in step 7.
But this is not enough! Right now there's a single response item that assumes that the correct response is always 'a'. We have not yet specified when the correct response is 'a', nor have we considered trials on which the correct response is 'b', 'c', or 'd'.
To accomplish this, first create three more keyboard_response items: press_b, press_c, and press_d. These are all the same, except for the correct response, which is defined for each of them separately and should be respectively 'b', 'c', and 'd'.
Finally, in the trial_sequence, use Run If statements to decide under which condition each of the four keyboard_response items should be executed (thus deciding what the correct response is). For press_a, the condition is that shape1 should be equal to response_shape. Why? Well, because that means that the shape of the first stimulus card is equal to the shape of the response card, and in that case the correct response is 'a'. This condition corresponds to the following run-if statement: [shape1] = [response_shape]. The run-if statements for the other keyboard_response items are analogous (see Figure 11).
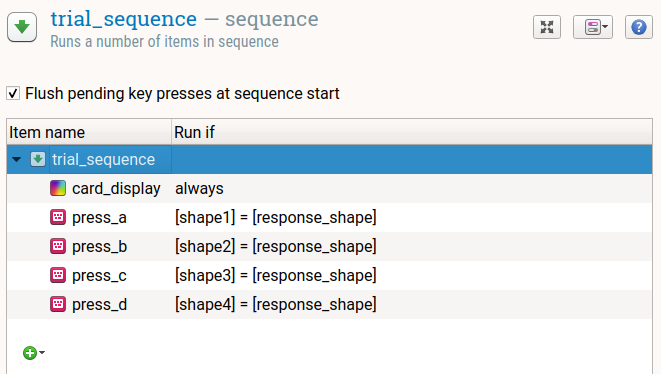
Figure 11. The trial_sequence at the end of step 7.
Step 8: Give feedback to the participant
OpenSesame automatically keeps track of whether a response was correct or not, by setting the variable correct to respectively 1 or 0. (Provided, of course, that you have specified the correct response, as we've done in step 7.) We can use this to give feedback to the participant about whether they responded correctly or not.
To do this, add two new sketchpads to the trial_sequence and call them correct_feedback and incorrect_feedback. Then, specify which of the two should be executed using a run-if statement (see Figure 12).

Figure 12. The trial_sequence at the end of step 8.
Finally, add some useful content to both sketchpads. For example, for correct_feedback you could use a green fixation dot, and for incorrect_feedback you could use a red fixation dot, in both cases shown for 500 ms (i.e. setting the sketchpad duration to 500). Colored dots are a nice, unobtrusive way to provide feedback.
Step 9: Test the experiment
You have now created a basic (but incomplete!) implementation of the Wisconsin Card Sorting Test. (You will complete the implementation as part of the Extra Assignments below.)

Figure 13. The main toolbar contains buttons to (from left to right): run fullscreen, run in a window, quick-run (run in a window without asking for log file or participant numebr ), abort the experiment, and run in a browser.
To test the experiment, click on the quick-run button (the blue double arrows) to test the experiment on the desktop (see Figure 13). If the experiment runs as expected on the desktop, click on the run-in-browser button (the arrow inside a green circle) to test the experiment in a browser.
Extra assignments
Extra 1 (easy): Add a logger
OpenSesame doesn't automatically log data. Instead, you need to explicitly add a logger item to your experiment. In a trial-based experiment, a logger is generally the last item of the trial_sequence, so that it logs all the data that was collected during the trial.
Right now, our WCST doesn't log any data. Time to fix that!
Extra 2 (easy): Inspect the data file
Requires that you have completed Extra 1.
Give the experiment a short test run. Now inspect the log file in a program like Excel, LibreOffice Calc, or JASP. Identify the relevant variables, and think of how you could analyze the results.
Pro-tip: Set the repeat value of the block_loop to 0.1 to reduce the number of trials during testing.
Extra 3 (easy): Add instructions and goodbye screen
A good experiment comes with clear instructions. And a polite experiment says goodbye to the participants when they are done. You can use a sketchpad to do this.
Extra 4 (medium): Set the correct response and matching rule through Python inline script
To include Python scripting in OpenSesame, you can use the inline_script item.
So far, the matching rule is always to match by shape. To change this, add an inline_script item to the start of the experiment, and use the following script (in the prepare phase) to randomly set the variable matching_rule to 'shape', 'number', or 'color'.
import random

var.matching_rule = random.choice(['shape', 'number', 'color'])
Now add another inline_script item to the start of the trial_sequence. In the prepare phase, add a script to set the correct_response variable to 'a', 'b', 'c', or 'd'. To do so, you need a series of if statements, that first look at the matching rule, and then look at which shape corresponds to the response shape (for the shape-matching rule) or which color corresponds to the response color (for the color-matching rule) etc.
To get started, here's part of the solution (but it needs to be completed!):
if var.matching_rule == 'shape':
    if var.shape1 == var.response_shape:
        var.correct_response = 'a'
    # Not done yet
# Not done yet

# Let's print some info to the debug window
print('matching_rule = {}'.format(var.matching_rule))
print('correct_response = {}'.format(var.correct_response))
Extra 5 (difficult): Periodically change the matching rule
So far, the matching rule is randomly determined at the start of the experiment, but then remains constant throughout the experiment. In a real WCST, the matching rule changes periodically, typically after the participant has made a fixed number of correct responses.
To implement this, you need another inline_script. Here are some pointers to get started:
- Use a counter variable that increments by 1 after a correct response, and is reset to 0 after an incorrect response.
- When changing the matching rule, make sure that it is not (by coincidence) set to the same matching rule again.
Extra 6 (really difficult): Constrain the response card
Right now, the response card can overlap with a stimulus card on multiple dimensions. For example, if one of the stimulus cards is a single blue circle, the response card might be two blue circles, thus overlapping on both color and shape. In a real WCST, the response card should overlap with each stimulus card on no more than a dimension.
This one is up to you. No pointers this time!
Solutions
You can download the full experiment, including the solutions to the extra assignments, here: