Backends
The backend is the software layer that deals with input (keyboard input, mouse input, etc.) and output (display presentation, sound playback, etc.). There are many libraries that offer this type of functionality and OpenSesame could, in principle, use any one of them. For this reason, OpenSesame is backend-independent, in the sense that you can choose which backend should be used. Currently there are four backends: legacy, psycho, xpyriment, and osweb.
Differences and some tips
Usually, you won't notice which backend is used. The differences between backends are largely technical, and, as long as you use the graphical user interface, all backends work more ore less the same way. However, there are a few reasons to prefer one backend over another:
- If you want to run the experiment in a browser, you need to select the osweb backend.
- Backend differs in temporal precision.
- Tip: If you care about millisecond temporal precision, use xpyriment or psycho.
- Backends differ in how long stimulus preparation takes.
- Tip: If forms are slow, use legacy.
- Tip: If the intertrial interval is long (due to stimulus preparation), use legacy.
- You can use backend-specific functionality when writing Python code.
- Tip: If you want to use PsychoPy functionality, use psycho.
- Tip: If you want to use Expyriment functionality, use xpyriment.
- Tip: If you want to use PyGame functionality, use legacy.
- Some backends are not available on all platforms.
Selecting a backend
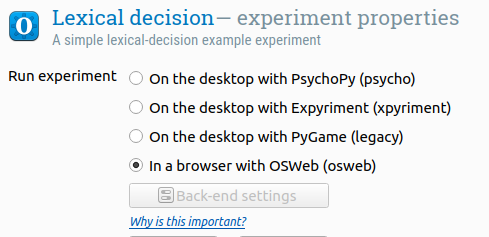
You can select a backend in the general properties of the experiment (Figure 1).

Figure 1. Selecting a backend
If you view the general script (select "Show script editor"), you will see that there are actually six distinct backends: canvas, keyboard, mouse, sampler, color, and clock. The combobox-method automatically selects an appropriate, predefined combination of backends, but you could, in theory, mix and match.
For example, if you select the xpyriment backend, the following code will be generated:
set sampler_backend legacy
set mouse_backend xpyriment
set keyboard_backend legacy
set color_backend legacy
set clock_backend legacy
set canvas_backend xpyriment
xpyriment
The xpyriment backend is built on top of [Expyriment][], a library designed for creating psychology experiments. It is a light-weight hardware-accelerated backend with excellent timing properties. If you care about temporal precision, but do not plan on generating complex stimuli (i.e. Gabor patches, random-dot gratings, etc.) xpyriment is a good choice.
Using Expyriment directly
You can find extensive documentation on Expyriment at http://www.expyriment.org/doc. The following code snippet shows a line of text:
from expyriment import stimuli
text = stimuli.TextLine('This is expyriment!')
text.present()
Citation
Although Expyriment is bundled with the binary distributions of OpenSesame, it is a separate project. When appropriate, please provide the following citation in addition to citing OpenSesame:
Krause, F., & Lindemann, O. (in press). Expyriment: A Python library for cognitive and neuroscientific experiments. Behavior Research Methods.
psycho
The psycho backend is built on top of [PsychoPy][], a library designed for creating psychology experiments. It is hardware accelerated and provides high-level routines for creating complex visual stimuli (drifting gratings, etc.). If you care about timing and plan on creating complex stimuli, Psycho is a good choice.
Using PsychoPy directly
You can find extensive documentation on PsychoPy at http://www.psychopy.org/. When using PsychoPy in OpenSesame, it is important to know that the main window can be accessed as self.experiment.window or simply win. So the following code snippet draws a Gabor patch:
from psychopy import visual
gabor = visual.PatchStim(win, tex="sin", size=256, mask="gauss", sf=0.05, ori=45)
gabor.draw()
win.flip()
Tutorials
A tutorial specifically for using PsychoPy from within OpenSesame:
And a more general PsychoPy tutorial:
Citation
Although PsychoPy is bundled with the binary distributions of OpenSesame, it is a separate project. When appropriate, please cite the following papers in addition to citing OpenSesame:
Peirce, J. W. (2007). PsychoPy: Psychophysics software in Python. Journal of Neuroscience Methods, 162(1-2), 8-13. doi:10.1016/j.jneumeth.2006.11.017
Peirce, J. W. (2009). Generating stimuli for neuroscience using PsychoPy. Frontiers in Neuroinformatics, 2(10). doi:10.3389/neuro.11.010.2008
legacy
The legacy backend is built on top of [PyGame][] in non-OpenGL mode. The downside of this is that there is no hardware acceleration, and the timing properties are not as good as that of the psycho or xpyriment backends. The upside is that PyGame is very easy to use, very reliable, and well supported on a wide range of platforms.
Mouse-cursor visibility
On some systems, the mouse cursor is not visible when using the legacy backend in fullscreen mode. You can work around this is the following ways:
- Open the legacy backend settings and set "Double buffering" to "no".
- Note: This may disable v-sync, which can be important for time critical experiments, as discussed here.
- Open the legacy backend settings and set "Custom cursor" to "yes".
- Switch to another backend.
Using PyGame directly
PyGame is well documented and you can find everything you need to know about using PyGame on http://www.pygame.org/docs/. Specific to OpenSesame is the fact that the display surface is stored as self.experiment.window or simply win. So the following code snippet, which you could paste into an inline_script item, draws a red rectangle to the display:
import pygame # Import the PyGame module
pygame.draw.rect(self.experiment.window, pygame.Color("red"),
    [20, 20, 100, 100]) # Draw a red rectangle. Not shown yet...
pygame.display.flip() # Update the display to show the red rectangle.
osweb
The osweb backend is built on top of OSWeb and allows you run experiments in a browser. For more information, see:


