


Intermediate tutorial (Python) visual search
- About OpenSesame
- About this tutorial
- Resources
- The experiment
- Experimental design
- Step 1: Create the basic structure of the experiment
- Step 2: Define experimental variables that are varied between blocks
- Step 3: Give instructions at the start of each block
- Step 4: Define experimental variables that are varied within blocks
- Step 5: Create the trial sequence
- Step 6: Generate the search display
- Step 7: Define the correct response
- Step 8: Give per-trial feedback
- Finished!
- References
About OpenSesame
OpenSesame is a user-friendly program for the development of behavioral experiments for psychology, neuroscience, and experimental economy. For beginners, OpenSesame has a comprehensive graphical, point-and-click interface. For advanced users, OpenSesame supports Python (desktop only) and JavaScript (desktop and browser).
OpenSesame is freely available under the General Public License v3.
About this tutorial
This tutorial shows how to create a basic visual-search experiment using OpenSesame (Mathôt, Schreij, & Theeuwes, 2012). We will use both the graphical interface and Python scripting to develop an experiment that you can run on the desktop in a traditional lab-based setting. Some experience with OpenSesame and Python is recommended. This tutorial takes approximately one hour.
A JavaScript-based version of this tutorial is also available. If you want to run your experiments online in a browser (with OSWeb), then the JavaScript tutorial is what you need:
Resources
- Download — This tutorial assumes that you are running OpenSesame version 4.0.0 or later. You can download the most recent version of OpenSesame from:
- Documentation — A dedicated documentation website can be found at:
- Forum — A support forum can be found at:
- Sigmund -- SigmundAI is an AI assistant with expert knowledge of OpenSesame and can be found at:
The experiment
In this tutorial, you will create a basic visual-search experiment. The experiment resembles the classic visual-search studies of Treisman and Gelade (1980), but it is not identical.
In this experiment, participants search for a target object, which can be a yellow square, a yellow circle, a blue square, or a blue circle; the identity of the target is varied between blocks of trials. Participants indicate whether the target is present or not by pressing the right (present) or left (absent) arrow key.
In addition to the target, zero or more distractor objects are shown. There are three conditions, and the condition determines what kind of distractors there are:
- In the Conjunction condition, distractors can have any shape and color, with the only restriction that distractors cannot be identical to the target. So, for example, if the target is a yellow square, then distractors are yellow circles, blue circles, and blue squares.
- In the Shape Feature condition, distractors have a different shape from the target, but can have any color. So, for example, if the target is a yellow square, then distractors are yellow circles and blue circles.
- In the Color Feature condition, distractors can have any shape, but have a different color from the target. So, for example, if the target is a yellow square, then distractors are blue squares and blue circles.
Immediate feedback is shown after each trial: a green dot after a correct response, and a red dot after an incorrect response. Detailed feedback on average response times and accuracy is shown after each block of trials.
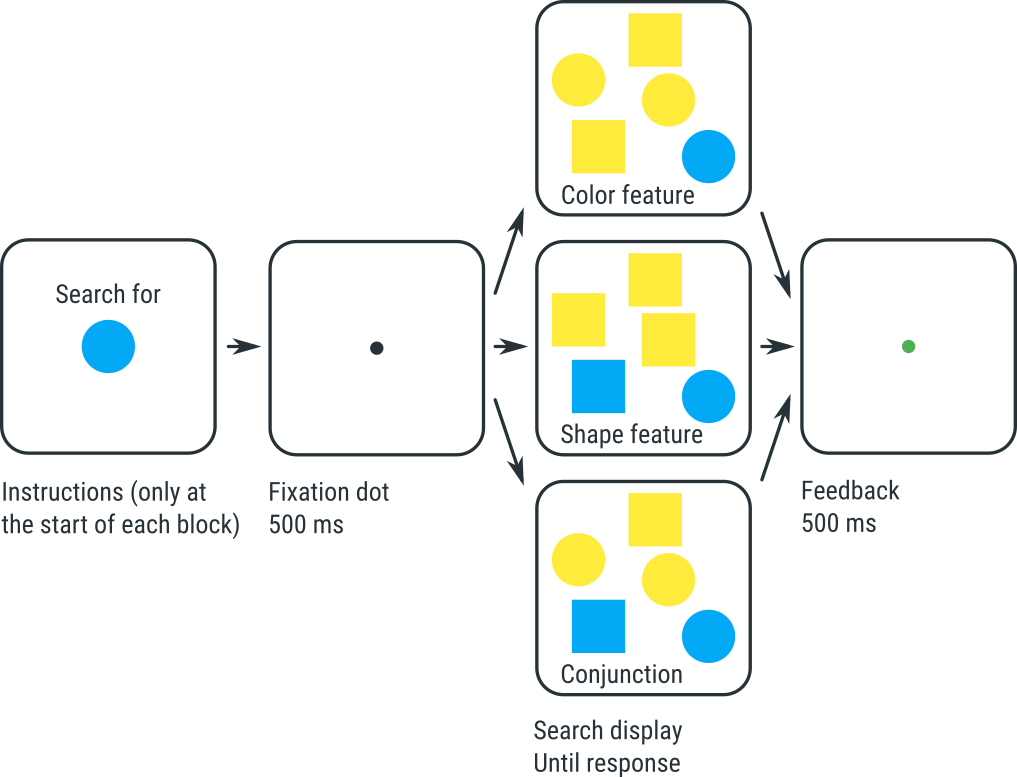
Figure 1. The visual-search experiment that you will implement in this tutorial.
Experiments like this show two typical findings:
- It takes more time to find the target in the Conjunction condition than in the two Feature conditions.
- In the Conjunction condition, response times increase as the number of distractors increases. This suggests that people search for the target one item at a time; this is called serial search.
- In the Feature conditions (both shape and color), response times do not, or hardly, increase as the the number of distractors increases. This suggests that people process the entire display at once; this is called parallel search.
According to Treisman and Gelade's feature-integration theory, these results reflect that the Conjunction condition requires that you combine, or bind, the color and shape of each object. This binding requires attention, and you therefore need to shift your attention from one object to the next; this is slow, and explains why response times depend on how many objects there are. In contrast, in the Feature conditions, color and shape do not need to be bound, and therefore the whole display can be processed in a single sweep without attention being directed at each and every object.
Experimental design
This design:
- Is within-subject, because all participants do all conditions
- Is fully crossed (or full-factorial), because all combinations of conditions occur
- Has three conditions (or factors):
- Varied within blocks:
set_sizewith three levels (1, 5, 15), or SS3conditionwith three levels (conjunction, feature_shape, feature_color), or CN3target_presentwith two levels (present, absent), or TP2
- Varied between blocks:
target_shapewith two levels (square, circle), or TS2target_colorwith two levels (yellow, blue), or TC2
- Varied within blocks:
- Has N subjects, or SN
You can write this design as SN×SS3×CN3×TP2×TS2×TC2
For more information about this notation for experimental design, see:
Step 1: Create the basic structure of the experiment
Start OpenSesame and, in the 'Get started!' tab, select the Extended template. This template provides the basic structure that is common to many cognitive-psychology experiments, such as the one that we will create here.
The Extended template contains a few items that we don't need. Delete the following items:
- about_this_template
- practice_loop
- end_of_practice
When you have deleted these items, they are still visible in the 'Unused items' bin. To permanently delete these items, click on the 'Unused items' bin, and then click on the 'Permanently delete unused items' button.
Finally, give the experiment a good title, such as 'Visual search'. To do this, open the general-properties tab (by clicking on 'Extended template' in the overview area) and click on the experiment name to edit it.
The overview area should now look like Figure 2:

Figure 2. The overview area at the end of step 1.
Step 2: Define experimental variables that are varied between blocks
As described above, two variables are varied between blocks in our experiment: target_shape and target_color. We therefore need to define these variables in the experimental_loop. To understand why, consider the structure shown in Figure 2, starting from the bottom (i.e. the most indented level).
- trial_sequence corresponds to a single trial
- block_loop corresponds to a block of a trials
- Therefore, variables defined here vary for each run of trial_sequence; in other words, variables defined in block_loop are varied within blocks.
- block_sequence corresponds to a block of trials, preceded by resetting of the feedback variables, and followed by participant feedback
- experimental_loop corresponds to multiple blocks of trials
- Therefore, variables defined here vary for each run of block_sequence; in other words, variables defined in experimental_loop are varied between blocks.
- experiment corresponds to the entire experimental, which is an instruction screen, followed by multiple blocks of trials, followed by an end-of-experiment screen
Click on experimental loop, and define:
target_shape, which can be 'square' or 'circle'; andtarget_color, which can be 'yellow' or 'blue'.
We have a full-factorial design, which means that all 2 × 2 = 4 combinations must occur. The table of experimental_loop should now look like Figure 3:
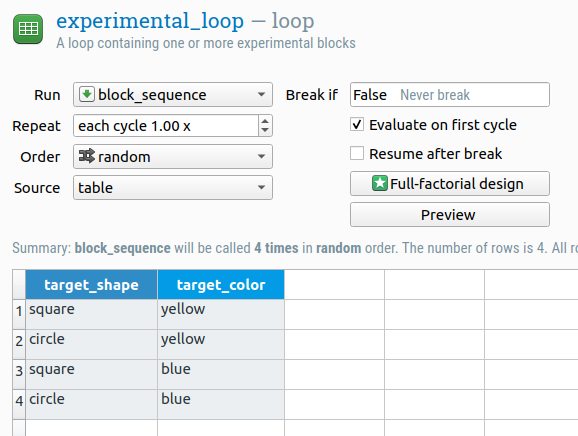
Figure 3. The table of experimental_loop at the end of step 2.
Step 3: Give instructions at the start of each block
Right now, the experiment starts with a single instructions screen. In our case, we want to give instructions before each block of trials, to tell the participant what target to look for (because the identity of the target varies between blocks).
Move the instructions into block_sequence
Therefore, pick up the instructions item and drag it onto block_sequence. A pop-up will appear, asking you if you want to:
- Insert the item into block_sequence, in which case instructions would become the first item of block_sequence; or
- Insert the item after block_sequence, in which case instructions would move to a position after block_sequence.
Select the first option ('Insert into'). Now block_sequence starts with an instructions screen, which is what we want.
Add instructional text
Click on instructions to open it, and add a good instructional text, such as:
INSTRUCTIONS

Search for the {target_color} {target_shape}

Press the right-arrow key if you find it
Press the left-arrow key if you don't

Press any key to begin
The curly braces brackets around '{target_color}' and '{target_shape}' indicate that these are not literal text, but refer to the variables that we have defined in experimental_loop. When the experiment runs, the values of these variables will appear here, and the participant will see (for example), 'Search for the yellow circle'.
Give a visual preview of the target
It also good to show the participant the actual stimulus that she needs to find. To do this:
- Draw a filled circle at the center of the display (make sure it doesn't overlap with the text);
- Change the color of the circle to '{target_color}'. This means that the color of the circle depends on the value of the variable
target_color; and - Change the show-if expression to
target_shape == 'circle'. This is a Python expression that checks if the variabletarget_shapehas the value 'circle'.
In other words, we have drawn a circle of which the color is determined by target_color; furthermore, this circle is only shown when the variable target_shape has the value 'circle'. For more information about variables and show-if statements, see:
We use the same trick to draw a square:
- Draw a filled square at the center of the display;
- Change the color of the square to '{target_color}'; and
- Change the show-if statement to
target_shape == 'square'
The instructions screen should now look like Figure 4:
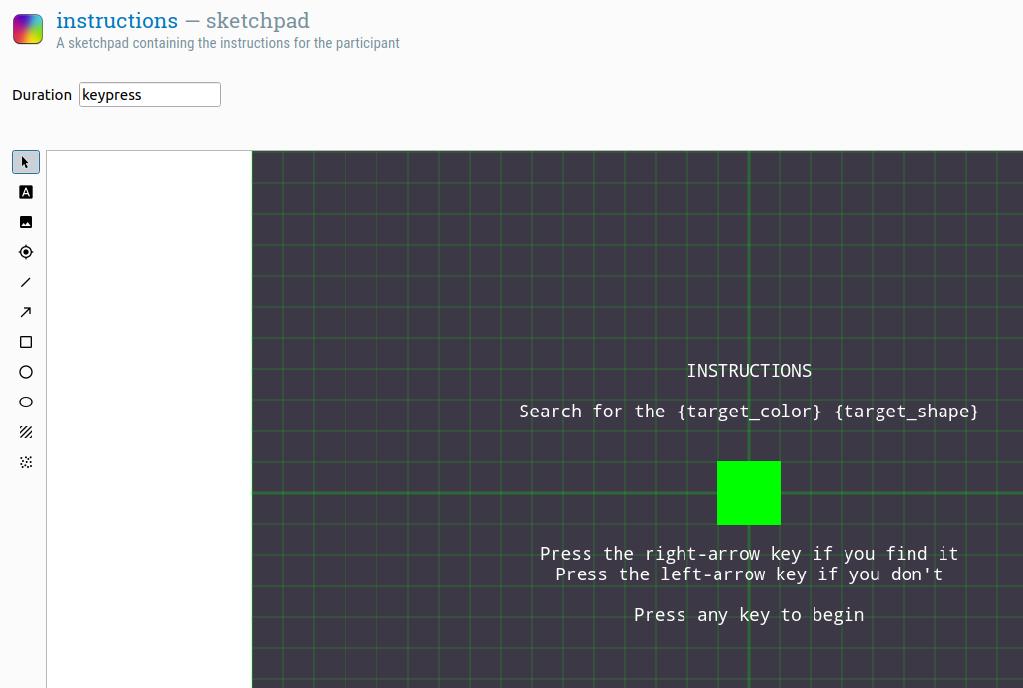
Figure 4. The instructions screen at the end of step 3.
Step 4: Define experimental variables that are varied within blocks
Three variables are varied within blocks in our experiment: condition, set_size, and target_present. As described under Step 2, we need to define these variables in the block_loop so that they vary for each run of trial_sequence.
The three variables make a total of 3 × 3 × 2 = 18 different combinations. We can type these into the table manually, but, because we have full-factorial design, we can also use the full-factorial-design wizard. To do this, first open block_loop and click on the 'Full-factorial design' button.
In the table that appears, put the variable names on the first row, and the values on the rows below, as shown in Figure 5.
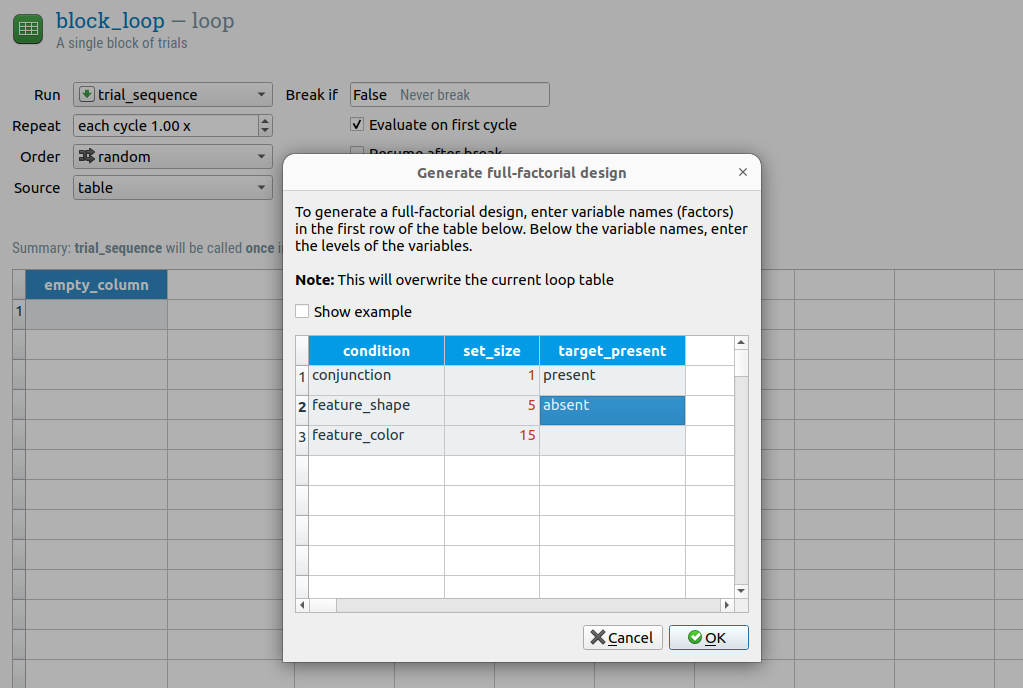
Figure 5. The instructions screen at the end of step 3.
Now click on 'Ok' to generate the full design. The table of block_loop should now look like Figure 6.
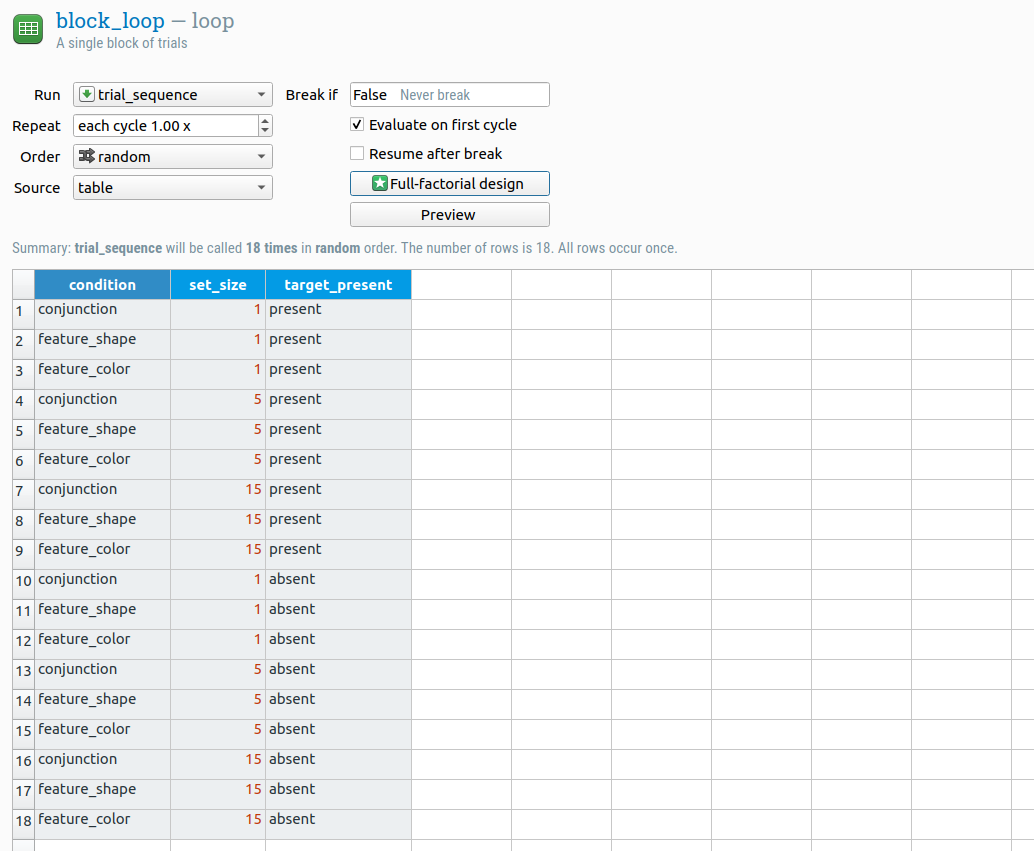
Figure 6. The table of block_loop at the end of step 4.
Step 5: Create the trial sequence
We want our trial sequence to look as follows:
- A fixation dot, for which we will use a sketchpad.
- A search display, which we will create in Python with a custom inline_script.
- Response collection, for which we will use a keyboard_response.
- Data logging, for which we will use a logger.
- (We also want immediate feedback after each trial, but we will get back to this later.)
So the only thing that is missing is an inline_script.
- Insert a new inline_script after sketchpad and rename it to search_display_script.
- Rename sketchpad to fixation_dot, so that its function is clear; and
- Change the duration of fixation_dot to 500, so that the fixation dot is shown for 500 ms. (There should already be a fixation dot drawn; if not, draw one in the center of fixation_dot.)
The overview area should now look like Figure 7.
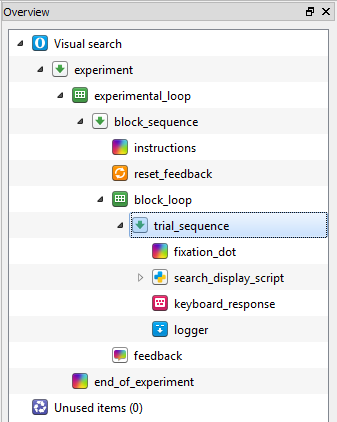
Figure 7. The overview area at the end of step 5.
Step 6: Generate the search display
Top-down and defensive programming
Now things will get interesting: We will start programming in Python. We will use two guiding principles: top-down and defensive programming.
- Top-down programming means that we start with the most abstract logic, without bothering with how this logic is implemented. Once the most abstract logic is in place, we will move down to a slightly less abstract logic, and so on, until we arrive at the details of the implementation. This technique helps to keep the code structured.
- Defensive programming means that we assume that we make mistakes. Therefore, to protect us from ourselves, we build sanity checks into the code.
Note: The explanation below assumes that you're somewhat familiar with Python code. If concepts like list, tuple, and functions don't mean anything to you, then it's best to first walk through an introductory Python tutorial, such as this one:
The logic of the code is shown in Figure 8. The numbers indicate the order in which we will implement the functionality, starting at the abstract level.

Figure 8. The logic of the code to draw a visual-search display.
The Prepare and Run phases
Open search_display_script and switch to the Prepare tab. OpenSesame distinguishes two phases of execution:
- During the Prepare phase, each item is given the opportunity to prepare itself; what this means depends on the item: For a sketchpad, it means drawing a canvas (but not showing it); for a sampler, it means loading a sound file (but not playing it); etc.
- During the Run phase, each item is actually executed; again, what this means depends on the item: For a sketchpad, it means showing the previously prepared canvas; for a sampler, it means playing a previously loaded sound file.
For an inline_script, you have to decide yourself what to put in the Prepare phase, and what to put in the Run phase. The distinction is usually quite clear: In our case, we put the code for drawing the canvas in the Prepare phase, and the code for showing the canvas (which is small) in the Run phase.
See also:
Implement the abstract level
We start at the most abstract level: defining a function that draws a visual-search display. We don't specify how this is done; we simply assume that there is a function that does this, and we will worry about the details later—that's top-down programming.
In the Prepare tab, enter the following code:
c = draw_canvas()
What happens here? We …
- Call
draw_canvas(), which returns aCanvasobject that we store asc; in other words,cis aCanvasobject that corresponds the search display. This assumes that there is a functiondraw_canvas(), even though we haven't defined it yet.
A Canvas object is a single display; it is, in a sense, the Python counterpart of a sketchpad. See also:
We now go one step down by defining draw_canvas() (above the rest of the script so far):
def draw_canvas():
    """Draws the search canvas.

    Returns
    -------
    Canvas
    """
    c = Canvas()
    xy_list = xy_random(n=set_size, width=500, height=500, min_dist=75)
    if target_present == 'present':
        x, y = xy_list.pop()
        draw_target(c, x, y)
    elif target_present != 'absent':
        raise Exception(f'Invalid value for target_present: {target_present}')
    for x, y in xy_list:
        draw_distractor(c, x, y)
    return c
What happens here? We …
- Create an empty canvas,
c, using the factory functionCanvas(). - Generate a list of random
x, ycoordinates, calledxy_list, using another common function,xy_random(). This list determines where the stimuli are shown. - Check if the experimental variable
target_presenthas the value 'present'; if so,pop()onex, ytuple fromxy_list, and draw the target at this location. This assumes that there is a functiondraw_target(), even though we haven't defined it yet. - If
target_presentis neither 'present' nor 'absent', we raise anException; this is defensive programming, and protects us from typos (e.g. if we had accidentally entered 'presenr' instead of 'present'). - Loop through all remaining
x, ytuples and draw a distractor at each position. This assumes that there is a functiondraw_distractor(), even though we haven't defined it yet. - Return
c, which now has the search display drawn onto it.
There are several common functions, such as Canvas() and xy_random(), which are always available. See:
Experimental variables are global variables. That's why you can refer to set_size, which is defined in block_loop, even though the variable set_size is never explicitly defined in the script. The same is true for target_shape, target_color, condition, etc. See:
Implement the intermediate level
We now go one more step down by defining draw_target (above the rest of the script so far):
def draw_target(c, x, y):
    """Draws the target.

    Parameters
    ----------
    c: Canvas
    x: int
    y: int
    """
    draw_shape(c, x, y, color=target_color, shape=target_shape)
What happens here? We …
- Call another function,
draw_shape(), and specify the color and shape that needs to be drawn. This assumes that there is a functiondraw_shape(), even though we haven't defined it yet.
We also define draw_distractor (above the rest of the script so far):
def draw_distractor(c, x, y):
    """Draws a single distractor.

    Parameters
    ----------
    c: Canvas
    x: int
    y: int
    """
    if condition == 'conjunction':
        draw_conjunction_distractor(c, x, y)
    elif condition == 'feature_shape':
        draw_feature_shape_distractor(c, x, y)
    elif condition == 'feature_color':
        draw_feature_color_distractor(c, x, y)
    else:
        raise Exception(f'Invalid condition: {condition}')
What happens here? We …
- Call another function to draw a more specific distractor depending on the Condition.
- Check whether
conditionhas any of the expected values. If not, we raise anException. This is defensive programming! Without this check, if we made a typo somewhere, the distractor might simply not be shown without causing an error message.
Now we define the function that draws distractors in the Conjunction condition (above the rest of the script so far):
import random


def draw_conjunction_distractor(c, x, y):
    """Draws a single distractor in the conjunction condition: an object that
    can have any shape and color, but cannot be identical to the target.

    Parameters
    ----------
    c: Canvas
    x: int
    y: int
    """
    conjunctions = [('yellow', 'circle'),
                    ('blue',   'circle'),
                    ('yellow', 'square'),
                    ('blue',   'square')]
    conjunctions.remove((target_color, target_shape))
    color, shape = random.choice(conjunctions)
    draw_shape(c, x, y, color=color, shape=shape)
What happens here? We …
- Define a list,
conjunctions, of all possible color and shape combinations. - Remove the target from this list; this is necessary, because the distractor cannot be identical to the target.
- Randomly select one of the color and shape combinations from
conjunctions. - Call another function,
draw_shape(), and specify the color and shape of the to-be-drawn distractor. This assumes that there is a functiondraw_shape(), even though we haven't defined it yet.
In addition, we …
- Add the line
import randomto the top of the script. This is necessary so that we can use functions that are part of therandommodule, such asrandom.choice().
Now we define the function that draws distractors in the Shape Feature condition (right below the import statement):
def draw_feature_shape_distractor(c, x, y):
    """Draws a single distractor in the feature-shape condition: an object that
    has a different shape from the target, but can have any color.

    Parameters
    ----------
    c: Canvas
    x: int
    y: int
    """
    colors = ['yellow', 'blue']
    color = random.choice(colors)
    if target_shape == 'circle':
        shape = 'square'
    elif target_shape == 'square':
        shape = 'circle'
    else:
        raise Exception(f'Invalid target_shape: {target_shape}')
    draw_shape(c, x, y, color=color, shape=shape)
What happens here? We …
- Randomly select a color.
- Choose a square shape if the target is a circle, and a circle shape if the target is square.
- If
target_shapeis neither 'circle' nor 'square', raise anException—more defensive programming! - Call another function,
draw_shape(), and specify the color and shape of the to-be-drawn distractor. This assumes that there is a functiondraw_shape(), even though we haven't defined it yet.
Now we define the function that draws distractors in the Color Feature condition (right below the import statement):
def draw_feature_color_distractor(c, x, y):
    """Draws a single distractor in the feature-color condition: an object that
    has a different color from the target, but can have any shape.

    Parameters
    ----------
    c: Canvas
    x: int
    y: int
    """
    shapes = ['circle', 'square']
    shape = random.choice(shapes)
    if target_color == 'yellow':
        color = 'blue'
    elif target_color == 'blue':
        color = 'yellow'
    else:
        raise Exception(f'Invalid target_color: {target_color}')
    draw_shape(c, x, y, color=color, shape=shape)
What happens here? We …
- Randomly select a shape.
- Choose a blue color if the target is yellow, and a yellow color if the target is blue.
- If
target_coloris neither 'yellow' nor 'blue', raise anException—more defensive programming! - Call another function,
draw_shape(), and specify the color and shape of the to-be-drawn distractor. This assumes that there is a functiondraw_shape(), even though we haven't defined it yet.
Implement the detailed level
Now we go all the way down to the details by defining the function that actually draws a shape to the canvas (right below the import statement):
def draw_shape(c, x, y, color, shape):
    """Draws a single shape.

    Parameters
    ----------
    c: Canvas
    x: int
    y: int
    color: str
    shape: str
    """
    if shape == 'square':
        c += Rect(x=x-25, y=y-25, w=50, h=50, color=color, fill=True)
    elif shape == 'circle':
        c += Circle(x=x, y=y, r=25, color=color, fill=True)
    else:
        raise Exception(f'Invalid shape: {shape}')
    if color not in ['yellow', 'blue']:
        raise Exception(f'Invalid color: {color}')
What happens here? We …
- Check which shape should be drawn. For squares, we add a
Rect()element to the canvas. For circles, we add aCircle()element. - Check if the the shape is either a square or a circle, and if not raise an
Exception. This is another example of defensive programming! We're making sure that we haven't accidentally specified an invalid shape. - Check if the the color is neither yellow nor blue, and if not raise an
Exception.
Implement the Run phase
Because we have done all the hard work in the Prepare phase, the Run phase is just:
c.show()
That's it! Now you have drawn a full visual-search display. And, importantly, you have done so in a way that is easy to understand, because of top-down programming, and safe, because of defensive programming.
Step 7: Define the correct response
To know if the participant responds correctly, we need to know the correct response. You can define this explicitly in the block_loop (as done in the beginner tutorial); but here we're going to use a simple Python script that checks whether the target is present or not, and defines the correct response accordingly.
To do this, insert a new inline_script at the start of trial_sequence, and rename it to correct_response_script. In the Prepare phase (not the Run phase!), enter the following code:
if target_present == 'present':
    correct_response = 'right'
elif target_present == 'absent':
    correct_response = 'left'
else:
    raise Exception(f'target_present should be absent or present, not {target}')
What happens here? We …
- Check whether the target is present or not. If the target is present, the correct response is 'right' (the right arrow key); if the target is absent, the correct response is 'left' (the left arrow key). The experimental (global) variable
correct_responseis automatically recognized by keyboard_response; therefore, we don't need to explicitly indicate that this variable contains the correct response. - Check if the target is either present or absent, and if not raise an
Exception—another example of defensive programming.
Step 8: Give per-trial feedback
Feedback after every trial can motivate participants; however, per-trial feedback should not interfere with the flow of the experiment. A good way to give per-trial feedback is to briefly show a green fixation dot after a correct response, and a red fixation dot after an incorrect response.
To do this:
- Insert two new sketchpads into trial_sequence, just after keyboard_response.
- Rename one sketchpad to green_dot, draw a central green fixation dot onto it, and change its duration to 500.
- Rename the other sketchpad to red_dot, draw a central red fixation dot onto it, and change its duration to 500.
Of course, only one of the two dots should be shown on each trial. To accomplish this, we will specify run-if expressions in trial_sequence:
- Change the run-if expression for green_dot to 'correct == 1', indicating that it should only be shown after a correct response.
- Change the run-if expression for red_dot to 'correct == 0', indicating that it should only be shown after an incorrect response.
The variable correct is automatically created if the variable correct_response is available; that's why we defined correct_response in step 7. For more information about variables and run-if statements, see:
The trial_sequence should now look like Figure 9.
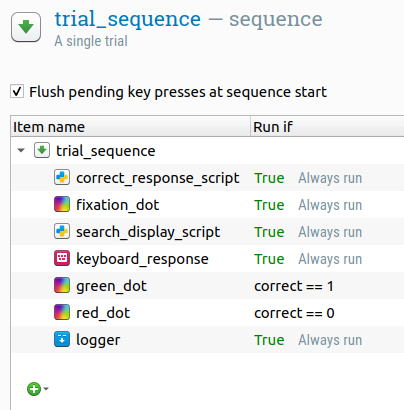
Figure 9. The trial_sequence at the end of step 8.
Finished!
Congratulations, the experiment is complete! You can give it a test run by pressing on the blue double-arrow button (shortcut: Ctrl+W).
If the experiment doesn't work on the first try: Don't worry, and calmly figure out where the mistake comes from. Crashes are part of the normal development process. But you can save yourself a lot of time and headache by working in a structured way, as we have done in this tutorial.
References
Mathôt, S., Schreij, D., & Theeuwes, J. (2012). OpenSesame: An open-source, graphical experiment builder for the social sciences. Behavior Research Methods, 44(2), 314-324. doi:10.3758/s13428-011-0168-7
Treisman, A. M., & Gelade, G. (1980). A feature-integration theory of attention. Cognitive Psychology, 12(1), 97–136. doi:10.1016/0010-0285(80)90005-5